Enabling spell check

Enabling the spell check option is a good practice to ensure high quality. Spell check is supported in Windows and if you have MS Office installed. Spell check is enabled by default.


To disable spell check:

  1. Open Wordfast Pro 3 and click .
    The TXML perspective appears.

  2. Click Edit > Preferences > Spelling.
    The Preferences (Filtered) Spelling dialog appears.
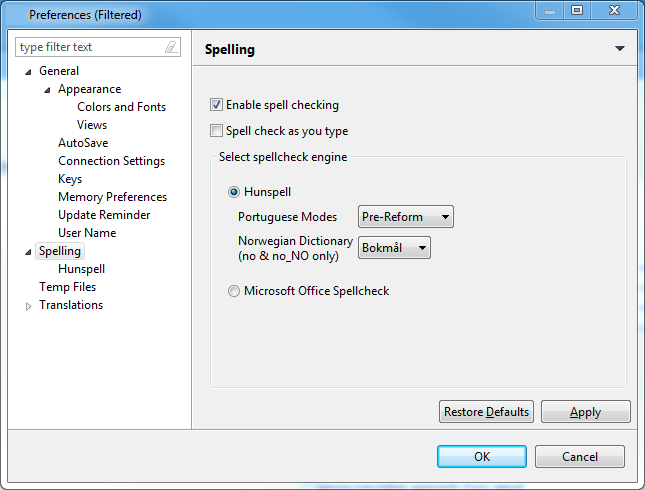

  3. Select Enable spell checking checkbox.
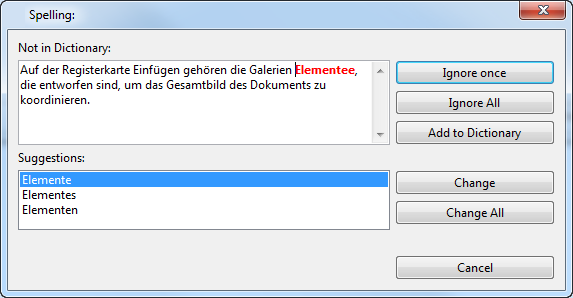
    All spelling preferences are cleared. To select spelling preferences, select the Enable spell checking checkbox. The Hunspell spellcheck engine is automatically selected. To view all dictionaries available in the Hunspell spell check engine, click Spelling > Hunspell in the left pane.

  4. Select the Check Spelling as you type checkbox. (Optional)

  5. Select the spellcheck engine, if needed. The options are Hunspell and Microsoft Office Spellcheck.
    The additional options for Hunspell are as follows:

  1. Click OK.
    To use spell check, click Edit > Spell Check or press F7.
    The Spelling options appear. An example is shown below.


    The options available are:

  2. Use

    to...

    Ignore once

    ignore the suggestions for the highlighted word or phrase.

    Ignore All

    ignore the suggestions for highlighted word or phrase in the entire file.

    Add to Dictionary

    add the word or phrase to the dictionary.

    Change

    change the existing word or phrase to the selected suggestion.

    Change All

    change all instances of the existing word or phrase to the selected suggestion.

    Cancel

    cancel spell checking.