
was found in topics.
Release notes summary
11.0.0
Improvements
-
AP5 | Modules upgrade for WFP 11.0.0
-
Locales upgraded to version 1.27.0. -
NLP upgraded to version 6.36.1.
-
-
Update to display XLIFF2 tags If a segment contains x tags with equiv-text values, then on hover over, the equiv-text is shown instead of the ctype value. If there is no equiv-text on the x tags then the ctype value is shown.
Known Issues
-
MacOS: Issue with Catalina/Big Sur reporting keystroke logging during opening of application
-
TXLF Editor column outlines get hidden when windows display settings are set to 125%
Get started
This section provides basic information to get started with Wordfast Pro, a stand-alone desktop application you install on and access with your local computer.
About Wordfast Pro
Wordfast Pro is the latest standalone, multi-platform TM tool designed to address the needs of translators, language service providers, and multi-national companies. It offers a complete translation environment that stores your translated content for reuse on future projects, thereby maximizing efficiency, increasing overall consistency and reducing translation costs.
-
Cross-platform compatibility — Browser-based tool runs natively on Windows, Mac, and Linux.
-
Target-only Live Preview — After translation, provides a preview to proofread a target-only version with layout and formatting.
-
Segment filtering — Filters segments based on terms, regular expressions, match scores, notes, and other attributes.
-
Configure multi-lingual translation projects — Supports translation into multiple target languages and can send as a single package or separate packages based on language pairs.
-
Export and import translation packages — Allows configuration and export of translation packages for fast, seamless translation management.
-
Format flexibility — Supports virtually any file format, including MS Office, Adobe InDesign, FrameMaker, PDF, HTML, XML, SDL Trados Xliff, MemoQ Xliff, and more.
-
Chain files — Allows combination of multiple files into a single file to improve the consistency of repeated segments and facilitate file management.
-
Unlimited TM and glossary access — Accesses an unlimited number of TMs and glossaries simultaneously and prioritizes as primary or secondary.
Installation
Activation of Wordfast Pro requires a license and online or offline registration.
|
An unlicensed version of Wordfast Pro working in Demo mode is limited.
|
To install Wordfast Pro:
Activation
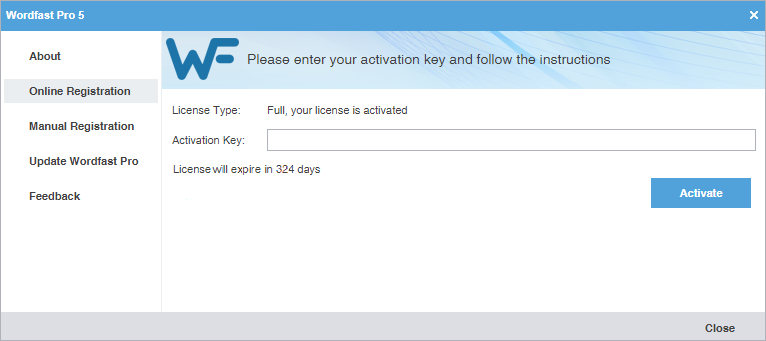
You can activate Wordfast Pro either manually or online. Both methods require an activation key. When you purchase a Wordfast license, you can generate an activation key at https://www.wordfast.com/myaccount by signing in with your sign in email and password. Copy and save the activation key.
To activate Wordfast Pro:
-
On the Sidebar, select the Open General icon
 to open the Wordfast Pro 5 application dialog.
-
Select Online Registration or Manual Registration, then follow the activation instructions.
Option
Description
Online Registration
Enter the Activation Key, then select Activate.
Manual Registration
-
Enter the Activation Key, then select Generate.
-
Copy the generated text into an email and send it to the email address provided on the screen.
-
Save the license file from the return email.
-
Select Browse to the license file.
-
Select the license file, then select Activate.

After you activate the software, you can select either registration option to view the number of days remaining on your license.
-
-
Restart Wordfast Pro.
The Wordfast Pro activation process is complete.
To resolve any license issues, sign in to your user account at https://www.wordfast.com/myaccount and submit a Hotline request.
Licensure
You can view license information after you have activated Wordfast Pro.
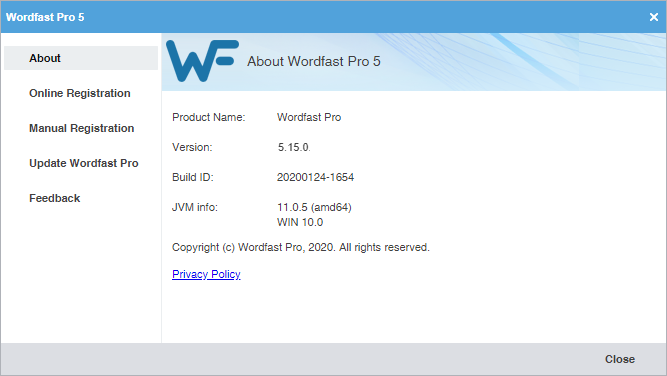
On the Sidebar, select the Open General icon ![]() to view product information, your current license information, and Wordfast Pro update
info.
to view product information, your current license information, and Wordfast Pro update
info.
|
Wordfast Pro automatically monitors for updates. If an update is available, you receive notification after you open the application. |
|
Option |
Description |
|---|---|
|
About |
Use to review product information, including your current version number. |
|
Online Registration |
Use to activate your Wordfast Pro license online. |
|
Manual Registration |
Use to manually activate your Wordfast Pro license through e-mail. |
|
Update Wordfast Pro |
Use to check for updates to the application and to add languages for the application's Hunspell spelling dictionary. |
|
Feedback |
If you have questions about how to use Wordfast Pro, or need help, please review our Online Support information at wordfast.com/training_support. For software usage questions, select the Help icon |
 to review the online help. If you still have questions after reviewing the online
help, sign in to your user account at
to review the online help. If you still have questions after reviewing the online
help, sign in to your user account at Start Wordfast Pro
After you install and activate Wordfast Pro, it is ready to use.
To start Wordfast Pro:
-
Double-click the Wordfast Pro icon on the desktop or select Wordfast Pro from the
Windows Start menu.
Wordfast Pro opens to the Project List view.
Wordfast user interface overview
Wordfast Pro allows users to coordinate and automate the translation and review process through an intuitive, stand-alone user interface.
Wordfast Pro uses a Sidebar to navigate among views. Click the icons to change from one view to another.
|
Sidebar Icon |
Action |
|---|---|
|
|
Select to open the General view. The General view includes general product information. In Wordfast Pro, you will also find product registration and software update information here. See Activation or Licensure for more information. |
|
|
Select to open the Project List view. |
|
|
Select to open the Current Project view. |
|
|
Select to open the TXLF Editor view. |
|
|
Select to open the Quick Tools view. |
|
|
Select to open the Preferences view. |
|
|
Select to collapse the Sidebar. This action hides the icons and increases the workspace. Select |
The default view is the Project List view. ![]()
When you begin working on a project from the project list, the result is the Current Project view. ![]()
Each view is explained in more detail in the subsequent sections.
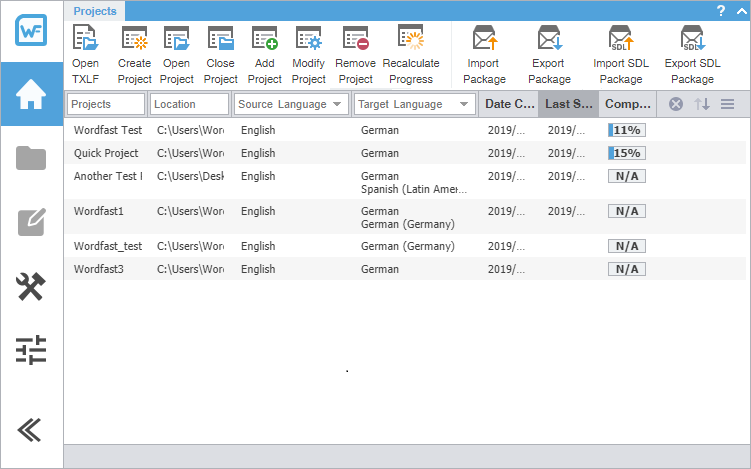
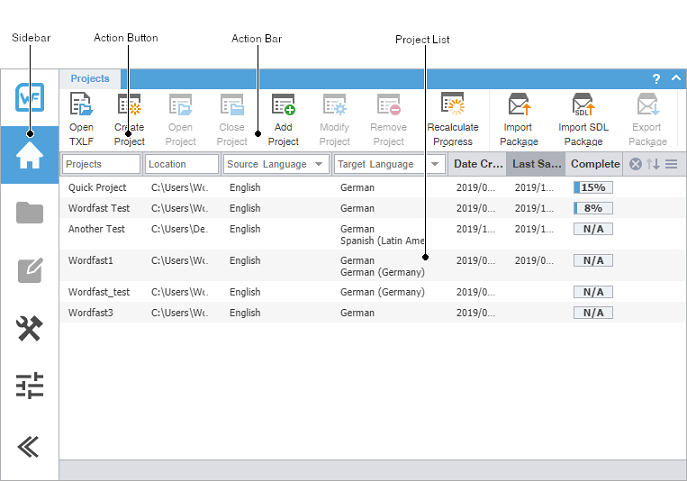
Project list view
The Project List view displays a list of your active projects.
|
Item |
Action |
|---|---|
|
Sidebar |
Click icons to switch among user views. User views include General application information, Project List, Current Project, TXLF Editor, Quick Tools, and Preferences. |
|
Action Button |
Perform a specific task. |
|
Action Bar |
Access all action buttons associated with a specific user view and tab. |
|
Project List |
View all files associated with a specific project. |
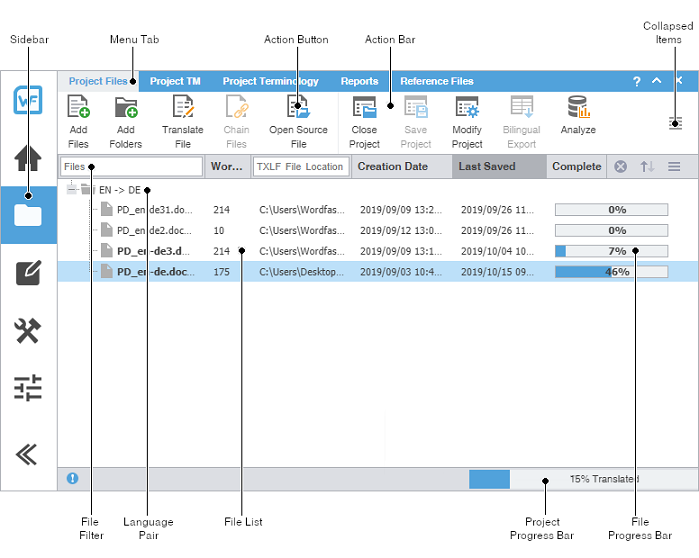
Current project view
The Current Project view displays a list of the TXLF files that are included in a selected project. Double-click a file from the list of TXLF files to open it in the TXLF Editor.
|
Item |
Action |
|---|---|
|
Sidebar |
Select icons to switch among user views. |
|
Menu Tab |
Access the various tools of the application. Each user view contains different tabs. |
|
Action Button |
Perform a specific task. |
|
Action Bar |
Access all action buttons associated with a specific tab. |
|
Collapsed Items |
Access any remaining tools that do not fit in the window. |
|
File Filter |
Create filter criteria to refine the file list. |
|
Language Pair |
Access the file list associated with a specific source and target language pair. |
|
File List |
Access a specific file within the language pair. |
|
Project Progress Bar |
View the percentage of work completed on a project. |
|
File Progress Bar |
View the percentage of work completed on a file. |
You can view file information, filter criteria, and sort files using the provided search options.

|
Item |
Action |
|---|---|
|
Files |
Lists the files available in the current project. Type a file name in the box to locate a file in the project list. |
|
Word Count |
Displays the total word count of each file in the project. |
|
TXLF File Location |
Displays the directory path to the stored file location. Type a path name in the box to locate a file or to group files in a particular path. |
|
Creation Date |
Displays the date and time the file was created based on the user's system settings. |
|
Last Saved |
Displays the date and time of the most recently saved the file. |
|
Complete |
Displays the file progress bar with completion percentage. |
|
|
Clears filter criteria. |
|
|
Sorts filter criteria in ascending or descending order. |
|
|
Change the sort order. The sort options are Files, Word Count, Translations Status, Complete, and Last Saved. |
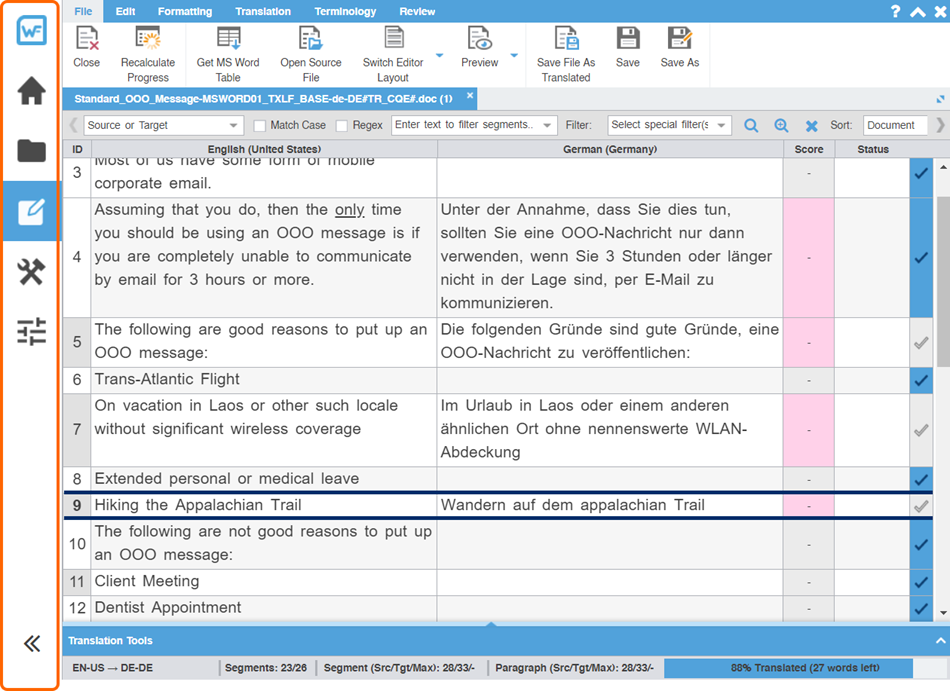
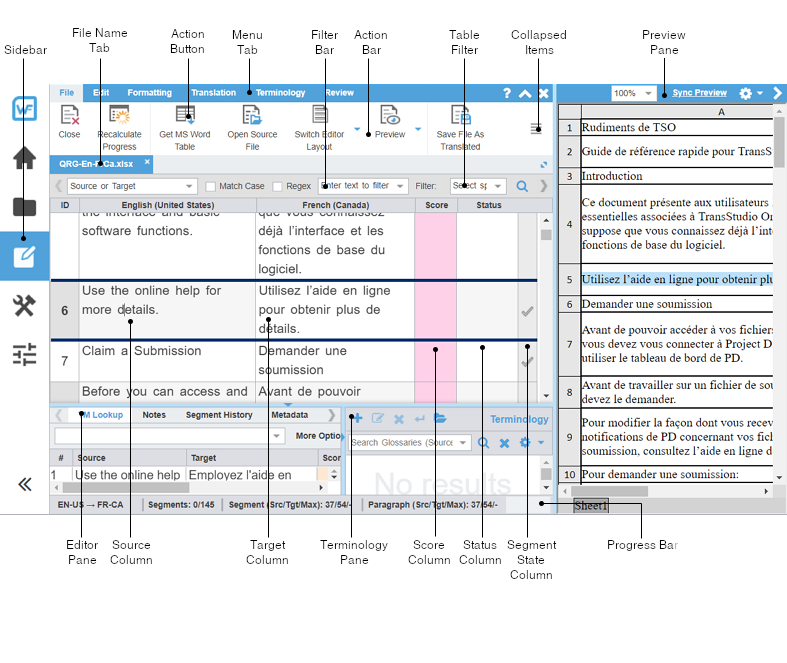
TXLF editor view
The TXLF Editor view is your default translation and review workspace.
You can choose from two layouts for your TXLF Editor workspace.
-
Table view—This layout displays the source segment to the left and the target segment to the right.
-
Stacked view—This layout displays the source segment row directly above the target segment in a spanned row.
You can select either layout view by selecting the drop-down menu for the Switch Editor Layout action on the File tab.
|
Item |
Action |
|---|---|
|
Sidebar |
Select the icons to switch among user views. |
|
File Name Tab |
View an open or chained file. |
|
Action Button |
Perform a task. |
|
Menu Tab |
Access a specific function and its Action Buttons. |
|
Filter Bar |
Filter how segments are sorted and displayed. |
|
Action Bar |
Access all Action Buttons associated with a specific tab. |
|
Table Filter |
Create filter criteria for searching in the open file. |
|
Collapsed Items |
Access any remaining tools that do not fit in the window. |
|
Preview Pane |
View the translated content in its original format for MS Word .DOC and .DOCX files, MS PowerPoint .PPT and .PPTX files, Markdown .MD files, MS Excel .XLS and .XLSX files, or JSON .JSON files. |
|
Editor Pane |
Access editor tab content or interact with it using menus and sub-menus. |
|
Source Column |
View numbered text segments that will be translated in the Target Column. |
|
Target Column |
Use as primary work area for translation entry with or without leveraging a translation memory (TM). |
|
Terminology Pane |
Search the source or target glossaries, or add terms to terminology glossaries, if enabled. |
|
Segment Score Column |
View the TM match score represented as a percentage. |
|
Status Column |
View the status of a segment by its status icon. |
|
Segment State Column |
View the state of the translated segment. Toggle between Needs Translation and Translated. |
|
Progress Bar |
View the progress of the total translation based on the number of translated segments. If you have chained files, the percentage includes all the segments in the chained file. |
|
When the Preview, Editor, or Terminology panes are resized, Wordfast will remember the settings the next time it is run. |
Filter criteria
Use filter criteria to narrow your search for segment content.

|
Option |
Action |
|---|---|
|
Source or Target |
Select from drop-down menu to search source, and or target segments, or user attributes. |
|
Match Case |
Make your search case-sensitive. |
|
Regex |
Select to search on regular expression or wild card characters. |
|
Text Filter |
Filter segments based on text search. Type or paste text into the text filter box and press Enter or select the Filter |
|
Special Filters |
Select the drop-down list for more search filter criteria (listed below). |
|
|
Activate the filter action. |
|
|
Activate the cumulative filter action for all search fields. |
|
|
Reset the toolbar filter fields. |
|
Sort |
Select from drop-down menu to order the remaining search list. |
|
|
Configure the maximum word count for the segment filter. |
Special Filters are a drop-down list of all available search filter criteria:
-
100% match segments: shows segments matching completely in the TM.
-
Aligned segments: shows segments that contains aligned score coming from the aligner tool.
-
All except 100% and Context match segments: shows segments with partial TM match, no match, or modified segments.
-
All except 100%, Context match and Auto-propagated segments: shows segments that are modified, fuzzy, MT, no match, Align and Client provided scores.
-
All except 100%, Context match and Translated segments: shows segments that are fuzzy, modified, MT, no match, Align and Client provided scores with the Needs Translated Segments state.
-
All except 100%, Context match and Auto-propagated and Translated segments: shows segments that are fuzzy, modified, MT, no match, Align and Client provided scores with the Needs Translated Segments state.
-
All except Duplicate segments: shows segments that are not duplicates but can include repetitions.
-
All except auto-propagated: shows all statuses except the segments that are auto-propagated.
-
All except locked segments: shows all segments that are not locked.
-
Auto-propagated segments: shows all auto-propagated matches.
-
Client provided segments: shows segments provided by the client TM.
-
Committed segments: shows segments with translated content committed to the TM.
-
Context match segments: shows all 100+% context matches. Context matches provide more refined matches that are based on contextual references in the TM. For example, a segment is considered a context match when the previous and next segments also have a 100% match against the TM.
-
Do not write to TM segments: this is a status in the editor to mark segments that should not be written to TM.
-
Duplicate segments: shows all duplicates.
-
Edited 100% match segments: shows segments that contain 100% matches that are edited.
-
Edited MT segments: shows MT segments that have been edited.
-
Edited context match segments: shows segments that contain context matches that are edited.
-
Edited fuzzy match segments: shows segments that contain fuzzy matches that are edited.
-
Edited no match segments: shows segments that contain no matches that are edited.
-
Edited source segments: shows source segments that have changed.
-
Empty target segments: shows segments without a translated target.
-
Excel Sheetname Segments: shows segments that contain sheetnames from an Excel file.
-
First instance of Duplicate Segments: shows the first instance of duplicates.
-
Fuzzy match segments: shows segments with partial TM match.
-
Locked segments: shows segments that cannot be edited.
-
Merged segments: shows segments that have been merged.
-
Modified segments: shows all modified segments. By default all modified segments are highlighted in pink.
-
Needs translation segments: shows untranslated segments.
-
No match segments: shows segments with no match in the TM.
-
Reviewed state segments: shows segments marked as reviewed.
-
Segments merged across paragraph: shows segments have been merged across a paragraph.
-
Segments with Transcheck warnings: shows segments with Transcheck warning status.
-
Segments with history: shows segments that have been edited and has a segment revision history viewable in the Segment History tab.
-
Segments with notes: shows segments containing comments.
-
Segments with find/replace highlight all: shows segments containing text highlighted by Highlight All from the Find/replace dialog.
-
Segments with repetitions: shows all repetitions.
-
Segments with tags: segments that contain tags.
-
Short segments: shows segments of fewer than {#} words, paragraphs or other blocks.
-
Signed off state segments: shows segments are signed off.
-
Split segments: shows segments that have been split into more than one segment due to length.
-
TU Autocorrected Segments: shows segments that have a target have replacement TUs applied.
-
Translated state segments: shows segments that have been translated.
-
Unedited MT segments: shows Machine Translated segments that are unedited.
-
Unique segments: shows segments that are unique and also shows the first occurrence of repeated segments.
Segment status
You can quickly identify the status of a segment in the TXLF Editor view by its status icon.
|
Status Icon |
Segment Status |
|---|---|
|
|
A non-linguistic error occurred in the segment during a Transcheck test. |
|
|
The segment is locked, so you cannot edit it. |
|
|
The segment is do not write to TM, so you cannot commit it to the translation memory. |
|
|
The segment is marked as a repetition during analysis. |
|
|
The segment has a note associated with it. |
|
|
The content of the source segment was edited. |
|
|
The segment was split. |
|
|
The segment was merged. |
|
|
Segments across a paragraph were merged. |
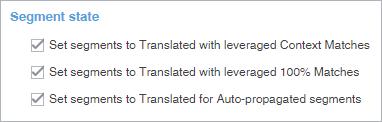
Segment state
The Segment State allows you to view, set, or change the state of a translation segment in the TXLF Editor view. Untranslated target segments are automatically set to Needs Translation. Once a translation is committed to the translation memory, the application considers the translation to be complete and changes the state to Translated. Changes to the Segment State will also change the total translation completed percentage on the Progress Bar.
|
Segment State Icon |
Segment State Description |
|---|---|
 |
Needs Translation — This state indicates that the segment is not finished and is therefore not included in the calculated progress shown on the Progress Bar.
|
 |
Translated — This state indicates that the segment is finished and is therefore included in the Progress Bar. Select this icon, or make a change in the translated segment, to change the state back to Needs Translation.
|
|
* You can change this default setting on a project-by-project basis in Preferences. Select Translation Memory in the Current Project Preferences section. Clear or check the preferred check boxes in the Segment state section.
|
|
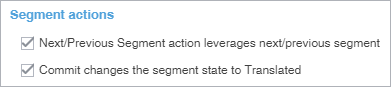
** You can change the Next Segment action so that the segment state does not change to Translated. In Preferences, select Segment in the General Preferences section. Clear the check box for Commit changes the segment state to Translated in the Segment actions section.
|
Progress bar
The TXLF Editor view displays translation information and status in the Progress Bar at the bottom of the window.

|
Item |
Description |
|---|---|
|
Source and Target Languages |
View the source and the target languages in the open translation file. |
|
Filtered Segments Total |
View the number of filtered segments in the open translation file. When filter criteria is cleared the Filtered Segments Total is removed from the status. |
|
Translated |
View the percentage of filtered segments that are translated versus the total number of filtered segments in the open translation file. The words done total is calculated from all the translated segments from the filtered table. When filter criteria is cleared, the Translated % is removed from the status. |
|
Segments |
View the number of segments completed versus the total number of segments in the open translation file. |
|
Segment (Src/Tgt/Max) |
View the character breakdown in a segment. This breakdown includes the number of characters in the source and the target segments, and the maximum number of characters allowed in the target. Hover over this portion of the toolbar to view the progress in a larger display window. A red box flashes around the Max segment value if the number of characters exceeds the maximum allowed.
The maximum length check counts HTML entities such as: &. These are real characters and are counted as part of the overall character count (1 Character per entity). Refer to Manage tags for more information. |
|
Paragraph (Src/Tgt/Max) |
View the character breakdown in a paragraph. This breakdown includes the number of characters in the source and target paragraphs, and the maximum number of characters allowed in the target paragraph. Hover over this portion of the toolbar to view the progress in a larger display window. A red box flashes around the Max segment value if the number of characters exceeds the maximum allowed.
If the maximum length is set for a paragraph and the paragraph has only one segment then the maximum length limit is shown in the editor for a filtered editor table. |
|
Percent Translated |
View the total progress of the translation in a file or in a group of chained files. If you have chained files, the percentage complete will be the total for all the files as if they were one. |


Help
Select the Help icon ![]() to access the online help for answers about how to use the software.
to access the online help for answers about how to use the software.
If you still have questions after reviewing the online help, sign in to your user account at https://www.wordfast.com/myaccount and submit a Hotline request.
Please do not submit questions related to software usage to Feedback. Instead, sign in to your user account at https://www.wordfast.com/myaccount and submit a Hotline request.
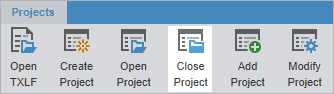
Manage projects
When Wordfast Pro opens, the default view is the Project List view. This view displays all your active translation projects, and is where you manage the translation process for each project. On the Projects tab you can perform many project operations, including creating projects, opening and closing projects, adding and removing projects, and importing translation packages. After you create a project, you can keep a project on the projects list for as long as it takes to complete it. A project stays in the projects list until you remove it. You can filter the list of projects to display them by a variety of criteria including name, location, source or target language, and completion percentage.
|
You can add a project to the projects list again, even after you remove it. Wordfast does not erase removed projects, so you can retrieve them from the project folder on your computer using the Add Project action. |
|
To bypass the typical project creation process, create a Quick Project with the Open TXLF action. |
Open a TXLF file
A TXLF file contains text segments in a source language and a target language. In Wordfast Pro, to translate the content in a TXLF file, you must create a project. A project may contain one TXLF file or multiple TXLF files. This section describes how to create a Quick Project by opening existing TXLF files. To set up a new project and prepare new TXLF files for translation, refer to Create a project.
To open a TXLF file:
-
Choose one of the following actions:
-
Select the Project List icon
 on the Sidebar to open the Project List view. Select Open TXLF, then browse to select a file.

-
Drag-and-drop one or more TXLF files to the project list.
-
-
If you used drag-and-drop, determine if you want to remember your choice on the Quick Open TXLF dialog, then choose one of three possible actions.
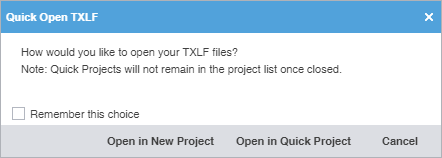
- (Optional) Select Remember this choice to use your selected option each time you choose the Quick Open TXLF action without displaying the dialog again. Use General Preferences > General to show this dialog again, after you choose to Remember this choice.
- Select Open in New Project to use the standard Project Creation dialog.
- Select Open in Quick Project to open the TXLF file in TXLF Editor as a temporary Quick Project.
- Select Cancel to disregard the TXLF file open action and close the dialog.
-
In the Save Project dialog, modify the project details.
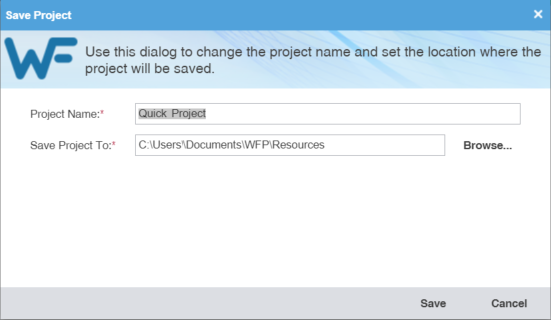
Required fields are marked with a red asterisk.
- Enter the Project Name.
- Browse and select the file location in the Save Project To field.
- Select Save.
Create a project
In Wordfast Pro, every translation begins with a project. Projects act as repositories for all related content, along with associated translation memories (TMs) and glossaries.
|
You must create a project before you begin translation, unless you use the Open TXLF action. |
|
A project also requires file format filters to convert the source content into segments prior to beginning the translation process. |
To create a project:
-
Click the Project List icon on the Sidebar to open the Project List view.
-
Click Create Project.

-
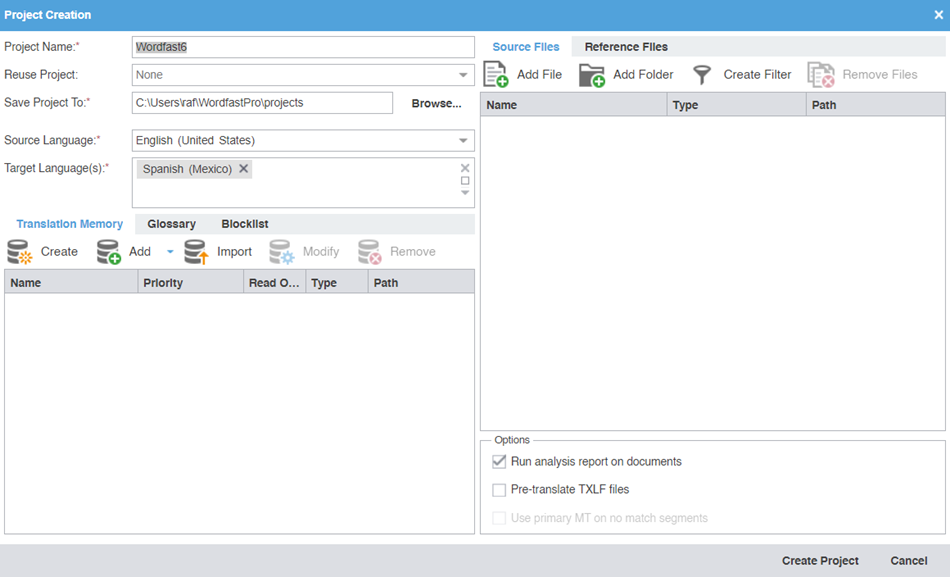
On the Project Creation dialog, enter a project name.
Required fields are marked with a red asterisk.
-
(Optional) If you want to reuse the profile of a previously created local project,
select it from the Reuse Project drop-down list.
Project reuse removes all existing translation memories, glossaries, and blocklists from the new project. On the Reuse Project Warning dialog, click Yes to agree to reuse the project.
-
Select Source Language and Target Language(s) from the drop-down lists.

You can refine the source language and target language drop-down list results by starting to type a language name.
-
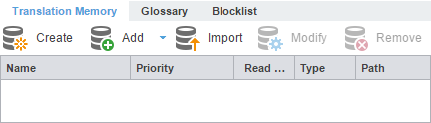
On the Editor pane, click the Translation Memory tab, if it is not already active.
-
(Optional) Click Create to add a new local TM for your project.
-
Select either primary or secondary priority from the drop-down list to determine the
TM you leverage first.
You can select only one TM as the primary. The primary status dictates that the content of that TM overrides any content in secondary TMs.
-
Select either primary or secondary priority from the drop-down list to determine the
TM you leverage first.
-
(Optional) To add an existing TM to your project, click Add, then select a local, remote, or a project-specific TM from the drop-down menu.
To use an online tool for work and production that integrates with Wordfast Pro, use Wordfast Anywhere (WFA) as your remote, unlimited, and private TM.
-
Add Project TMs — Enter the details on the Add Project TMs dialog by selecting the project.
The source language, target languages, and list of TMs auto-populate, based on the project you select. Remove the target languages or TMs that you do not want to import from the target languages and list of TM fields.
-
Add Project TMs — Enter the details on the Add Project TMs dialog by selecting the project.
-
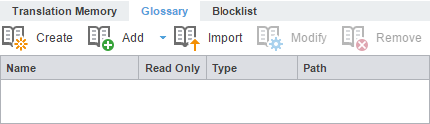
(Optional) On the Editor pane, click the Glossary tab.
-
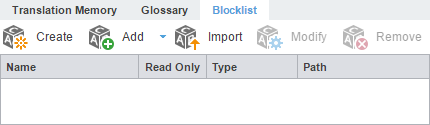
(Optional) On the Editor pane, click the Blocklist tab.
-
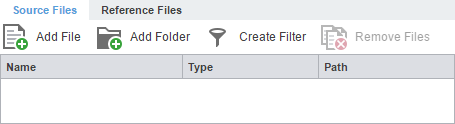
On the Source Files tab, choose a method to add project source files.
You can drag-and-drop files from a folder to the Files panel.
To copy source files into the Source File folder within the Project folder on your computer, select Copy Source or TXLF Files into Project Folder Structure in your General Preferences.
- (Optional) Add File — Click to browse to the source file.
- (Optional) Add Folder — Click to browse to the folder location for source files.
- (Optional) Create Filter — Click to create a conversion filter the source files. You can create multiple filters.
-
(Optional) On the Reference Files tab, choose a method to add supporting documentation.
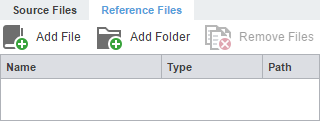
- (Optional) Add File — Click to browse to the source file.
- (Optional) Add Folder — Click to browse to the folder location for source files.
-
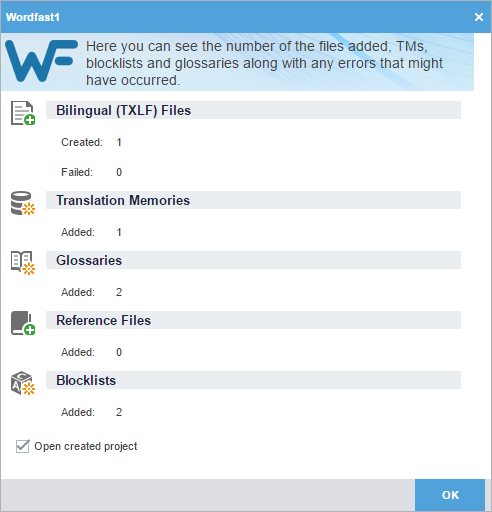
Click Create Project to analyze the files and display the project creation summary.
Open a project
Once you create a project, the next step is to open it. You cannot open files for translation without first opening the associated project.
To open a project:
-
Click Open Project or double-click the project name to open it.

The project opens in the Current Project view. A list of the project's language pairs and the associated translation files displays on the Project Files tab.
Modify a project
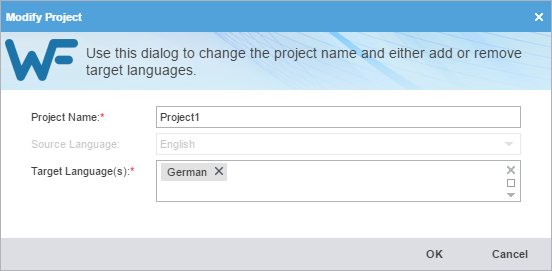
You can change the project name and target language using the Modify Project action.
To modify a project:
-
In the Project List view, select a project, then click Modify Project.

-
(Optional) On the Modify Project dialog, enter a different name in the Project Name field.
Remove a project
To remove a project:
|
You can add a project to the Project List again, even after you removed it. Wordfast Pro does not erase removed projects, so you can still retrieve them from the project folder on your computer using the Add Project action. |
-
Click the Project List icon
 on the Sidebar to open the Project List view.
-
Select the project from the list, then click Remove Project.

-
On the Remove dialog, click one of the action buttons.
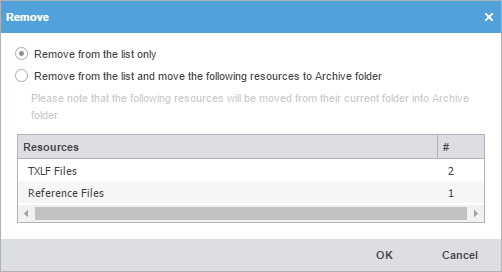
Remove from the list only
Remove the project from the Projects List but retain project resources in the project folder on your computer.
Remove from the list and move the following resources to Archive folder
Move the project TXLF, reference, and source files to the Archive sub-folder within the project folder on your computer.
Package files
A package file contains all of the required information to work on a translation project. You can use a package file to share content and files among different Wordfast Pro (WFP) users. The package file can contain complete or incomplete projects.
A package file generally includes:
-
Source files
-
All target translatable files
-
Instructions
-
Background information
-
Reference files
-
Comments
-
Connection to at least one Translation Memory (TM)
-
Connection to at least one glossary and blocklist
To access a package file from another user, import the file into WFP. Wordfast connects the imported files to translation memories and glossaries. It provides you access to all translatable files and additional resources, including TMs and glossaries, without any additional setup or configuration.
To share a completed project with other users, export it as a package file.
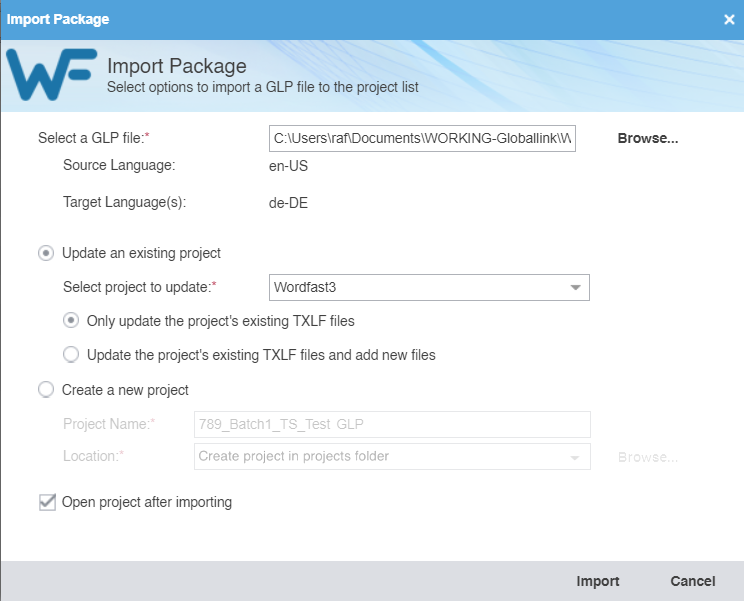
Import package files
Package files allow different Wordfast Pro users to share files. When you import a package file, you automatically connect the files to translation memories and glossaries. You also gain access to all translatable files and additional resources. This eliminates the need for manually creating a project.
To import package files:
-
Click the Project List icon on the Sidebar to open the Project List view.
-
Click Import Package.

-
On the Import Package dialog, click Browse to locate and select the package file.
Required fields are marked with a red asterisk.
Alternatively, you can drop a package file into the white space on the Import Package dialog to begin the import process.
Export package files
Use Export Package to share a complete project package with other Wordfast Pro users.
To export package files:
-
Click the Project List icon on the Sidebar to open the Project List view.
-
Select a project from the list of projects , then click Export Package.

-
On the Export Package dialog, select either Entire Project or Specific target languages and resources.
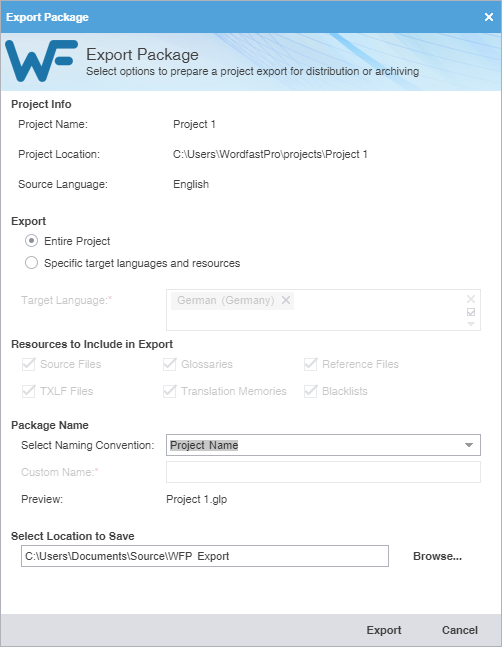
Entire Project
Click to export all target languages and their associated resources.
Specific target languages and resources
-
Click to export specific target languages and associated resources.
-
Click items from the drop-down list for further options to deselect specific Target Language and resources for exclusion from the export.
-
-
Choose an existing name from the Select Naming Convention drop-down list or enter a name of your choice in the Custom Name field.
The Preview field provides the name of the file as it will export below the Package Name fields.
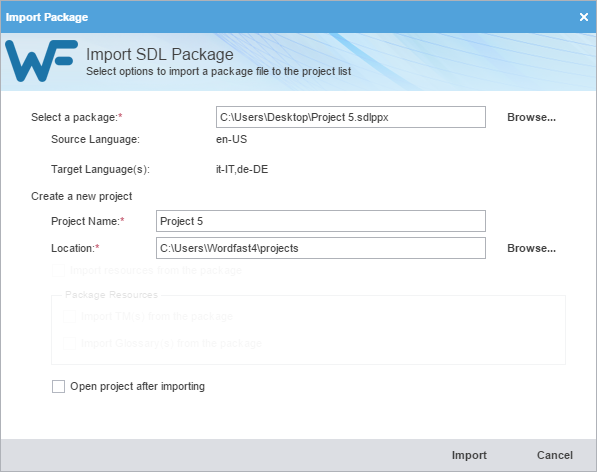
Import SDL package files
You can import an SDL package file for conversion of SDL source files to a compatible Wordfast Pro format. Imports include scores for source content, but do not include translation memories, glossaries, and reference files.
To import SDL package files:
-
Click the Project List icon on the Sidebar to open the Project List view.
-
Click Import SDL Package or drop the SDL Package file into the application window.

-
On the Import Package dialog, click Browse to locate and select the SDL Package file.

If the SDL Package file contains unsupported target languages, a warning message notifies you. Click OK.
Export SDL package files
Use Export SDL Package to export an SDL package.
To export package files:
-
Click the Project List icon on the Sidebar to open the Project List view.
-
Select a project from the list of projects, then click Export SDL Package.

-
On the Export Package dialog, select the location of the original package and the location for the exported
package.
When exporting the SDL package, the Select original package: text box automatically selects the file path of the original imported package file location based on the previously used SDL package location. If the selected project was not imported from the SDL package then the Select original package: text box will be blank.
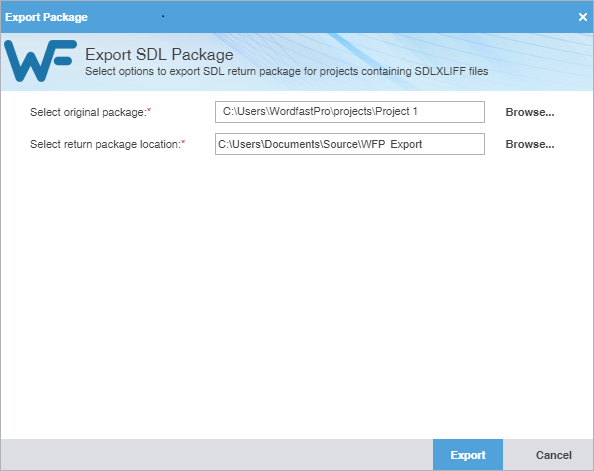
The exported project package is built and saved to the folder location.
Manage project files
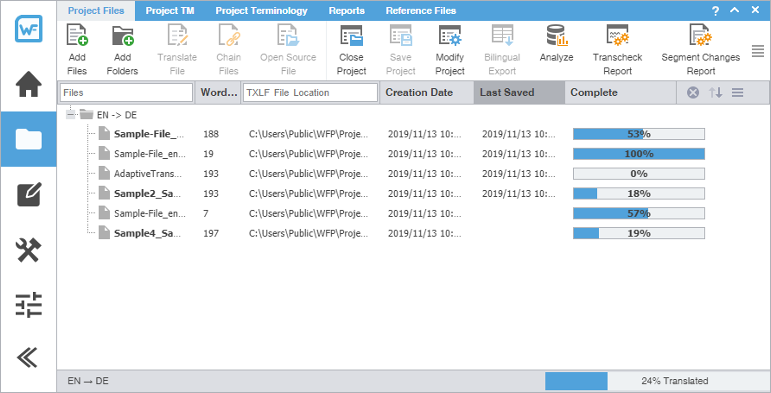
When you open a project, the view changes to the Current Project view. On the Project Files tab, the language pair of the project displays the list of translation files.
Add files
You can add files to an existing project using the Add Files option on the Project Files tab.
|
If one or more of the source files have a different language code, you will receive a prompt to modify the project and add the new target language. |
To add files to a project:
-
Click the Project List icon on the Sidebar to open the Project List view.
-
Click the Current Project icon
 on the Sidebar to open the Current Project view.
-
Click Add Files on the Project Files tab.

Add a folder
You can add a folder containing multiple files to an existing project using the Add Folders option on the Project Files tab.
To add a folder to a project:
-
In the Current Project view, click Add Folders on the Project Files tab.

To activate the Current Project view, you must first open a project. Click the Project List icon
on the Sidebar and select a project from the Project List view, then click the Current Project icon .
Open a source file
You can view a source file in its original format.
To open a source file:
-
In the Current Project view, select a file from the list, then click Open Source File.

-
View the source file when its default application opens.
If the default application is not set, choose an application when prompted to do so.
Close a project
When you are finished working on a project, close it before you open another.
|
You can only have one project open at a time. |
Conduct a bilingual export
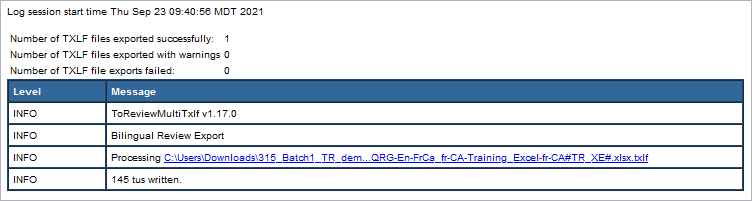
Use Bilingual Export to export the TXLF file with highlighted glossary terms into a .DOC or .DOCX format. This allows you to edit and spell check the file using Microsoft Word, rather than the internal spell check.
You can also complete a bilingual export or import outside the Project List view using Quick Tools.
|
Bilingual exports require you to set Bilingual Export Options in Preferences > General Preferences. |
To conduct a bilingual export:
-
In the Current Project view, select a file, and click Bilingual Export on the Project Files tab.

You cannot select files that are already open for bilingual export in TXLF Editor view.
-
Select the destination folder for the exported documents, then click Select Folder.
The session log is displayed. This log and the exported bilingual Word documents are saved in the selected folder.
-
(Optional) Open the bilingual export report and review the results.
Analyze project files
Project analysis compares source files to a connected translation memory (TM) to leverage reusable content. Use the Analyze action to assess files prior to translation or to pretranslate files.
To analyze project files:
-
In the Current Project view, click Analyze on the Project Files tab.

-
On the Project Analyze dialog, select the language pairs and files for analysis.
Verify that the TXLF file you want to analyze is not open in TXLF Editor. You cannot analyze an open file.
Run a Transcheck report
Use a Transcheck Report to verify target segments and identify a variety of common errors within segments in the translated files.
|
If you have specific terms you want Transcheck to ignore, you can mark those segments for exclusion in the Transcheck Report using the Transcheck All action. This reduces false positives during Transcheck error detection. |
To run a Transcheck Report:
-
In the Current Project view, click Transcheck Report on the Project Files tab.

-
On the Project Transcheck dialog, select one or more files.
-
To select the Transcheck Tests you want to conduct, click the underlined Preferences > Transcheck path name in Transcheck Tests. This link opens the Preferences dialog where you can configure the preferred settings for each Transcheck.
Consistency checks are accessible through the Project Transcheck dialog. Or click the Preferences icon
 on the Sidebar, then click Transcheck under Current Project Preferences.
-
Source Consistency — Use to search for segments with the same target translation, but with different source segments.
-
Target Consistency — Use to search for segments with same source segments, but with different target translations.
Select the appropriate check boxes to ignore differences such as case, numbers, tags, and white space for source and target file consistency checks. Click OK to return to the Project Transcheck dialog.
-
-
Click Run Transcheck.
A Report Summary is saved to the chosen location. Once complete, a Transcheck report finished message displays with the number of segment errors found, if any.
Generate a segment changes report
A Segment Changes Report provides you with the history of changes to a segment. You can run a Segment Changes Report on one or more project files.
To generate a segment changes report:
-
In the Current Project view, select one or more project files from the list on the Project Files tab, then click Segment Changes Report.

The Segment Changes Report button is removed when Hide MT as score is enabled in the workflow for that specific phase.
-
On the Segment Changes Report dialog, select the languages or files to include in the report.
-
On the Segment Changes Summary dialog, verify the names of the files you chose to include, then click OK.
Generate an export notes report
The Notes Report contains all notes added to the bilingual project files. It can be exported to HTML or MS Word.
To generate an Export Notes Report:
-
In the Current Project view, click Export Notes Report on the Project Files tab.

-
On the Export Notes Report dialog, select one or more project language files.
-
On the Export Notes Summary dialog, click OK.
The notes report saves to the specified location.
Clean up a project
After you have translated project files, you can clean them and update the translation memory (TM). The Clean Up action converts the bilingual TXLF files into translated target files with the file format of the source.
To clean up the project and update the TM:
-
In the Current Project view, click Cleanup on the Project Files tab.

-
On the Project Cleanup dialog, select a language or languages.

All Language Pairs
Click to clean up all language pairs for the project.
Specific Language Pairs
Click to clean up only the language pairs you specify from the drop-down list.
Single Language Pair
Click to clean up only one language pair you select from the drop-down list.
Remove a file
Use these steps to remove one or more files from a project.
|
You can add a removed file back into a current project. Retrieve removed files from the project folder on your computer using the Add Files action. |
To remove a file from a project:
-
In the Current Project view, select one or more files, then click Remove File(s) on the Project Files tab.

-
On the Remove dialog, choose a removal option.
Remove from the list only
Click to remove the selected files from the file list without moving them to an Archive folder.
Remove from the list and move the following resources to Archive folder
Click to remove the selected files from the file list and to move them into a local Archive folder. When this option is selected, a warning displays to alert you that this option physically moves the files from their current project folder into an Archive folder.
Manage submission files
Once you have a project set up in Wordfast Pro, you are ready to work with the files. Access the project files from the Current Project view. When you open a TXLF file, the view switches to the TXLF Editor view. In the TXLF Editor view, you can translate, review, temporarily combine files by chaining them together, and work with translation memories and terminology lists.
Save a file
As you work on a file, frequently save your changes to a local folder.
To save a file:
-
Click the File tab, if you are not already on it, and then click the Save File as Translated, Save or Save As button.

Save File As Translated
Select to save the translated file to a local folder.
Save
Select to save the .TXLF file to a local folder with the existing file name.
Save As
Select to save the .TXLF file to a local folder under a different name.
A progress bar is displayed. After successful completion, the file is updated in a local folder.
Chain files
To combine multiple files and view them as a single file, use Chain Files. For example, if you are translating or reviewing ten files with ten segments each, you can temporarily chain them into a single file of 100 segments. Chaining files is particularly useful when working with duplicate or similar content among files.
|
You cannot export or save chained files as a single TXLF file. |
|
You can open and work on a single chained file or multiple sets of chained files in the TXLF Editor view. Each chained file displays on its own tab. |
To chain files:
-
In the Current Project view, on the Project Files tab, select a set of files, then click Chain Files.
Use Shift+Click to select sequential files or Ctrl+Click to select individual files.
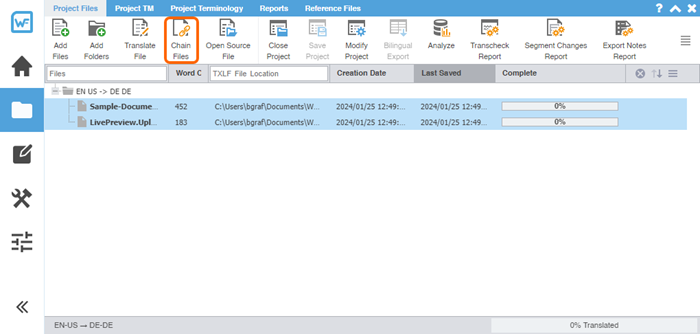
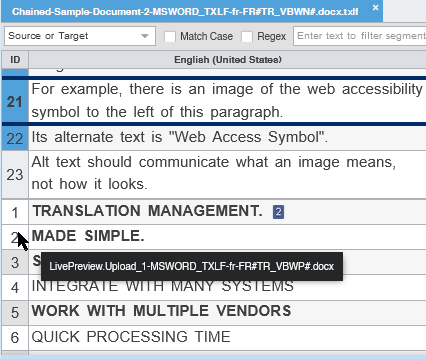
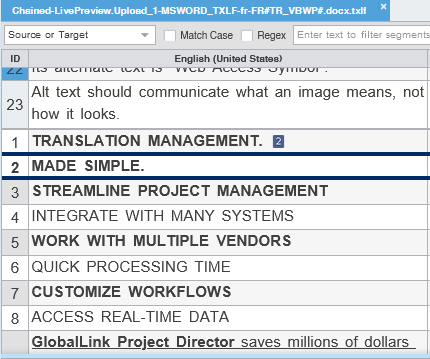
The chained file opens in the TXLF Editor.
To determine the related file name for a segment, hover over the segment ID.
-
Click a segment to make it the active segment.
The file name changes from the chained name to the source file name of the active segment.
-
From the File tab, click Save.
If you need to review the files again, the chained files will open in the same order you saved them.
The segments are saved in the chained file and restored to their original files without the chained format. The progress for each individual file will show on the Progress tab.
Translate a file
|
Save your work often by clicking Save on the File tab or by pressing Ctrl+S. |
To translate a file:
-
On the Project Files tab, select a file, then click Translate File or double-click the file name to open it.

-
Select a target segment and enter the translation. If you have a translation memory
(TM) added to the project, you can leverage translations from it.
-
Once you are satisfied with the translation, click Next Segment or Alt + Down Arrow. This action updates the TM and moves to the next target segment. The segment state
changes to Translated. Segments that are changed to Translated are calculated on the
Progress Bar at the bottom of the window.

As you translate, you can also commit the active segment to the TM by selecting the Next Needs Translation Segment shortcut key (CTRL + Enter), and the active segment state will change to Translated and then moves to the next segment whose status is set to Needs Translation.
Translate segments overview
When you convert a file to a translatable format, all complete sentences become separate segments, often divided by formatting or punctuation. Segments may be sentences, words, or numbers, depending on the formatting of the source file. After you save the segment translations, the application commits the segment translations to the translation memory (TM). Leveraging the TM automatically and consistently reduces the time and expense of future translations by translating reoccurring words and phrases.
|
To facilitate rapid use of language-specific quotation marks, punctuation, and white space, select Enable Smart Quotes in Preferences > General Preferences > Segment. |
You can choose from two layout views for your TXLF Editor workspace.
-
Table view — This layout view displays the source segment to the left and the target segment to the right.
-
Stacked view — This layout view displays the source segment row directly above the target segment in a spanned row.
You can select either layout view by clicking the drop-down list for the Switch Editor Layout action on the File tab.
|
If there are either split or merged segments, indicated in the Status column with |

Translate all segments
The Translate All option completes the translation of all segments by leveraging content in the connected TMs.
To translate a project file using Translate All:
-
On the Translation Tab, click Translate All.

This action leverages content in the connected TM and populates the target segments with translations. When this process is complete, the screen refreshes and displays the results in the target column. The segment states are all changed to Translated. The progress bar at the bottom of the user interface indicates the percentage of translation complete.

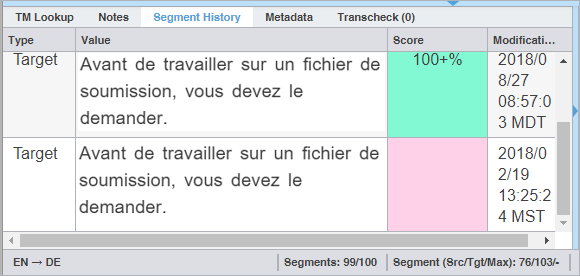
View segment history
In TXLF Editor, view the record of segment changes to the open file on the Segment History tab of the Editor pane. Changes to segments include segment updates, and lock actions.
Commit to the TM
Once you have finished translating some or all of the file segments, update the translation memory (TM) with your translation. This requires committing some or all of the translated target segments to the TM.
To update the translation memory:
-
In the TXLF Editor view, choose one of the following:
-
To commit a single segment to the TM, select a segment, then select Commit on the Translation tab.
-
To commit all segments in the file to the TM, select Commit All on the Translation tab.

-
-
(Optional) Verify that the updates you committed to the TM have a purple highlight.
The highlighted color can be selected in the General Preferences from the Colors option by selecting the listed Committed into TM item.
Copy source content
To copy source content to the target:
-
Select a copy action from the resulting drop-down menu.

Option
Action
Copy Source
Select to copy from source all content and tags to the target.
Copy Source Text
Select to copy only content from source to the target.
Copy Source, Tags and Term Translations
Select to copy from source to target all content text, its tags, and translated concordance glossary terms.
Copy Source and Term Translations
Select to copy from source to target all content text and translated concordance glossary terms.
Copy Source, Tags, Source and Target Terms
Select to copy from source to target all content text, its tags, and both source and translated concordance glossary terms.
Copy Source with Source and Target Terms
Select to copy all source and translated concordance glossary terms to the target.
The specified source content is copied to the selected target.
Copy all source segments
To copy all source segments to all target segments:
-
In the TXLF Editor view, on the Translation tab, click Copy All Sources.

All source segments are copied to all segments in the target column.
Split or merge a segment
You can split or merge an existing segment to change segmentation. This is particularly useful for certain file types or for languages where the next segment content may need to precede the previous segment. The best time to split or merge a segment is early in the translation process.
To split or merge a segment:
-
On the Translation tab, select Merge or Split.

The segment is merged or split and the segment Status column contains either the Merge icon
 or the Split icon
  , respectively. If the merge includes an entire paragraph, this is denoted with the
Merge Paragraph icon
, respectively. If the merge includes an entire paragraph, this is denoted with the
Merge Paragraph icon  .
.
Lock a segment
You can lock a segment to prevent any further changes to that segment. The best time to lock a segment is when the translation is complete and the reviewer has confirmed the content after proofreading it. The Commit action still updates the translation memory (TM) with the target segment content.
To lock a segment:
-
On the Translation tab, select the Lock/Unlock Segment drop-down and select one of the two options:
-
Lock/Unlock Segment locks or unlocks a single selected segment.
-
Lock/Unlock All Segments locks or unlocks all segments. If the table filter was used to filter segments, only the filtered segments are locked or unlocked. When Lock/Unlock All Segments is selected, a warning dialog is displayed warning that all segments will be locked or unlocked; select Yes to continue.
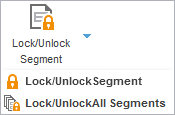
The lock icon
 is displayed in the segment Status column to indicate the segment or segments are locked.
-
Clear target segments
To clear target segments:
-
On the Translation tab, select Clear Target.

Do not write To TM
Translators or reviewers can use the Do Not Write To TM action to prevent a segment from being added to the translation memory (TM).
To prevent a segment from being added to the TM:
-
On the Translation tab, select Do Not Write To TM.

The TM is not updated with the target segment content.
The
 icon is displayed in the segment Status column.
Find and replace content
Use Find/Replace to search for and replace text in translated content.
To find and replace content in a file:
-
Click Find/Replace.

-
On the Find/Replace dialog, click in the Find what field, then enter your search text or select it from the drop-down list.
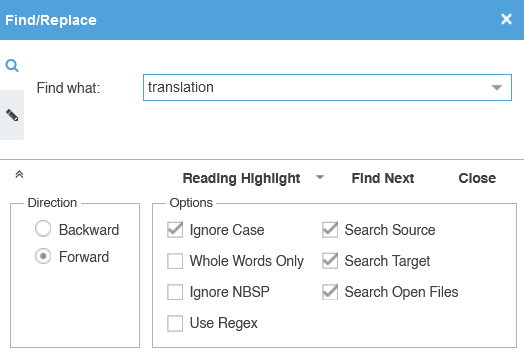
-
(Optional) Click the Expand icon
 to expand the panel for additional options, or click the Collapse icon
  to collapse the additional options.
Search text can include regular expressions (Regex), wild card characters, and non-breaking spaces.
-
(Optional) Click Reading Highlight and select the Highlight All action from the drop-down list to highlight all instances of the content in all open
files. Click Clear Highlighting to remove the highlighting from the previous search.
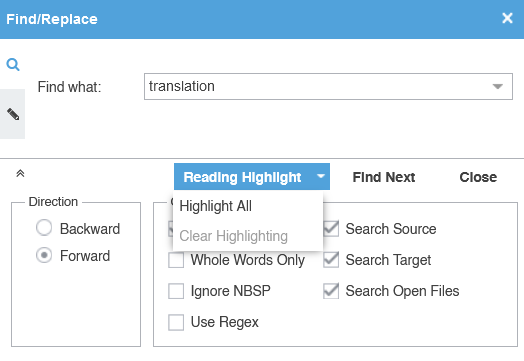
(Optional) You can filter table segments using the Segments with find/replace highlight all table filter to see all segments containing text highlighted by Highlight All.
-
(Optional) To replace regular expressions, wild card characters, or words, click the
Replace icon
 . For additional options, click the down arrow on the sidebar.
-
Click in the Replace with field and enter the replacement text.
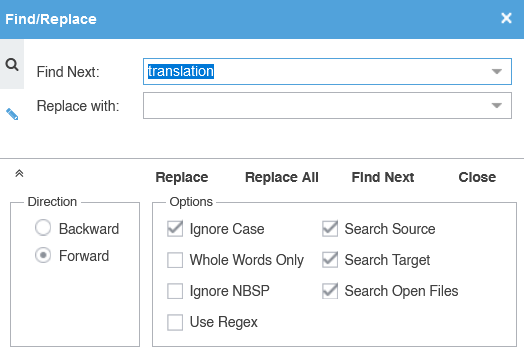
-
(Optional) Select the direction of the search and any other options.
You cannot use the Whole Words Only search option when entering multiple words or punctuation in either search field.
Select Use Regex to search on regular expressions or wild card characters.
Edit or revert source segments
Use Edit Source or Revert Source to edit or revert content in the Source column.
|
When the cursor is not on the source nor on the target segment then the Edit Source and Revert Source buttons are disabled. |
To edit content in the source segments:
-
Select the Edit tab and then select Edit Source.

-
Make edits to the source segment.
Editing the source adds the Edit Source status icon
 to the Status column.
-
(Optional) To revert changes to the source segment, select Revert Source.
The Revert Source button is disabled when a source segment does not contain any edited content.
Selecting Revert Source keeps the Edit Source status icon for the edited source and also retains segment history of the source.
Spell check a file
You can use a spellchecker to verify translated content aligns with configured spell checking preferences. Refer to Configure and enable spellchecker. You must verify that your Hunspell spelling dictionaries have the latest updates. Refer to Licensure.
To spell check a file:
-
On the Review tab, click Spellcheck File.
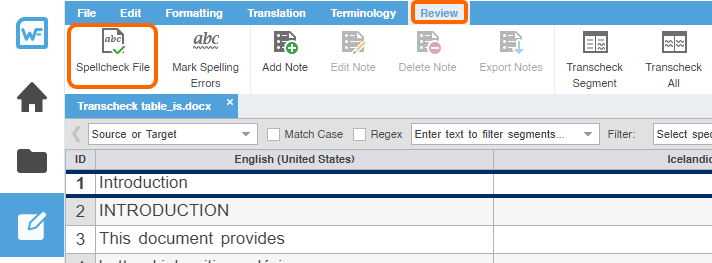
-
On the Spelling dialog, review the suggestions and select one of the options.
Item
Action
Ignore Once
Click to disregard the suggested change for a word only once.
Ignore All
Click to disregard the suggested change for all occurrences of a word in the file.
Add to Dictionary
Click to add word to personal dictionary.
Change
Click to accept the suggested change for a word.
Change All
Click to accept the suggested change for all occurrences of a word in the file.
If spell checking is not available for the target language, a warning message notifies you. Click OK.
Apply formatting
To apply formatting to the target:
-
On the Formatting tab, select a formatting option or use the equivalent shortcut.

Button
Keyboard Shortcut
Description

Ctrl+B
Format the selected text as bold.

Ctrl+I
Format the selected text as italic.

Ctrl+U
Format the selected text as underlined.

Ctrl+=
Format the selected text as subscript.

Ctrl+Shift+=
Format the selected text as superscript.

Ctrl+K
Format the selected text to display as strikethrough (deleted), without actually deleting the text.

No shortcut
Display actual formatting associated with tags for the active segment (when supported.)

No shortcut
Display the content of the formatting tags for the active segment.

Ctrl+Shift+Space
Insert a non-breaking space at the cursor location.

No shortcut
Insert a marker to indicate left-to-right reading direction.

No shortcut
Insert a marker to indicate right-to-left reading direction.

Ctrl+D
Attach and detach the Formatting toolbar. When attached, the toolbar is displayed as a tab. When detached, the toolbar is displayed as a minimized toolbar that can be moved to any area of the TXLF Editor.
Leverage auto-propagation
The purpose of auto-propagation is to apply translations to duplicate segments and re-use content. Configure and enable your auto-propagation preferences under Preferences > General Preferences > Auto-Propagation.
To leverage repetitive content:
-
Select a segment for translation in the TXLF Editor. In this example, a filtered search locates and identifies duplicate segments.

-
To auto-propagate duplicate segments, choose one of the following actions:
-
Click Next Segment or press Alt+Down to update the TM, move down one segment, and leverage the next segment from the TM.
-
Click Commit or Commit All to commit one or all of the segments to the TM.
Once you commit the target segment, this action automatically propagates the TM updates to duplicate segments throughout the file, based on segment preferences.

-
Leverage auto-suggestion
You can use auto-suggestion to propose target content based on specific source content, such as numbers, URLs, and proper names. You can also use auto-suggestion to propose terms for the glossary, machine translation (MT), translation memory (TM) matches, and sub-segment TM matches. Configure and enable your autosuggestion preferences under Preferences > General Preferences > Auto-Suggestion.
Monitor maximum segment length
Based on GlobalLink Enterprise TMS (GLE TMS) settings, your files may have a set maximum segment length. Any violation of a segment that exceeds the maximum characters allowed results in a change to the segment Max value in the progress bar from black to red and is indicated by a flashing red box appearing around this value.
Users can monitor the progress bar for maximum segment length violations, and can also configure the Transcheck Report to flag such violations.
Recalculate the progress of a file
Use Recalculate Progress to calculate and update the progress of translated files and word count, especially files created or edited in legacy versions. When you open a legacy file, the progress bar contains the N/A flag to denote that it will not calculate progress.
|
Refer to Chain files to recalculate progress of multiple files. |
To recalculate the progress of a file:
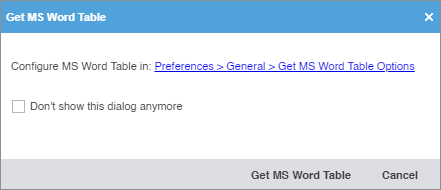
Get an MS Word table
You can preview and save the file you have open for translation as a bilingual table in MS Word format.
To get an MS Word table:
-
On the File tab, select Get MS Word Table.

-
On the Get MS Word Table dialog, select Get MS Word Table.
You can configure MS Word Table settings by clicking the hyperlink to the Preferences location. If you want to disable the dialog, select Don't show this dialog anymore. If you need to re-enable the warning dialog, select Show dialog to configure MS Word Table Preferences from General Preferences > Warnings.
-
If the segments were filtered, an Export Segments To MS Table dialog will appear. Select Continue to export only the filtered segments to the MS Word table.
Selecting Cancel will export all the segments to the MS Word table document regardless of any segment filter applied.

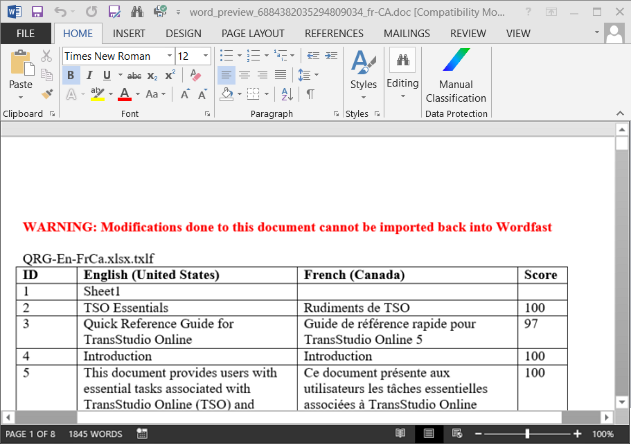
The file downloads as a Microsoft Word document containing a bilingual table of source and target segments. The target locale code is added to the file name for the generated word document.
Preview a file
Use Preview to display the source content in its original format, such as MS Office, HTML, and Markdown source formats.
To preview files:
-
On the File tab, click Preview, then select a preview type on the drop-down list.

The preview of the source content is displayed in its original format.
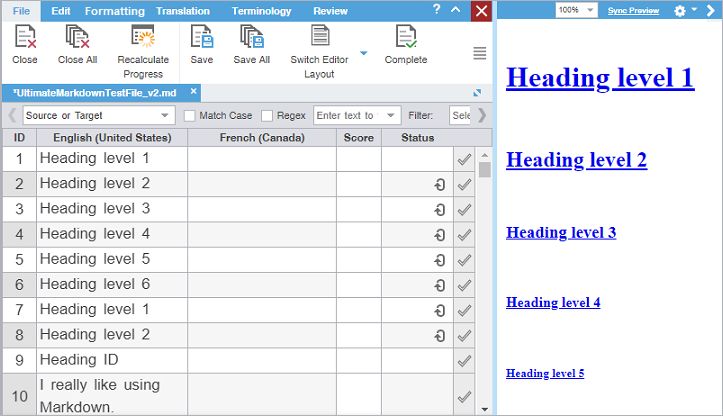
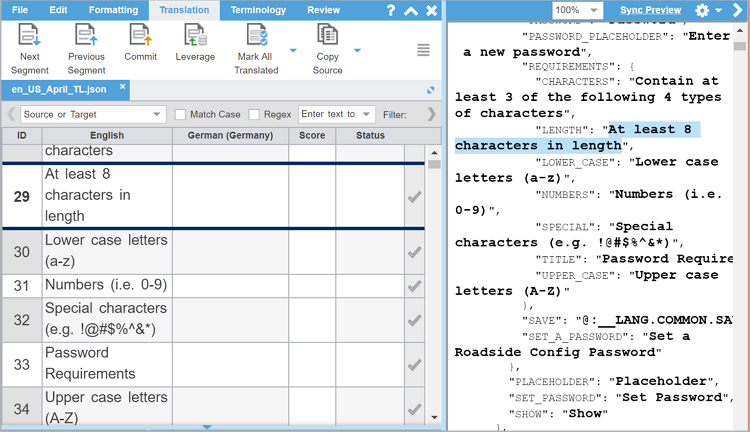
Use Live preview
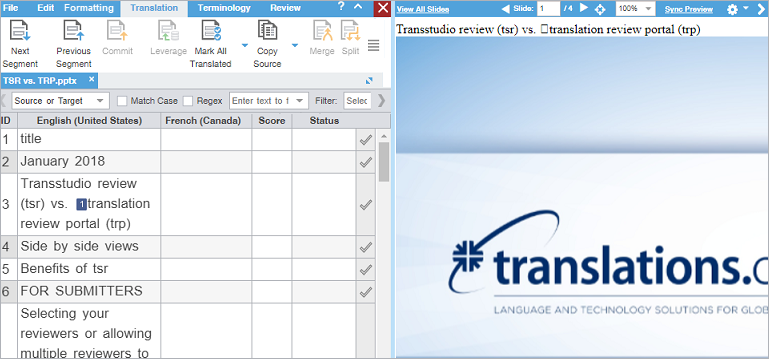
Using Live Preview you can generate a dynamic preview of a translated file in its original format for the following file types:
-
MS Word .DOC and .DOCX files
-
MS Word .DOCX files, converted from PDFs
-
MS PowerPoint .PPT and .PPTX files
-
Markdown .MD files
-
JSON .JSON files
-
MS Excel .XLS and .XLSX files
|
Preview is disabled for multilingual target Excel files. |
Live Preview is enabled by default in the TXLF Editor view. To enable or disable automatic opening of Live Preview, go to General Preferences > General, and select or deselect Automatically open Live Preview for supported files.
To collapse or expand the live preview pane, click the Collapse icon  or the Expand icon
  located on the top-right of the TXLF Editor view.
To zoom in or out of the live preview pane, select a percentage in the zoom drop-down
list  .
.
To generate a Live Preview:
-
On the File tab, select Live Preview from the Preview drop-down menu.
Only one preview option is possible at a time.
-
(Optional) Interact with the Live Preview of the file.
For MS Word files
The live preview pane docks to the right. For docking options, click the live preview panel's Settings icon:
 . Live Preview highlights the active segment. Move to any other segment by clicking on that area
of the Live Preview.
. Live Preview highlights the active segment. Move to any other segment by clicking on that area
of the Live Preview.
For MS Excel files
Excel documents display spreadsheets. Multiple sheets appear at the bottom of the live preview pane.
The live preview pane docks to the right. For docking options, click the live preview panel's Settings icon:
. Live Preview highlights the active segment. Move to any other segment by clicking on that area
of the Live Preview.
For MS PowerPoint files
PowerPoint files can be graphically intensive and may take time to load. The progress bar provides real-time loading status. Select the View All Slides box to load the entire document. Click the cancel icon
 to cancel the Live Preview.
-
Docking—The live preview pane docks to the right. For docking options, click the live preview panel's Settings icon:
. Live Preview highlights the active segment. Move to any other segment by clicking that area of
the Live Preview.
-
Slide Access—Click the forward or back arrow to progress through the slide deck or type the deck slide number in the Slide field. While in the editor, move back to the slide that correlates to the open segment by clicking the Target icon:
 .
.
For Markdown files
The live preview pane docks to the right. For docking options, click the live preview panel's Settings icon:
. Live Preview highlights the active segment. Move to any other segment by clicking on that area
of the Live Preview.
For JSON files
The live preview pane docks to the right. For docking options, click the live preview panel's Settings icon:
. Live Preview highlights the active segment. Move to any other segment by clicking on that area
of the Live Preview.
For JSON files, Live Preview shows the translatable text in bold and at a larger font size.
-
Use Office preview
The Office Preview option allows you to generate a static preview of MS Office documents using the target segments in your translation.
|
If the MS Office file type you select can be opened in a Live Preview, this option is shown, if not you see only the Office Preview option. |
To generate an Office Preview:
-
On the File tab, select Office Preview from the Preview drop-down menu.

Use HTML preview
If you are working with an HTML submission, the translated document can be viewed using the HTML Preview.
To generate the HTML Preview:
-
On the File tab, select HTML Preview from the Preview drop-down menu.

Translation memory overview
Translation memory (TM) acts as a database to provide maximum re-use of previously translated content. It also serves to facilitate collaboration between globally distributed localization resources.
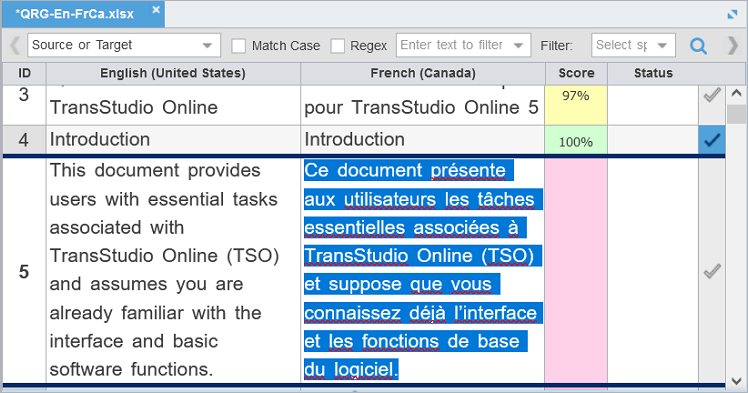
Projects connected to a translation memory (TM) leverage content matches against an existing TM. TM matches generally fall into three categories: 100% match, fuzzy repetitions, or no match. Your organization may choose to alter or add more fuzzy repetition categories. The typical fuzzy repetition values are for 95% to 75% matches. The segment highlight identifies the type of TM match.
|
Color Code |
Category |
|
|---|---|---|
|
Green  |
Indicates a 100% match. |
|
|
Green, Dark  |
Indicates a context match. A context match for a segment must meet one of the following criteria:
|
|
|
Grey  |
Indicates there is no TM match. |
|
|
Pink  |
Indicates a modified segment. |
|
|
Orange, Light  |
Indicates the segment was a machine translation (MT) instead of a human translation. |
|
|
Purple  |
Indicates an update to the TM for a modified segment. |
|
|
Purple, Light  |
Indicates the update to the TM of a translated and committed segment automatically updates other repetitive segments within the translation. |
|
|
Yellow  |
Indicates a fuzzy match. |
Leverage a TM
Leveraging a segment involves selecting the best possible translation from the connected translation memories (TMs) or machine translation engines to populate target segments.
To leverage a TM:
Conduct a translation memory lookup
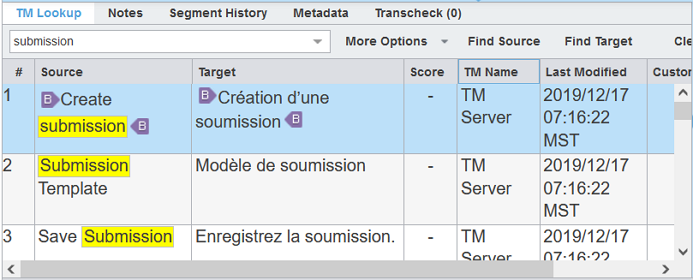
A translation memory (TM) lookup or concordance search looks for specific source segment text in a translation memory. To view search results for both source and target segments, use the TM Lookup tab in the Editor pane.
To conduct a TM lookup or concordance search:
-
Search for a word or phrase by entering it in the TM Lookup field. Then, to conduct a search of both source and target, press Enter. Instances of the search term are highlighted in the Editor pane, along with its
bilingual equivalents. To conduct a more specific search, click Find Source or Find Target.
You can also select a word or phrase in the segment in the TXLF Editor view and then click Concordance Search from the Translation tab, or press F8.
Instances of the search term are highlighted in the Editor pane, along with its bilingual equivalents. To conduct a more specific search, click Find Source or Find Target.
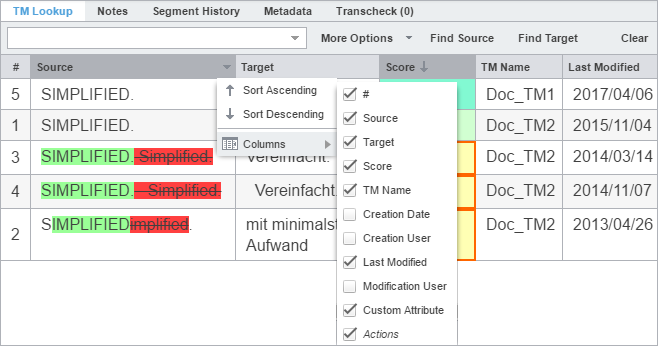
You can reorder the columns of the TM Lookup results. That reorganization remains, even after you exit the software.
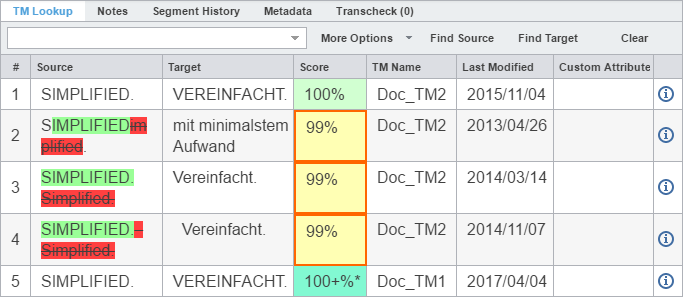
View TM leverage results
Leveraging the translation memory (TM) occurs automatically as you move through the target segments. This provides you with the best possible segment matches from the TM and is the only search that uses scoring to select the best match.
To view TM leverage results:
-
In the TXLF Editor view, click on a source or target segment.
This populates the columns on the TM Lookup tab of the Editor pane and provides a score, based on TM leverage results.
-
Review TM leverage results in each TM Lookup column for that segment.
Item
Behavior
Source
Displays source segments provided by the TM. Any difference between the submitted segment and the TM source segment is highlighted.
Target
Displays target segments already in the TM.
Score
Displays a TM leverage score.
-
Percent (%) — 100% and fuzzy matches
-
Plus (+) — Context matches
-
Asterisk (*) — Secondary TM match
-
Red outline — TM has assessed a penalty to the segment
Refer to Translation memory overview for more information on TM color codes.
TM Name
Identifies the name of the leveraged TM. If you are leveraging multiple TMs, it lists the TMs in order of priority: primary, then secondary TMs.
Creation Date
Identifies the TM segment creation date.
Creation User
Identifies the username of the segment creator.
Last Modified
Identifies the date of the last segment modification.
Modification User
Identifies the user who last modified the segment.
Custom Attribute
Identifies any segment custom attribute name and its associated values
Actions

Acts as a button to access score breakdown information, including penalties.
-
-
(Optional) To constrain the columns within the pane, click on any column head, then
deselect the names of the columns you want to hide.
Leverage machine translations
The machine translation (MT) feature can automatically populate target segments whenever you open a file or when there are no translation memory (TM) segment matches. Select a project for your MT and configure Machine Translation options under Preferences > General Preferences.
To leverage MT:
-
In TXLF Editor view, on the Translation tab, click Machine Translation to submit the source segment for MT and populate the target segment with the results.

Terminology lists overview
Terminology lists provide users with the ability to standardize term usage and to control the use of terms, variants of terms, and parts of speech allowed for terms. A terminology list includes a glossary, a specialized list of source terms, their definitions, and their preferred translations. It also includes alternate phrases for blocklisted terms.
Segment selection highlights terms from the terminology list on the Terminology pane along with potential translation options.
|
There are two possible methods for moving among terms on the Terminology pane.
|
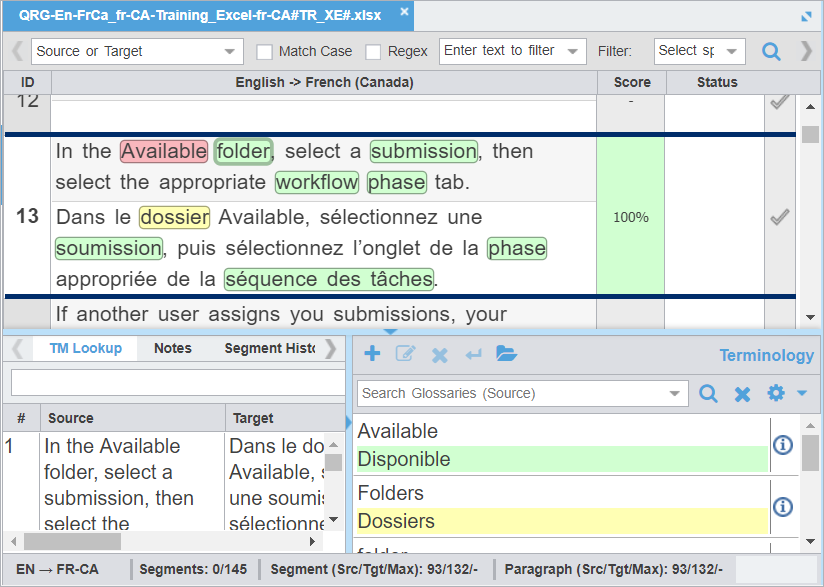
The term highlight identifies the type of translation match between the source term and the terminology list.
|
Use Highlight All Terms to view highlights for term matches in the open file. |
|
Color Code |
Category |
|
|---|---|---|
|
Green |
Exact term match |
|
|
Yellow |
Fuzzy term match |
|
|
Red |
Missing exact term match |
|
|
Purple |
Missing fuzzy term match |
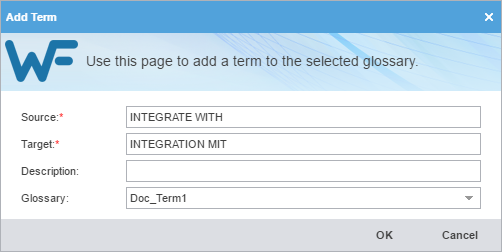
Add a term
You can add terms to both local and remote glossaries. You need read and write user permissions to add terms to a remote glossary that is not read-only.
To add a term to a glossary:
-
On the Terminology pane, select a word in the source segment and, optionally, the translation in the
target segment, then click
 .
.
-
(Optional) On the Add Term dialog, enter content in the Description field.
Required fields are marked with a red asterisk.
Edit a term
|
You can only edit terms in the local glossary. |
To edit a term:
-
In the TXLF Editor view, on the Terminology pane, select a term.
-
Click the Edit term icon
 .
.
-
On the Edit term dialog, make your edits.
Insert a term
To insert a term into the current target segment:
-
Click
 on the upper left menu bar within the Terminology pane.
The term is inserted into the target segment.
Search for a term
To search for a term:
-
Click the Search for Term icon
 .
.
The search results from the connected glossaries are displayed.

Copy a term
To copy a term from the glossary into the current target:
-
On the Terminology tab, click Previous Term or Next Term to select a source term.
-
Click Copy Term.
The glossary term is copied to the target segment.
Copy a synonym
To copy a synonym for a term:
-
In the TXLF Editor view, select a source term in a segment that has a glossary term.
This highlights and adds a border around the source and target terms. Synonyms display on a temporary pop-up pane and on the Terminology pane.


-
Click the preferred target term from the Terminology pane. This copies the term to the cursor location in the target segment.
An alternative is to click Copy Term. This also copies the term to the cursor location in the target segment.
The target synonym is copied to the target segment.
Remove a term
|
You can only remove terms from local glossaries, not read-only or remote glossaries. |
To remove a term:
-
Select a term, then click
 .
.
Use the Remove Term
at the top of the Terminology pane. Do not use the Reset Search . This clears the filter.
A warning message notifies you of the pending deletion and asks you to agree to the term removal.
Manage tags
Tags contain information related to a block of text, such as format or indentation. Tags are not translated and come in pairs: an opening and a closing tag.
|
Translations must retain the same tags at the correct location within a target segment. |
|
Unless you have disabled Remove incomplete tag pairs in Preferences> General Preferences >Tags , a warning message results when you try to save a target segment with a missing tag or an open tag. An open tag is part of a tag pair in the target segment that is missing its matching close tag. The warning will give you three choices: Fix Manually, Delete, or Always delete. Hover over a tag to view tool-tip information.  |
Tags contain numerals to indicate their order in the segment.
|
Red |
This is a tag you currently selected, such as the first tag, |
|
Purple |
This is a tag that specifies formatting, such as |
|
Blue |
This is a tag that specifies non-formatting controls, such as |
 , in the file.

 .
.
HTML entities are text strings that are used to represent reserved, invisible and other hard to type characters. Any inline tags for the following HTML entities are displayed with a specific inline tag image to show the actual character of the entity. This is to help linguists view the character representation of the entities directly without hovering over the tags.
|
Entity |
Tag Image |
Entity |
Tag Image |
Entity |
Tag Image |
|---|---|---|---|---|---|
|
& |
& |
“ |
“ |
≥ |
≥ |
|
< |
< |
‘ |
‘ |
≤ |
≤ |
|
> |
> |
— |
— |
± |
± |
|
" |
" |
|
o |
± |
± |
|
' |
' |
  |
o |
´ |
´ |
|
' |
' |
– |
– |
µ |
µ |
|
• |
• |
» |
» |
μ |
µ |
|
© |
© |
” |
” |
· |
· |
|
° |
° |
® |
® |
º |
º |
|
½ |
½ |
’ |
’ |
­ |
- (soft hyphen) |
|
¼ |
¼ |
™ |
™ |
² |
² |
|
¾ |
¾ |
\' |
' |
³ |
³ |
|
… |
… |
\" |
" |
||
|
« |
« |
≥ |
≥ |
||
|
The maximum length check counts HTML entities such as: &. These are real characters and are counted as part of the overall character count (1 Character per entity). |
Copy a tag
Translated content retains the formatting of the source content, so tags are an important element in the final translation. You can copy tags from the source to the target for formatting and indentation accuracy.
|
Use Preferences > General Preferences > Tags to configure tags as full name, short name, or numbered tags. |
To copy a tag:
-
In the TXLF Editor view, on the Translation tab, select a segment with tags.
When the selected segment contains tags, the first tag is automatically selected. Red indicates selection.
-
Choose one of the following actions:
-
Click a source segment tag and drag it to the corresponding location in the target segment or press Ctrl+Alt+Down Arrow.
-
Click a source segment tag, then click in the corresponding target segment location and click Copy Tag.
-
Right click a source segment tag, select Copy (Ctrl+C) in the drop-down menu, click in the corresponding target segment location, then select Paste (Ctrl+V).
The target segment, highlighted in blue, contains the copied tag at the cursor location you selected in the target segment.
-
Copy all tags
|
Use Preferences > General Preferences > Tags to configure tags as full-sized or shortened. |
To copy all tags:
-
On the Edit tab, click Copy All Tags.
All copied tags display at the location of the cursor. Reorder them to mimic the source content order using the drag-and-drop or copy-and-paste technique.

Edit a tag
Most tags in your target content have specific formatting and indentation settings copied from the source. You can modify tags to change content format in the translated file.
|
Do not edit tags in the source segment. |
To edit a tag:
-
Choose one of the following actions:
-
On the Translation tab, click Edit Tag.

-
Right-click the tag and select Edit Tag from the drop-down menu.
-
-
On the Edit Tag dialog, modify the tag.
Verify that all tag edits are valid. Otherwise, the file could become corrupt.

Clear all tags
|
Use Preferences > General Preferences > Tags to configure tags as full-sized or shortened. |
To clear all tags:
-
In the TXLF Editor view, on the Edit tab, click Clear All Tags.

Delete a tag
You may choose to delete target tags, particularly if there are multiple copies of the same tag in the same target segment. You can only delete target segment tags.
To delete a tag:
-
Choose one of the following actions:
-
Press Delete or Backspace.
-
On the Edit tab, click Cut, then paste the tag elsewhere.

To undo the change, click Undo or press Ctrl + Z.
The target tag is deleted.
-
Manage project notes
You can add notes that are specific to each segment during the translation and review process. If you have chained files together, you can review all notes for all files in the chain.
There are two ways to access the Notes editor.
-
Use the Notes tab on the Editor pane to view and manage project notes.
-
Use the Notes icons on the Review tab to view and manage project notes.
View notes
The Notes tab is on the Editor pane. Notes retain the same ID as the related segment.
|
Segments with notes include the Notes icon |
To view notes:
-
In the TXLF Editor view, click the Notes tab on the Editor Pane, then view note details for all file segments.
Notes for all file segments are displayed.
Add a note
To add a note:
-
Choose one of the following actions:
-
Click the Notes tab on the Editor pane, then click Add Note.
-
On the Review tab, click Add Note, or right click on the target segment and select Add Note to open Add/Edit Notes dialog.

-
-
On the Add/Edit Notes dialog, select a Type from the drop-down list.
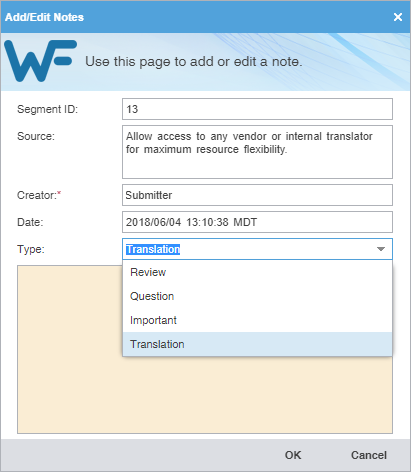
The selected note Type is saved for the next time Wordfast is run.
Type
Description
Translation
Select to include data for the reviewer from the translator.
Review
Select to includes data for the translator from the reviewer.
Question
Select to solicit a response about the segment from a user.
Important
Select to flag the data for the segment as a priority for other users.
Edit a note
To edit a note:
-
Choose one of the following actions:
-
Click the Notes tab on the Editor pane, then click Edit Note.
-
On the Review tab, click Edit Note.

-
-
On the Add/Edit Notes dialog, edit the note.
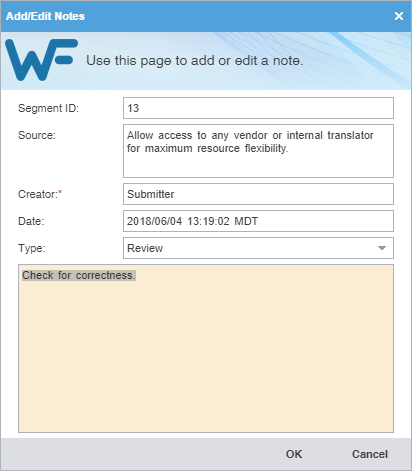
Delete a note
To delete a note:
-
Choose one of the following actions:
-
Click the Notes tab on the Editor pane, then click Delete Note.
-
On the Review tab, click Delete Note.

The note is no longer attached to the segment. If there are no other notes, the notes icon is removed from the Status column for the segment.
-
Export notes
To export notes:
-
In TXLF Editor, choose one of the following actions:
-
Click the Notes tab on the Editor pane, then click Export Note.
-
On the Review tab, click Export Notes.

-
Right-click the segment and click Export Notes.
-
Transcheck overview
You can use Transcheck to scan translated content for non-linguistic errors such as missing tags, empty targets, numbers, and terminology within target segments.
![]() is displayed in the Status column for segments with errors.
is displayed in the Status column for segments with errors.
|
To enable Transcheck and customize Transcheck options, configure in Preferences > Current Project Preferences > Transcheck. |
Use Transcheck
After you have configured Transcheck options, you can begin using Transcheck when you translate or review a segment and commit it to the TM. You can also use the Transcheck configuration option Transcheck segments while translating to check for errors during the translation process.
To use Transcheck during translation:
-
(Optional) If Transcheck identifies an error in the segment, it posts a warning message.
Choose one of the following actions:
-
Select Go back to fix issue to correct the error.
-
Select Continue to continue translating without changes.
If you choose to correct the error, the Error Status icon
 is removed from the Status column and from the Transcheck tab.
If you do not correct the error, the Error Status icon
remains in the Status column and on the Transcheck tab.
-
Use Transcheck All
Use Transcheck All to scan all segments of a file for non-linguistic errors in the target segments and issue warnings for missing and incorrect text. Configure and enable your Transcheck preferences under Preferences > Current Project Preferences > Transcheck.
Do not use Transcheck All if you want Source and Target Consistency checks. Instead, use Transcheck Report from the Project Files tab on the Current Project view.
|
Use the Transcheck All option before you complete a file. |
To use Transcheck All:
-
Click the Review tab, then click Transcheck All.

In General Preferences under Warnings, if Transcheck All Warnings is selected a Transcheck All Warning pop-up dialog appears. The "Do not warn me about this anymore" checkbox will turn off this pop-up dialog. The Use Transcheck Report From Current Project view link will open the Project Transcheck dialog.
-
Click Continue.
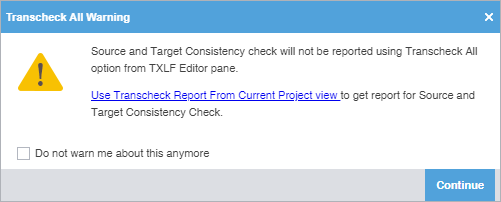
A Transcheck report and summary results.
-
(Optional) On the Transcheck Report, determine the terminology errors you want Transcheck
to ignore from highlighted terms in the Terminology Check report section.
To best optimize the Transcheck Report, you can configure Transcheck to ignore highlighted terms you identify under conditions you specify. The terms and conditions you select are in the Ignored Terminology Errors section of the report.
-
(Optional) Select either When term is for source terms in the glossary or When target contains for target terms.
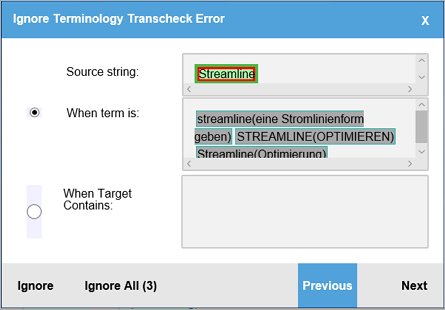
-
(Optional) Either click Ignore to disregard the single instance of a string or Ignore All to disregard every instance of a string.
The number following Ignore All contains the total number of instances within that file.
-
(Optional) Review the terms in the Ignored Terminology Errors section of the Transcheck report.
-
(Optional) After closing the Transcheck report, select any remaining segments with
the Error Status icon in the Status column.
-
(Optional) Click the Transcheck tab to examine the details of the segment error.
The total number of errors in the segment is the number in parentheses on the Transcheck tab.
-
Choose one of the following actions:
-
Correct the error and click Refresh to complete the correction.
-
Click Ignore warning to continue reviewing error warnings without making any changes.
If you correct the error, the Error Status icon
is removed from the Status column.
If you do not correct the error, the Error Status icon
remains in the Status column.
-
Leverage project TMs
A translation memory (TM) provides maximum content re-use and facilitates collaboration among localization resources. Users can leverage reusable content using one of two different types of TMs.
|
Consider using a hosted service: WordFast Anywhere (WFA). WFA allows translators to connect to a shared server and interact with a private, remote TM and glossary. |
|
Local TM |
Located on your local computer system and only you can access it. |
|
Remote TM |
Located on a server that other translators can access. This allows multiple translators to leverage the available content and update the TM with new reusable content. |
|
You can remove a TM from a project so it is no longer in the project TM list. When you remove a local TM from a project, it remains in the TM folder on your computer system. To add a removed local TM back to the project, use the Add Local action on the Project TM tab. To add a removed remote TM to the project, use the Connect to Remote action on the Project TM tab. |
Create a local TM
Create a local translation memory (TM) for quick, local access. If it is possible you may need to share your TM with other users, connect to a hosted service: Wordfast Anywhere (WFA). Refer to Connect to a remote glossary.
To create a local TM:
-
On the Project TM tab, select Create Local.

-
On the Translation Memory dialog, enter the required TM configuration.
Required fields are marked with a red asterisk.
Field
Action
Name
Enter a unique TM name that includes the client or organization name and the TM's language for easy identification.
Target Language
Select target languages. Target languages are limited to those languages configured in the project.
Location
Select the destination where the application saves the new TM.
Priority
Set the TM sequence used during translation, using the Primary TM first, followed by any Secondary TMs.
You can only select one TM as primary.
Selected
(Optional) Select to use the current TM for the project.
Read-Only
(Optional) Select to leverage the TM without updating it with the new translation.
The new TM is created and is displayed in the Project TM list.
Add a local TM to a project
You can add a local TM to your project at the time of creation or as a separate action.
|
You can add TMs created by Wordfast Pro 4 or 5 only. If you want to add TMs from Wordfast Classic or Wordfast Pro 3, use the Import TM option. |
To add a local TM to a project:
-
Select the Project TM tab, then select Add Local.

The selected TM is added to the project and displayed in the Project TM list.
Add project TMs
Some projects may use multiple local and remote translation memories (TMs). In such instances, it is more efficient to add all of the TMs for the project with a single Add Project TMs action.
To add project TMs:
-
On the Project TM tab, select Add Project TMs.

-
On the Add Project TMs dialog, enter the project TM information.
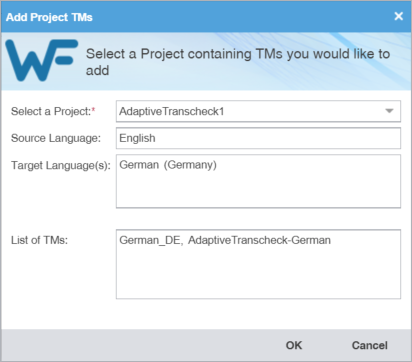
Field
Action
Select a Project
Select a project name from the drop-down list.
Source Language
Leave the auto-populated source language.
Target Language(s)
Leave the auto-populated target languages.
List of TMs
Review the list of TMs associated with that project.
The selected project TMs are added to the project and are displayed in the Project TM list.
Connect to a remote TM
You can connect to one or more translation memories (TMs) on other computers, including a hosted service, such as Wordfast Anywhere (WFA).
|
WFA allows translators to connect to a shared server and interact with a private, remote TM and glossary. |
To connect to a remote TM:
-
In the Current Project view, and on the Project TM tab, click Connect To Remote.

-
(Optional) Add a TM Server on the TM Server tab, complete the required fields, then click OK.
Required fields are marked with a red asterisk.
Field or Option
Action
Symbolic Name
Enter a unique name for the TM. The symbolic name can be automatically populated from the URL String for remote TM connections.
URL
Enter the remote TM URL using the following format:
tms://address:port/TMS?. The remaining URL Settings automatically populate when you enter the URL string. Click Test to validate the connection. The symbolic name can also be automatically populated from the URL String for remote TM connections.TM Cleanup Passcode
Enter the password to update the TM for the project.
Priority
Select a priority from the drop-down list.
The priority determines the sequence of reference during translation, first referencing the primary TM, then any secondary TMs. You can only designate one TM as primary.
Selected
(Optional) Select to use the current TM for the project.
Read-only
(Optional) Select to leverage the TM without updating it with the new translation.
-
(Optional) Add a WF Server on the WF Server tab, complete the required fields, then click OK.
Required fields are marked with a red asterisk.

Field or Option
Action
Symbolic Name
Enter a unique name for the TM. The symbolic name can be automatically populated from the URL String for remote TM connections.
URL
Enter the remote TM URL using the following format:
wf://jsmith.password@address:port/TMS?. The remaining URL Settings automatically populate when you enter the URL string. The symbolic name can also be automatically populated from the URL String for remote TM connections.(Optional) The Password and Workgroup ID fields depend on server settings.
Click Test to validate the connection.
Address
Enter the address associated with the URL.
Port
Enter the port associated with the URL.
Account Name
Enter the username associated with the URL sign in.
Account Password
(Optional) Enter the password associated with the username.
Workgroup ID
(Optional) Enter the workgroup ID for the project.
Use TM (Write) Password
Enable, if you are a PM or TM Administrator, to require a password to overwrite the existing TM with new translations.
TM (Write) Password
If enabled, enter the password to overwrite the existing TM with new translations.
Selected
(Optional) Select to use the current TM for the project.
Read-only
(Optional) Select to leverage the TM without updating it with the new translation.
-
(Optional) Add a WFA Server on the WFA Server tab, complete the required fields, then click OK.
Required fields are marked with a red asterisk.
Field or Option
Action
Symbolic Name
Enter a unique name for the TM.
URL
WFA server TM URL with default URL set to: https://anywherebeta.wordfast.com/
API key
Enter the API key you obtain from WFA.
-
Sign in to your WFA account at
https://www.wordfast.com/myaccount. -
Click TMs & Glossaries, then Setup.
-
On the TMs and glossaries management dialog, select a TM or glossary.
-
Click Manage Sharing.
-
On the TMs and glossaries shares dialog, click the API key and copy the text string.
-
Paste the API key into the Connect to Remote TM dialog using the following format:
username@1234567, then click Test to validate the connection.
Priority
Select a priority from the drop-down list.
The priority determines the sequence of reference during translation, first referencing the primary TM, then any secondary TMs. You can only designate one TM as primary.
Selected
(Optional) Select to use the current TM for the project.
Read-only
(Optional) Select to leverage the TM without updating it with the new translation.
-
The new TM is added to the project and is displayed in the project TM list.
Open and edit a local TM
You can open and edit local translation memory (TM) entries at any time after TM creation.
|
You cannot open a remote TM in TM Editor. |
To open and edit a local TM:
-
On the Project TM tab, select a translation memory and select Open TM.

-
On the TM Editor tab, view the translation units (TUs) for both source and target languages.
-
(Optional) To search for source or target translation units (TUs), enter your search
criteria in the appropriate fields in the Filters sidebar, then select Find.
You can make your filtered search case-sensitive or specify an exact match, then filter further by creator, user, and modification date.
Modify a TM
To rename, write-protect, or change the priority of a TM, use the Modify TM action.
To modify a local or remote TM:
-
Click Modify TM.

-
On the Connect to Remote TM dialog, modify the details for your connection. Based on your selection, other fields
auto-populate. Refer to Connect to a remote TM.
You can only select one primary TM for a project.
Required fields are marked with a red asterisk.
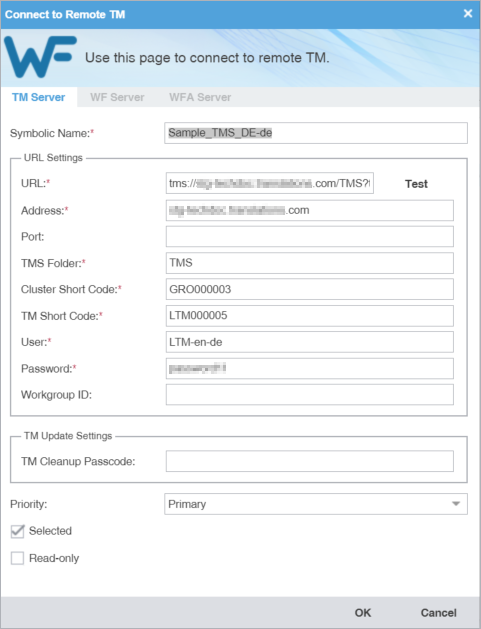
Your modifications to the TM are saved.
Copy a local TM
Copy a TM to use an existing TM for a new project.
|
The copied TM is in the Wordfast Pro TM format, regardless of the original TM format. |
To copy a local translation memory:
-
On the Project TM tab, select a translation memory and select Copy TM.

-
On the Copy Translation Memory dialog, enter the TM Name.
Required fields are marked with a red asterisk.
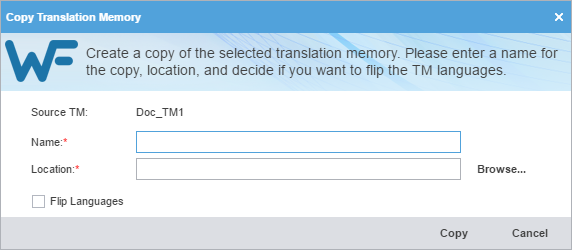
A copy of the translation memory is saved in the selected folder location.
Import a local TM
To use a local translation memory (TM) from another linguist, use the Import TM action.
To import a local TM:
-
Select Import TM on the Project TM tab.

-
On the Import Translation Memory dialog, select the import File Type from the drop-down list.
Required fields are marked with a red asterisk.
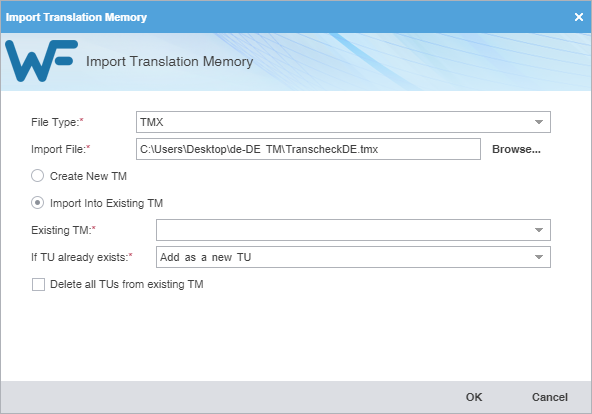
Field
Action
File Type
Select an action from the drop-down list.
-
TMX — Translation Memory eXchange file format provides compatibility with all translation tools.
-
WF TXT TM format (.txt) — File format provides backward compatibility for Wordfast Classic and Wordfast Pro 3.
Import File
Browse to select the file for import.
Create New TM
Select to import the TM into a new TM file.
Import into Existing TM
Select to import the TM into an available TM file, based on selection from the drop-down list.
Existing TM
Select an available TM file from the drop-down list.
If TU already exists
Select a TM option from the drop-down list to import it into an available TM file.
Delete all TUs from existing TM
Select to delete the existing TM and replace it with the new TM.
-
The translation memory is imported and is displayed in the Project TM list.
Export a local TM
To share a local translation memory (TM) with another linguist, use the Export TM action.
To export a local TM:
-
Select Export TM on the Project TM tab.

-
On the Export Translation Memory dialog, choose a location and export type for the TM export file.
Required fields are marked with a red asterisk.
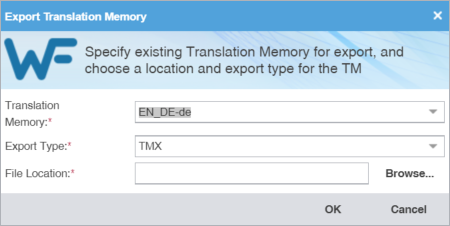
Translation Memory
Select a TM from the drop-down list.
Export Type
Select the export file type from the drop-down list.
File Location
Browse and select the folder location for the export.
The selected translation memory exports to the selected folder location.
Leverage project terminology lists
Terminology is a phrase used to identify two distinct groupings: the glossary and the blocklist.
-
Glossary—A database of preferred source terms, words, and phrases paired with their target equivalents designated as preferred and client-specific
-
Blocklist—A database of rejected target terms prohibited from use in the translation
You can use the Project Terminology tab to modify and remove glossaries and blocklists.
Create a local glossary
To create a local glossary:
-
In the Current Project view, on the Project Terminology tab, click Create Local.
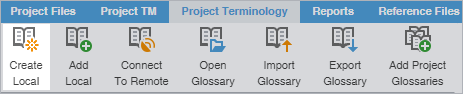
-
On the Create Glossary dialog, enter the glossary information.
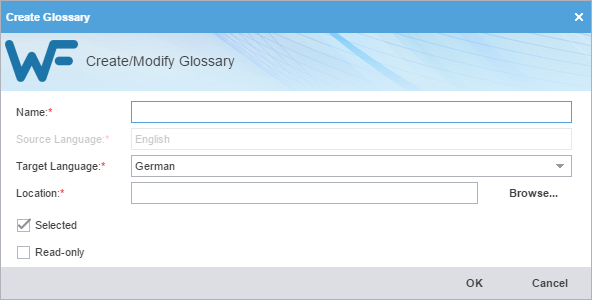
Required fields are marked with a red asterisk.
Field
Action
Name
Enter a unique name for the glossary.
Source Language
Do nothing, since the source language auto-populates.
Target Language
Select a language from the target languages available for your project in drop-down list.
Location
Browse and select the folder location for the new glossary.
Selected
(Optional) Select to use the current local glossary for the project.
Read Only
(Optional) Select to leverage the glossary without updating it with new terms.
Add a local glossary
You can only add glossaries created by Wordfast Pro 4 or 5. For glossaries from Wordfast Classic or Wordfast Pro 3, use the Import Glossary action. Refer to Import a local glossary.
To add a local glossary:
-
In the Current Project view, on the Project Terminology tab, select Add Local.
Add project glossaries
Some projects may use multiple local and remote glossaries. In such instances, you can add all of the glossaries from a previous project with a single Add Project Glossaries action.
To add project glossaries:
-
In the Current Project view, on the Project Terminology tab, select Add Project Glossaries.
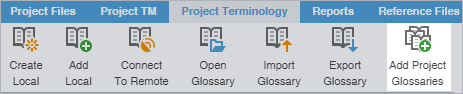
-
On the Add Project Glossaries dialog, enter the project glossaries information.
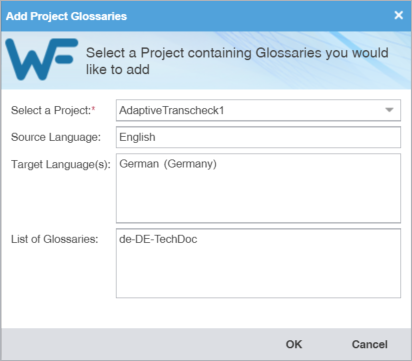
Field
Action
Select a Project
Select a project name from the drop-down list.
Source Language
Leave the auto-populated source language, based on the project.
Target Language(s)
Leave the auto-populated target languages, based on the project.
List of Glossaries
Review the list of glossaries associated with that project.
Connect to a remote glossary
You can connect to a glossary residing on another server, including a hosted service, such as Wordfast Anywhere (WFA).
|
WFA allows translators to connect to a shared server and interact with a private, remote translation memory (TM) and glossary. |
To connect to a remote glossary:
-
On the Project Terminology tab, click Connect To Remote.

-
(Optional) Add a Term Manager (TMGR) Server on the TMGR Server tab and complete the required fields.
Required fields are marked with a red asterisk.
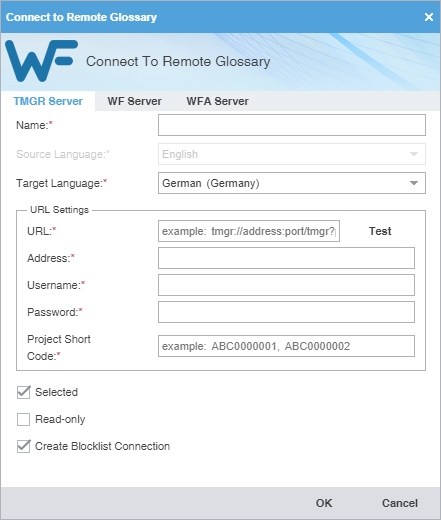
Field or Option
Action
Name
Enter a unique name for the glossary. The name can be automatically populated from the URL String for remote glossary connections.
Target Language
Select a language from the drop-down list. This list is constrained by the available target languages for your project.
URL
Enter the remote glossary URL using the following format:
tmgrs://address:port/TMGR?.The remaining URL Settings automatically populate when you enter the URL string. This includes the username, password, and project short code. The name can also be automatically populated from the URL String for remote glossary connections.
Click Test to validate the connection.
Selected
(Optional) Select to use the current glossary for the project.
Read-only
(Optional) Select to leverage the glossary without updating new terms.
Create Blocklist Connection
(Optional) Select to connect to an available blocklist already in TMGR.
-
(Optional) Add a WF Server on the WF Server tab and complete the required fields.
Required fields are marked with a red asterisk.
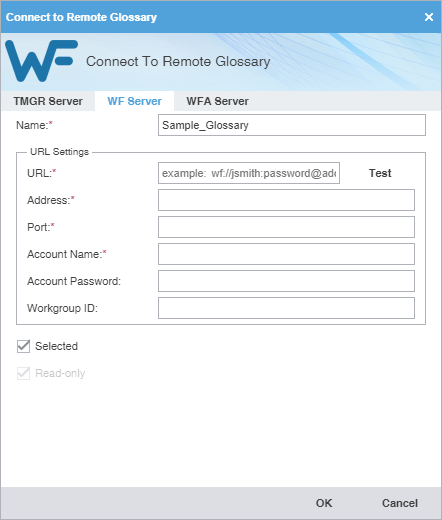
Field or Option
Action
Name
Enter a unique name for the glossary. The name can be automatically populated from the URL String for remote glossary connections.
URL
Enter the remote glossary URL using the following format:
wf://jsmith:password@address:port/tmgr?. The remaining URL Settings automatically populate when you enter the URL string. Click Test to validate the connection. The name can be automatically populated from the URL String for remote glossary connections.Address
Enter the address associated with the URL.
Port
Enter the port associated with the URL.
Account Name
Enter the username associated with the URL sign in.
Account Password
(Optional) Enter the password associated with the username.
Workgroup ID
(Optional) Enter the workgroup ID for the project.
Selected
(Optional) Select to use the current glossary for the project.
Read-only
(Optional) Select to leverage the glossary without updating new terms.
-
(Optional) Add a WFA Server on the WFA Server tab and complete the required fields.
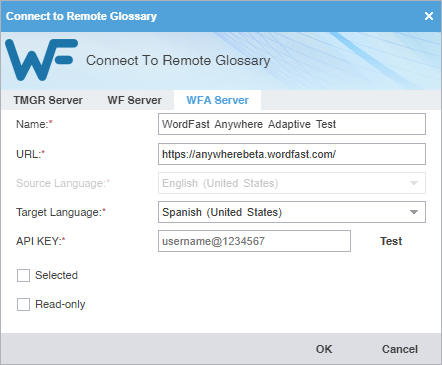
Field or Option
Action
Name
Enter a unique name for the glossary.
URL
WFA server Glossaries URL with default URL set to: https://anywherebeta.wordfast.com/
Target Language
Select a language from the drop-down list.
This list is constrained by the available target languages for your project.
API KEY
Enter the API key you obtain from WFA.
-
Sign in to your WFA account at
https://www.wordfast.com/myaccount. -
Click on TMs & Glossaries, then Setup.
-
On the TMs and glossaries management dialog, select a glossary.
-
Click Manage Sharing.
-
On the TMs and glossaries shares dialog, click on the API key and copy the text string.
-
Paste the API key into the Connect to Remote Glossary dialog on the WFA Server tab using the following format:
username@1234567, then click Test to validate the connection.
Selected
(Optional) Select to use the current glossary for the project.
Read-only
(Optional) Select to leverage the glossary without updating new terms.
-
Open a remote glossary
You can open and view remote glossary entries at any time after a glossary is connected.
|
You can only view the terms in a remote glossary. You cannot edit the glossary. |
To open a remote glossary from the TXLF Editor view:
-
In the TXLF Editor view, click Open Glossary on the Terminology tab, or click the Open Glossary icon
 on the Terminology pane.
The remote glossary will open in your default browser.
-
(Optional) If you are connected to multiple remote glossaries, clicking Open Glossary
or the Terminology List button (from the Terminology tab) opens the Project Glossaries dialog; do one of the following:
-
Click a remote glossary location link.
-
Select a remote glossary, then click Open.
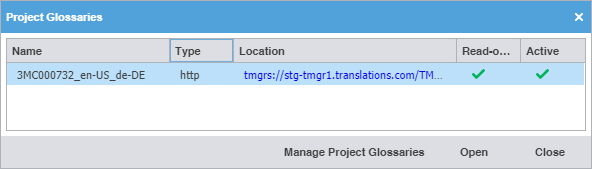
-
Open and edit a local glossary
You can open and edit local glossary entries at any time after glossary creation.
To open and edit a local glossary:
-
In the Current Project view, on the Project Terminology tab, select a local glossary, and select Open Glossary.
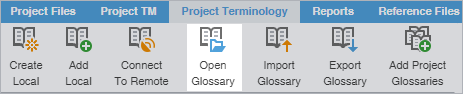
-
In the Glossary Editor, view the terms for both source and target languages. You can also filter, add, remove,
and update terms.
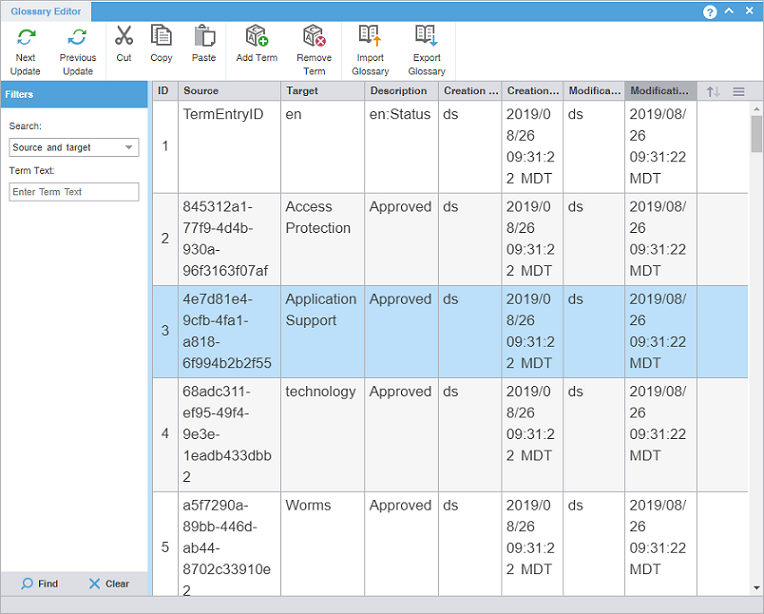
-
(Optional) To search for source or target terms, enter your search criteria in the
appropriate fields in the Filters sidebar, then select Find.
You can make your filtered search case-sensitive or specify an exact match, then filter further by creator, user, and modification date.
Import a local glossary
To exchange glossaries with other translators, save the exported glossary to a local drive, then use the Import Glossary action to import it to your project.
|
To exchange glossaries among projects on your local drive, use the Add Project Glossaries action. |
To import a local glossary:
-
In the Current Project view, on the Project Terminology tab, select Import Glossary.
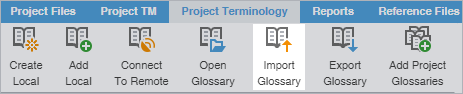
-
On the Import Glossary dialog, select the import File Type from the drop-down list.
Required fields are marked with a red asterisk.
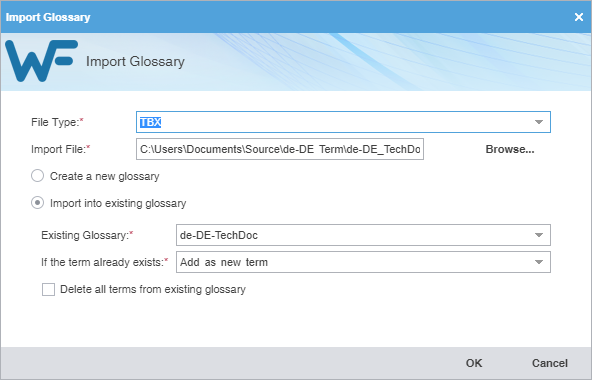
Field
Action
File Type
Select a file format for importing raw text files.
-
Term Base eXchange (TBX) — Use with other CAT tool glossaries
-
Tab delimited text file (TXT) — Use with Wordfast Classic and Wordfast Pro glossaries
Import File
Select Browse to locate and select an Import File.
Create a new glossary
Select to use the imported glossary to create a new glossary rather than add terms to an existing glossary.
Import into existing glossary
Select to use the imported glossary to add to the selected glossary.
Existing Glossary
Select from the drop-down list to append the imported glossary to an existing glossary file.
If term already exists
Select from the drop-down list to import the term into an existing glossary file.
-
Add as a new term — Add the term to the existing glossary file.
-
Do not overwrite — Ignore the term and retain the term already in the glossary file.
-
Overwrite existing term — Use the new term to replace the term already in the glossary file.
Delete all terms from existing glossary
Select to delete the existing term and replace it with the new glossary term.
-
Export a local glossary
To exchange glossaries with other translators, use the Export Glossary action and save it to a local drive, then send it to another translator to import to their project.
|
To exchange glossaries among projects on your local drive, use the Add Project Glossaries action. |
To export a local glossary:
-
In the Current Project view, on the Project Terminology tab, select a glossary and select Export Glossary.
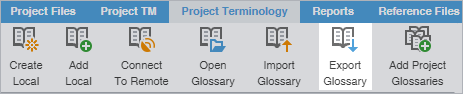
-
On the Export Glossary dialog, select a glossary from the drop-down list.
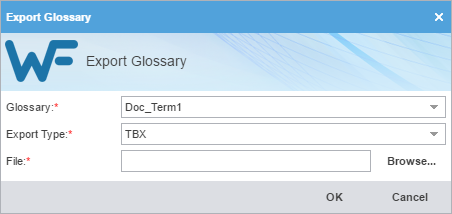
Create a local blocklist
You can create a blocklist for your project on your local computer.
To create a local blocklist:
-
In the Current Project view, on the Project Terminology tab, select Create Local in the Blocklist group.

-
On the Create Blocklist dialog, enter the required blocklist information.
Required fields are marked with a red asterisk.
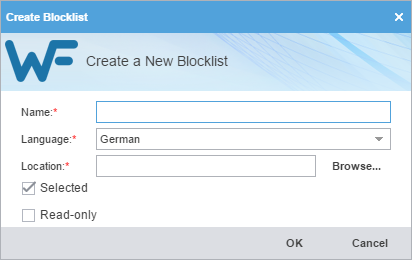
Field
Action
Name
Enter a unique blocklist name that includes the client or organization name and the blocklist target language for easy identification.
Language
Select the blocklist's target language, which is limited to languages configured in the project.
Location
Select the destination for the new blocklist.
Selected
(Optional) Select to use the current blocklist for the project.
Read-Only
(Optional) Select to leverage the blocklist without updating it with the new translation.
Add a local blocklist
Use a local blocklist already created on your computer when you want to leverage a translation blocklist, but do not want to collaborate with other users. You can add a local blocklist to your project at the time of creation or as a separate action.
To add a local blocklist:
-
In the Current Project view, on the Project Terminology tab, select Add Local in the Blocklist group.

Connect to a remote blocklist
You can connect to one or more blocklists on another computer or server.
To connect to a remote blocklist:
-
In the Current Project view, on the Project Terminology tab, click Connect To Remote.

-
On the Connect to Remote Blocklist dialog, enter the required information, based on your server options.
Required fields are marked with a red asterisk.
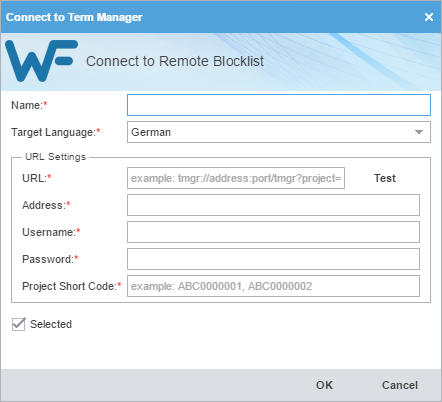
Field or Option
Action
Name
Enter a unique name for the blocklist.
Target Language
Select a target language from the drop-down list.
URL
Enter the remote TMGR URL using the following format:
tmgrs://address:port/TMS?. The remaining URL Settings automatically populate when you enter the URL string. Click Test to validate the connection.Address
Enter the remote address.
Username
Enter the username associated with the URL sign in.
Password
Enter the password associated with the username.
Project Short Code
Enter the short code for the project, such as
ABC0000001.Selected
(Optional) Select to use the current blocklist for the project.
Open and edit a local blocklist
You can open and edit local blocklist entries at any time after blocklist creation.
|
You cannot open a remote blocklist in Wordfast Pro. |
To open and edit a local blocklist:
-
In the Current Project view, on the Project Terminology tab, select a local blocklist, and select Open Blocklist.

-
On the Blocklist Editor tab, view the blocklist terms for both source and target languages. You can also
filter, add, remove, and update terms.
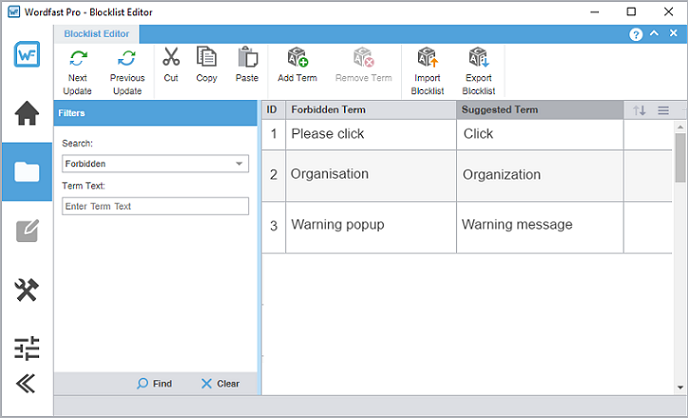
-
(Optional) To search for source or target blocklist terms, enter your search criteria
in the appropriate fields in the Filters sidebar, then select Find.
You can make your filtered search case-sensitive or specify an exact match, then filter further by creator, user, and modification date.
Import a local blocklist
To use a local blocklist from another source, use the Import Blocklist action.
To import a local blocklist:
-
In the Current Project view, on the Project Terminology tab, select Import Blocklist.

-
On the Import Blocklist dialog, select the import File Type from the drop-down list.
Required fields are marked with a red asterisk.
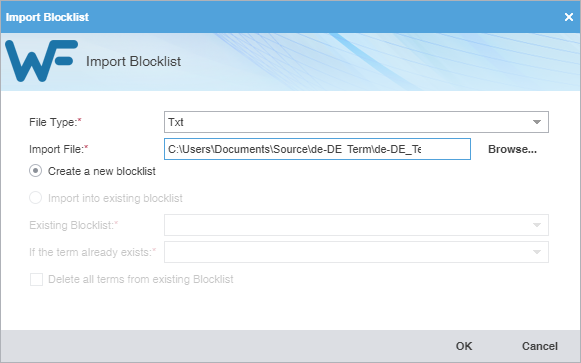
Field
Action
File Type
Select TXT as the file format for importing raw text files.
Import File
Select Browse to locate and select an Import File.
Create a new blocklist
Select to use the imported blocklist to create a new blocklist, rather than add terms to an existing blocklist.
Import into existing blocklist
Select to use the imported blocklist to add to the selected blocklist.
Existing Blocklist
Select from the drop-down list to append the imported blocklist to an existing blocklist file.
If term already exists
Select from the drop-down list to import the term into an existing blocklist file.
-
Add as a new term — Add the term to the existing blocklist file.
-
Do not overwrite — Ignore the term and retain the term already in the blocklist file.
-
Overwrite existing term — Use the new term to replace the term already in the blocklist file.
Delete all terms from existing Blocklist
Select to delete the existing term and replace it with the new blocklist term.
-
Export a local blocklist
To share a local blocklist with another linguist, use the Export Blocklist action.
To export a local blocklist:
-
Select Export Blocklist on the Project Terminology tab.

-
On the Export Blocklist dialog, choose a blocklist name, export type, and folder location for the blocklist
export file.
Required fields are marked with a red asterisk.
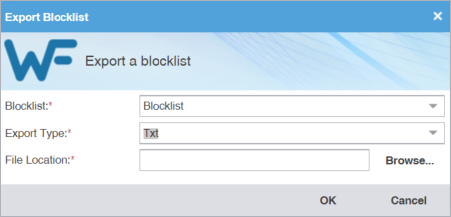
Blocklist
Select a blocklist from the drop-down list.
Export Type
Select the export file type from the drop-down list.
File Location
Browse and select the folder location for the export file.
Modify a glossary or blocklist
To modify a glossary or blocklist:
-
Select Modify.

-
On the Create Glossary dialog, modify the details as required. Based on your selection, other fields auto-populate.
Required fields are marked with a red asterisk.
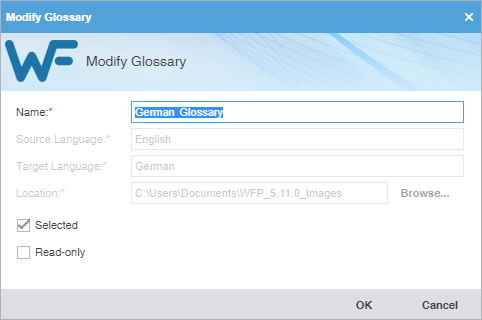
Name
Modify the name of the current glossary or blocklist.
Selected
(Optional) Select to use the current glossary or blocklist for modification.
Read Only
(Optional) Select to leverage the glossary or blocklist without updating it with the new translation.
Remove a glossary or blocklist
When you remove a glossary or blocklist from a project, the glossary or blocklist file remains in the glossary or blocklist folder on your computer. You can add it again with the Add Local or Connect to Remote action.
To remove a glossary or blocklist:
-
Select Remove.

A warning message asks you to agree to the removal.
Monitor reports
Use the Reports tab to open and to export auto-generated analysis and cleanup reports to .CSV, .HTML, .XLS, and .PDF formats.
Open a report
Use the Open Report action to open and view an auto-generated report.
To open a report:
-
Double-click the report file name.
Export a report
You can export an auto-generated report to a CSV, HTML, XLS, or PDF file format before you view it.
To export a report:
-
Select a format from the Export drop-down list.

Manage project reference files
You can include reference files in a project to provide context. Typical reference files are additional instructions, illustrations, workflow diagrams, certifications, or any file that might aid translators and reviewers. Reference files remain untranslated.
|
Users cannot modify reference files once you attach them to the project. |
Add reference files
To add reference files:
-
In the Current Project view, on the Reference Files tab, select Add Files.

Open a reference file
To open a reference file:
-
Select Open File.

The selected file is opened.
View submission instructions
Submitters can include instructions as part of the Package files imported into Wordfast Pro.
To view instructions:
-
On the Reference Files tab, select Show Instructions.

Remove a reference file
You can remove a reference file from a project, but the file remains on your local computer.
|
To add a removed reference file, use the Add Files action on the Reference Files tab. |
To remove a reference file:
-
Select Remove File(s).

-
On the Remove dialog, select one of the available buttons.
Remove from the list only
Removes the reference file from the files list, but retains the reference files resources in the project folder on your computer
Remove from the list and move the following resources to Archive folder
Removes the reference file from the files list and moves them to the archive folder inside the project folder on your local computer
Use quick tools
You can use Quick Tools to create and work with files outside of projects. Typically, Project Managers use Quick Tools before cleaning up and sending files to translation.
|
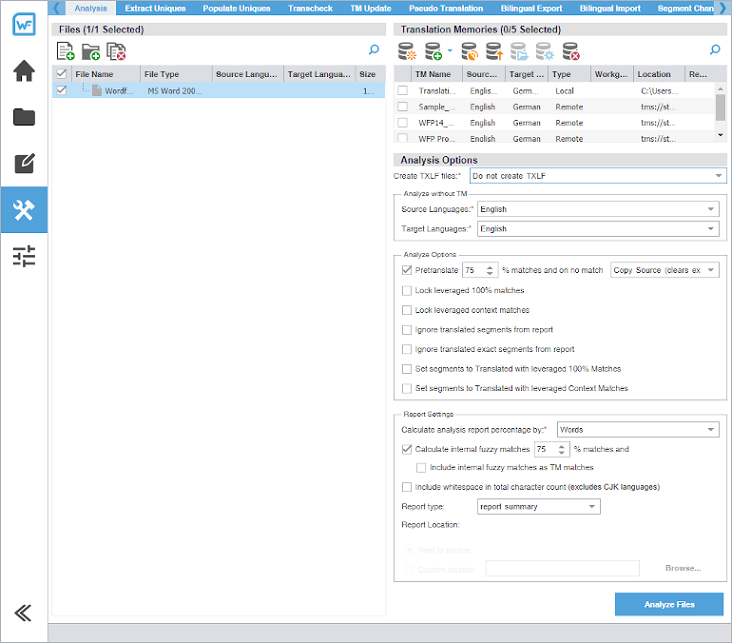
Analysis
You can use actions on the Analysis tab to create TXLF files or assess potential translation memory (TM) matches and repetitions for selected source files.
Analyze without using the TM panel is a quick way to obtain the word count of the files before TM leveraging.
|
You can pre-translate target segments using your TM and machine translation on No Match. You can also select Maintain existing target (if present) to pre-translate only blank target segments and preserve any existing translations in TXLF target segments with no TM match.
To analyze files:
-
Select the Analysis tab, if it is not already selected.
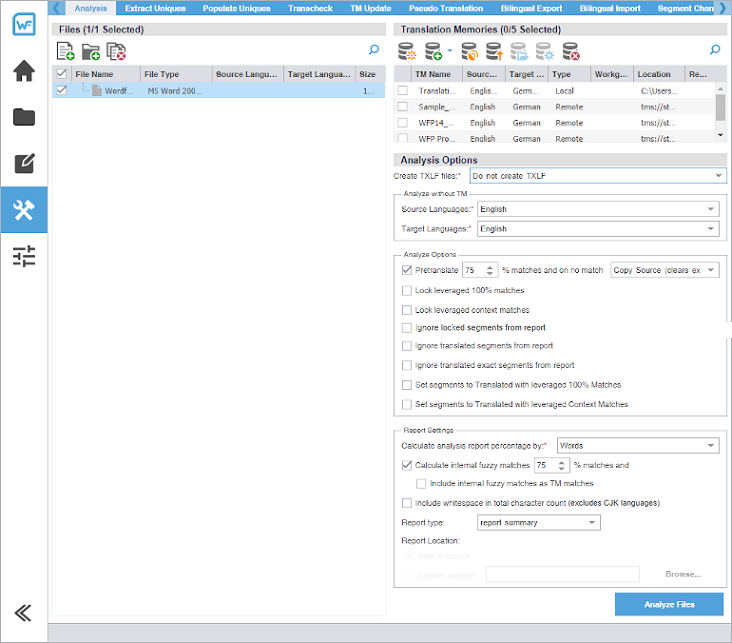
-
On the Files panel, choose one of the following actions:
To search the File Name column for a particular string, enter the search string in the available search field next to
on the Files panel.
Add Files
Select to browse and select a file from a folder.
Add Folder
Select to browse and select a folder and all its files.
Remove Files
Select to remove a folder and all its files or all selected files from the list.
-
(Optional) On the Translation Memories panel, select one or more TMs from the list of available TMs, then choose one of
the following actions:
-
To search the TM Name column for a particular string, enter the search string in the available search field next to
on the Translation Memories panel.
-
If you do not select a TM, the analysis report displays the word count without TM leverage and the Language Selection option is not available.
Item
Action
Create Local
Select to open the Create TM dialog and create a local TM for quick, local access. Refer to Create a local TM.
Add Local TM
Select, then select a local TM or a project TM from the project list from the drop-down list. Refer to Add a local TM to a project and Add project TMs.
Connect to Remote
Select to open the Connect to Remote TM dialog and complete the appropriate information to connect to a remote TM for the project. Refer to Connect to a remote TM for entering information into the TM Server and WF Server tabs. The symbolic name can be automatically populated from the URL String for remote TM connections.
Import TM
Select to open the Import Translation Memory dialog and complete the appropriate information to import a TM for the project. Refer to Import a local TM.
Open TM
Select to open and edit the selected TM. Refer to Open and edit a local TM.
Modify TM
Depending on the TM you select, select to open either the Modify a Local TM dialog or the Modify a Remote TM dialog, then complete the appropriate information to rename, write-protect, or change the priority of a TM for the project. Refer to Connect to a remote glossary.
Remove TM
Select to remove the selected TM from the project list.
-
-
For Analyze without TM, select the appropriate languages from the Source Languages and Target Languages drop-down list.
The options are not available for TXLF source files, or for non-TXLF source files when you also select a TM.
-
(Optional) On the Progress bar dialog, you can select Always run in background to preserve the background batch action for future analysis actions, then select
Run in Background.
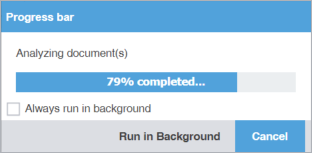
-
If you chose to run Analyze Files in the background, you can monitor its progress.

If you choose to run more than one batch action in the background, each action will have its own progress bar.
Extract uniques
You can use actions on the Extract Uniques tab to remove frequently occurring segments, control exclusions for matches, and create a .TXLF file of these unique segments before sending it out for translation. It uses the action for each file you selected in the TXLF Files panel.
You can set the number of occurrences of a segment to be extracted to two or higher to create a file containing only repeated segments. If you exclude context TM matches, 100% TM matches, and locked segments from the extract, it further reduces the number of extracted segments.
To extract unique segments:
-
In the Quick Tools view, select the Extract Uniques tab, if it is not already selected.
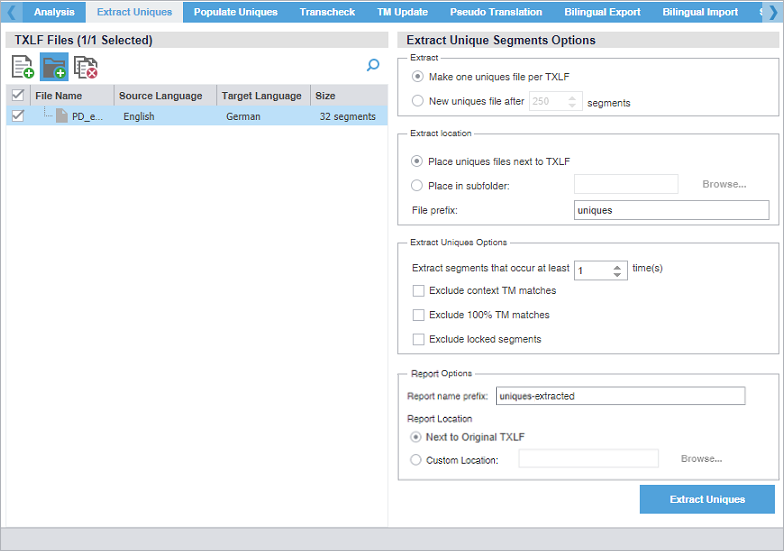
-
On the TXLF Files panel, choose one of the following actions:
To search the File Name column for a particular string, enter the search string in the available search field next to
on the TXLF Files panel.
Add Files
Select to browse and select a file from a folder.
Add Folder
Select to browse and select a folder and all its files.
Remove Files
Select to remove a folder and all its files or all selected files from the list.
-
(Optional) Select an Extract Location, by choosing one of the following actions:
-
Select Place unique segments next to TXLF.
-
Select Place in subfolder, then browse to and select a location on your computer, then use the default uniques prefix or create your own.
-
If you changed the uniques prefix, it will have the prefix you designate at the location you select.
-
-
(Optional) On the Progress bar dialog, you can select Always run in background to preserve the background batch action for future analysis actions, then select
Run in Background.
-
If you chose to run Extract Uniques in the background, you can monitor its progress.
If you choose to run more than one batch action in the background, each action will have its own progress bar.
After successful completion, the TXLF files containing unique segments are saved to your computer at the selected location with a dialog box listing the number of extracted segments. If a file did not have any unique segments, no file is created.
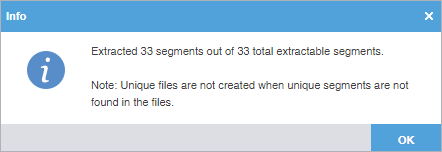
Populate uniques
You can use actions on the Populate Uniques tab to add the target translation from the translated uniques file back into the original TXLF file. After the uniques population, it creates a Populate Unique Segments report that identifies all related segment errors. This is helpful when determining why certain target segments did not properly populate.
To populate unique segments:
-
In the Quick Tools view, select the Populate Uniques tab, if it is not already selected.
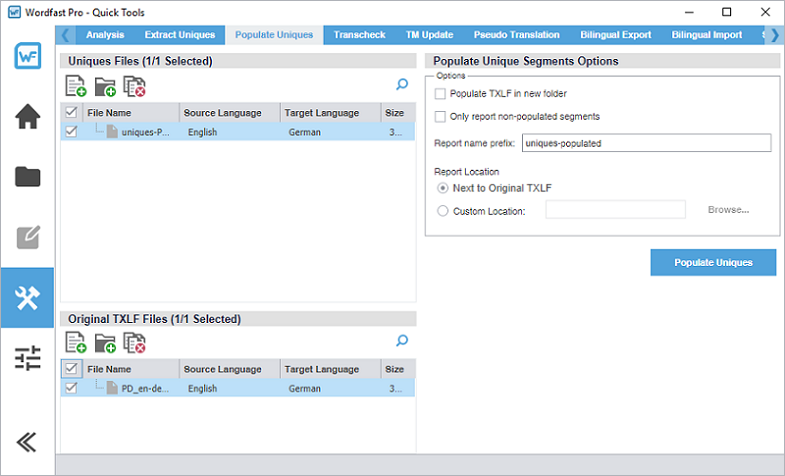
-
On the Uniques Files and Original TXLF Files panels, choose one of the following actions to select a file or files to receive
unique segments that have a high frequency of occurrence as an import from the original
TXLF files you selected.
-
To search the File Name column for a particular string, enter the search string in the available search field next to
on the Uniques Files and Original TXLF Files panels.
-
If you do not choose a new folder for this action, the populated files are placed in a separate folder.
Add Files
Select to browse and select a file from a folder.
Add Folder
Select to browse and select a folder and all its files.
Remove Files
Select to remove a folder and all its files or all selected files from the list.
-
Quick tools Transcheck
You can use Transcheck to scan translated content for non-linguistic errors such as missing tags, empty targets, numbers, and terminology within target segments. Using the Quick Tools Transcheck action is best for running on groups of files as a bulk batch.
|
If you have specific terms you want Transcheck to ignore, you can mark those segments for exclusion to reduce false positives during Transcheck error detection. |
To run Quick Tools Transcheck:
-
In the Quick Tools view, select the Transcheck tab, if it is not already selected.

-
On the TXLF Files panel, choose one of the following actions:
To search the File Name column for a particular string, select the search icon
on the TXLF Files panel and enter the search string in the available search field.
Add Files
Select to browse and select a file from a folder.
Add Folder
Select to browse and select a folder and all its files.
Remove Files
Select to remove a folder and all its files or all selected files from the list.
-
Select an action for the Glossary or Blocklist tabs.
To search the Glossary Name or Blocklist Name column for a particular string, select the search icon
on the Glossary or Blocklist panel and enter the search string in the available search field.
Option
Action
Create Local
Select to create a new glossary or blocklist and add it to the list of available ones.
Add Local
Select and choose from the drop-down list to add to a local or project glossary or blocklist.
Connect to Remote
Select to connect a remote glossary or blocklist to the project. Refer to Connect to a remote glossary for entering information into the TMGR Server and WF Server tabs. The symbolic name can be automatically populated from the URL String for remote glossary connections.
Import Glossary or Import Blocklist
Select to import .TBX or tab-delimited files to a glossary or blocklist assigned to the project.
Open
Select to open a glossary or blocklist in the Editor view.
Modify
Select to modify a glossary or blocklist assigned to the project.
Remove
Select to remove a glossary or blocklist assigned to the project.
-
On the Transcheck Options panel, select items within any of the major categories.
-
To search for an option, enter text in the search field above the options column list. To select all, select the checkbox, and to clear all options, deselect the checkbox. Use the Up or Down Arrow keys to move among the options, then the Spacebar to enable or disable.
-
The Sub-options panel to the right of the Transcheck Options panel contains any sub-options related to the selected category. Use the Tab key to enter and move among sub-options, then the Spacebar to enable or disable. To enter the Sub-options panel, press Tab. To exit the Sub-options panel, press Shift + Tab.
-
-
(Optional) On the Progress bar dialog, you can select Always run in background to preserve the background batch action for future analysis actions, then select
Run in Background.
-
If you chose to run Transcheck in the background, you can monitor its progress.
If you choose to run more than one batch action in the background, each action will have its own progress bar.
TM update
To clean up and convert bilingual .TXLF files to their original source format in the target language, use TM Update. Refer to Translate segments overview.
|
TM Update actions overwrite the translation memory (TM). |
To use TM Update:
-
Select the TM Update tab, if it is not already selected.
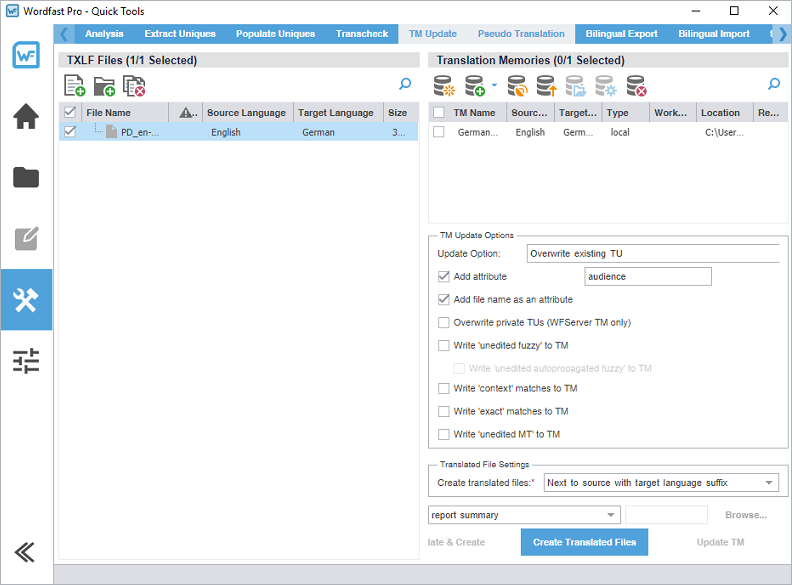
-
On the TXLF Files panel, choose one of the following actions:
To search the File Name column for a particular string, enter the search string in the available search field next to
on the TXLF Files panel.
Add Files
Select to browse and select a file from a folder.
Add Folder
Select to browse and select a folder and all its files.
Remove Files
Select to remove a folder and all its files or all selected files from the list.
-
On the Translation Memory panel, choose a TM or several TMs from the list, then choose one of the following
actions:
-
To search the TM Name column for a particular string, enter the search string in the available search field next to
on the Translation Memory panel.
-
To better understand context matches or the TM, refer to Leverage project TMs.
Item
Action
Create Local
Select to create a new TM and add it to the list of available TMs.
Add Local TM or Add Project TMs
Select and choose from the drop-down list to add to a local TM or to a project TM.
If you choose a project TM, you can only add a TM to a locale already assigned to the project.
Connect to Remote
Select to connect a remote TM to the project. Refer to Connect to a remote TM for entering information into the TM Server and WF Server tabs. The symbolic name can be automatically populated from the URL String for remote TM connections.
Import TM
Select to import .TMX or .TXT files to a TM assigned to the project.
Open TM
Select to open a TM in the TM Editor view.
Modify TM
Select to modify a TM assigned to the project.
Remove TM
Select to remove a TM assigned to the project.
-
-
(Optional) Configure the TM Update Options:
Use the search field next to a TM action to search that column above the search field location.
Item
Action
Update Option
Select one of the TM update options from the drop-down menu:
-
Append
-
Do not add to TM
-
Do not overwrite TU to retain existing TUs
-
Overwrite existing TU to overwrite existing translation units (TUs)
-
Overwrite if attributes are identical
Add attribute
Select to add an attribute to write to the TM for cleaned up segments.
Add file name as an attribute
Select to add the TXLF file name as an attribute to write to the TM for cleaned up segments.
Overwrite private TUs (WFServer TM only)
Select to replace existing private TUs with new ones. This requires a Cleanup password.
Write 'unedited fuzzy' to TM
Select to write fuzzy matches to the TM without user modification.
Write 'unedited autopropagated fuzzy' to TM
Select to write automatically inserted fuzzy matches to the TM without user modification.
Write 'context' matches to TM
Select to write context matches to the TM without user modification.
Write 'exact' matches to TM
Select to write exact matches to the TM without user modification.
Write 'unedited MT' to TM
Select to write machine translation to the TM without user modification.
-
-
(Optional) On the Progress Bar dialog, you can select Always run in the background to preserve the background batch action for future analysis actions, then select
Run in Background.
-
If you chose to run Update & Create in the background, you can monitor its progress.
If you choose to run more than one batch action in the background, each action will have its own progress bar.
The bilingual TXLF file is converted to its original source format in the target language.
Pseudo translation
Pseudo-translation simulates the entire translation process. This is particularly useful for several situations.
-
Use to verify successful completion of the extraction, translation, and creation of a translated file.
-
Use to identify any text expansion issues that might occur during translation.
-
Use to identify any font issues during creation of the translation file.
-
Use to identify any formatting or missing content issues.
You can copy the source content to the target content to preview translatable content for target languages and the complexity of associated formatting. This preview is particularly useful when content has accented characters and when the content is likely to expand during translation.
|
To pseudo-translate files:
-
In the Quick Tools view, select the Pseudo Translation tab, if it is not already selected.
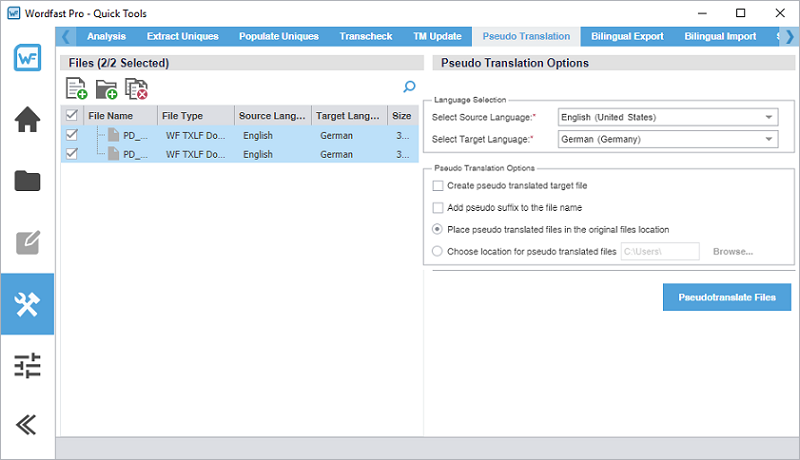
-
On the TXLF Files panel, choose one of the following actions:
To search the File Name column for a particular string, enter the search string in the available search field next to the Search icon
on the TXLF Files panel.
Add Files
Select to browse and select a file from a folder.
Add Folder
Select to browse and select a folder and all its files.
Remove File(s)
Select to remove a folder and all its files or all selected files from the list.
-
(Optional) On the Progress bar dialog, you can select Always run in background to preserve the background batch action for future analysis actions, then select
Run in Background.
-
If you chose to run Pseudotranslate Files in the background, you can monitor its progress.
If you choose to run more than one batch action in the background, each action will have its own progress bar.
The pseudo-translation is created and a successful completion message is displayed.
Quick tools bilingual export
Use Bilingual Export to export the TXLF file with highlighted glossary terms to a .DOC or .DOCX format for edit and translation of the content using Microsoft Word (Word).
|
You must not edit the exported table format. This includes merging or expanding segments and adding text outside of the target or notes column. Editing the exported table format will result in errors during bilingual import. |
To conduct a Quick Tools bilingual export:
-
In the Quick Tools view, select the Bilingual Export tab, if not already selected.
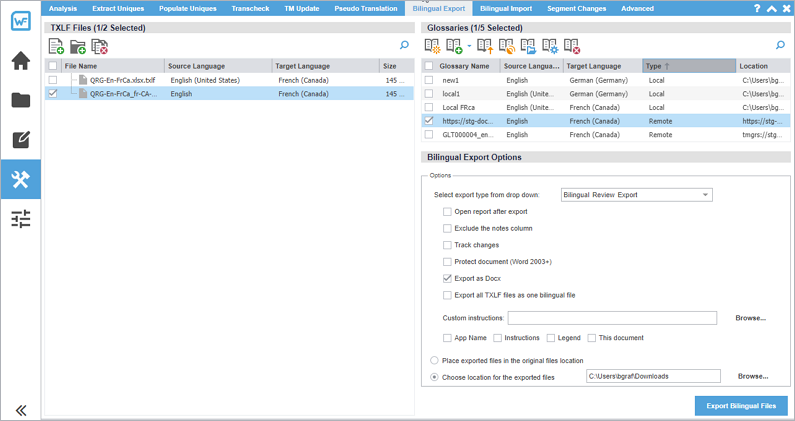
-
On the TXLF Files panel, choose one of the following actions:
To search the File Name column for a particular string, enter the search string in the available search field next to
on the TXLF Files panel.
Add Files
Select to browse and select a file from a folder.
Add Folder
Select to browse and select a folder and all its files.
Remove Files
Select to remove a folder and all its files, or all selected files from the list.
-
On the Glossaries panel, choose one of the following actions:To search the File Name column for a particular string, enter the search string in the available search field next to
on the Glossaries panel.
Item
Action
Create Local
Create a glossary on your local computer.
Add Local or Add Project Glossaries
Select and choose from the drop-down list to add to a local glossary or to a project glossary.
If you choose a project glossary, you can only add a glossary to a locale already assigned to the project.
Import Glossary
Select to import .TBX or tab-delimited files to a glossary assigned to the project.
Connect to Remote
Select to connect a remote glossary to the project. Refer to Connect to a remote glossary.
Open
Select to open a glossary in the Glossary Editor view.
Modify
Select to modify a glossary assigned to the project.
Remove
Select to remove a glossary assigned to the project.
-
(Optional) On the Progress bar dialog, you can select Always run in background to preserve the background batch action for future analysis actions, then select
Run in Background.
-
If you chose to run Export Bilingual Files in the background, you can monitor its progress.
If you choose to run more than one batch action in the background, each action will have its own progress bar.
Each exported document is saved to the specified folder on your local computer. The example does not include any custom content.

Quick tools bilingual import
Use Bilingual Import to re-import your translated or edited Microsoft Word (Word) bilingual export document.
Bilingual Import options allow you to open a report, accept tracked changes, and create a merged file from a translated Word document.
|
You must upload both the translated or edited bilingual Word document and the source TXLF file you used during export. |
|
Since imports overwrite content from the export, create a backup of the original TXLF file for reference. |
|
 is displayed. If the files are not paired,
  is displayed.
To conduct a Quick Tools bilingual import:
-
In the Quick Tools view, select the Bilingual Import tab, if not already selected.
-
On the Bilingual Files panel, choose one of the following actions:
To search the File Name column for a particular string, enter the search string in the available search field next to
on the Bilingual Files panel.
Add Files
Select to browse and select a TXLF file from a bilingual export folder, such as
Sample.txlf.doc, and add it to the Bilingual Files list.You must select the correct file format from the drop-down list. Select MS Word Document when uploading the bilingual Word document and WF TXLF Document when uploading the TXLF file.
Add Folder
Select to browse and select a folder and all its files from a bilingual export folder to add to the available TXLF Files list.
Remove Files
Select to remove a folder and all its files or all selected files from the list.
-
Select Import Bilingual Files.
Files excluded during export are ignored during import.
-
(Optional) On the Progress bar dialog, you can select Always run in background to preserve the background batch action for future analysis actions, then select
Run in Background.
-
If you chose to run Import Bilingual Files in the background, you can monitor its progress.
If you choose to run more than one batch action in the background, each action will have its own progress bar.
The translations and edits in the bilingual export Word document are imported into the specified TXLF file on your local computer.
The import overwrites the TXLF file content with the imported bilingual Word document content.
Segment changes
You can run a Segment Changes Report on one or more project files to view the history of changes to a segment. The report includes the segment ID, TM score, source and target content with the highlighted changes, username, time stamp, and translator notes. This is particularly useful in workflows that involve multiple people.
To generate a segment changes report:
-
In the Quick Tools view, select the Segment Changes tab, if it is not already selected.
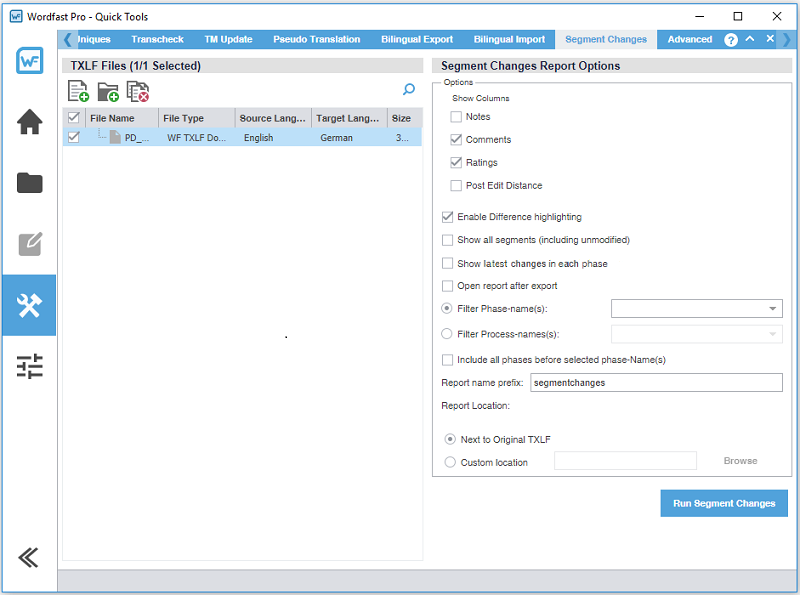
-
On the TXLF Files panel, choose one of the following actions:
To search the File Name column for a particular string, enter the search string in the available search field next to
on the TXLF Files panel.
Add Files
Select to browse and select a file from a folder.
Add Folder
Select to browse and select a folder and all its files.
Remove Files
Select to remove a folder and all its files, or all selected files from the list.
-
Select Run Segment Changes.
The Segment Changes Summary is displayed.
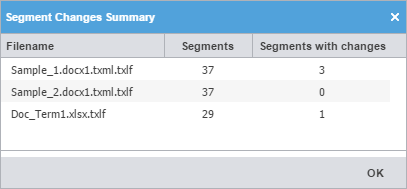
-
(Optional) Go to the designated location and view the Segment Changes Report.
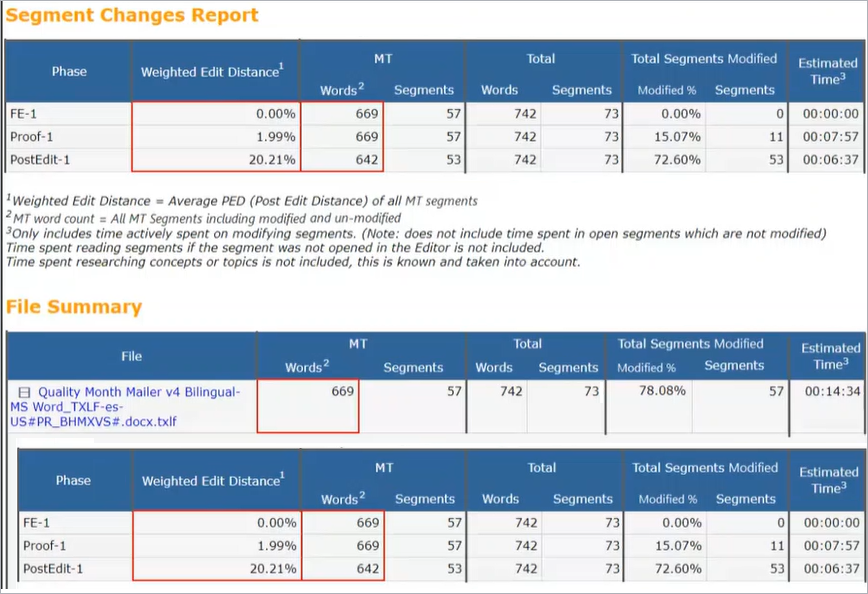
Advanced quick tools
The Advanced tab gives you access to several advanced features, each with its own independent action or set of actions.
Lock or unlock segments
You can quickly lock or unlock segments in the .TXLF files you select. You can lock 100% or context matches to prevent translators or editors from making changes to them.
To lock or unlock segments:
-
In the Quick Tools view, select the Advanced tab, if it is not already selected.

-
On the TXLF Files panel, choose one of the following actions:
To search the File Name column for a particular string, enter the search string in the available search field next to
on the TXLF Files panel.
Add Files
Select to browse and select a file from a folder.
Add Folder
Select to browse and select a folder and all its files.
Remove Files
Select to remove a folder and all its files, or all selected files from the list.
Swap the source and target
You can swap the source and target in translation files to create a back translation that validates the translated content.
To swap the source and target:
-
In the Quick Tools view, select the Advanced tab, if it is not already selected.

-
On the TXLF Files panel, choose one of the following actions:
To search the File Name column for a particular string, enter the search string in the available search field next to the Search icon
on the TXLF Files panel.
Add Files
Select to browse and select a file from a folder.
Add Folder
Select to browse and select a folder and all its files.
Remove Files
Select to remove a folder and all its files, or all selected files from the list.
Split or merge a TXLF file
You can split files to break a large file into smaller files. You can set a specific number of translation units (TUs), parts, or words the translated content for each file. For example, you can break a file of 1,000 TUs into four files of 250 TUs each. If there is a remainder, the last file contains the remnant.
You can use a file merge to either update the original file or create a new merged file.
With either option, you designate a specific location to split or merge the files to.
To split or merge a TXLF file:
-
In the Quick Tools view, select the Advanced tab, if it is not already selected.
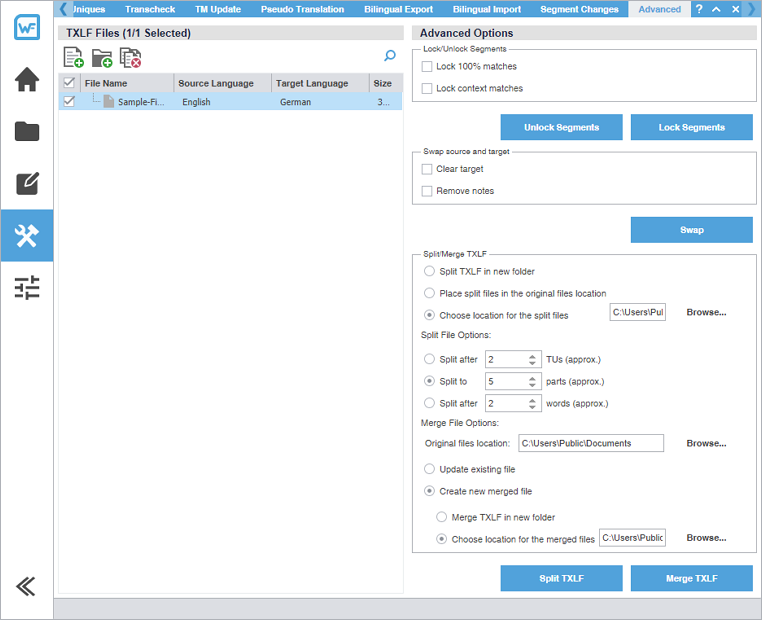
-
On the TXLF Files panel, choose one of the following actions:
To search the File Name column for a particular string, enter the search string in the available search field next to
on the TXLF Files panel.
Add Files
Select to browse and select a file from a folder.
Add Folder
Select to browse and select a folder and all its files.
Remove Files
Select to remove a folder and all its files, or all selected files from the list.
Configure preferences
Preference options control the functions available to you in the user interface. Configure preferences at either the project level or the file level.
-
General Preferences
Use these to configure the user interface and TXLF Editor view preferences.
-
Current Project Preferences
Use these to control settings unique to individual projects. Either you or your Project Manager can set project preferences.
New Project Preferences displays if a project is not opened in the Project List view.
-
User Preferences
Use these to manage your user preferences, including restoring them to the default state and exporting or importing them.
Configure color settings
The Colors preferences control color customization for specific types of content in TXLF Editor view.
|
When you change preferences from the default options, select OK to activate your selection. If you wish to return to the defaults, select Restore Defaults in Advanced Settings. |
To configure colors used in the translation table:
-
On the Sidebar, select the Preferences icon
 .
.
-
On the Preferences dialog, select Colors under General Preferences.

Configure general settings
General preferences link a specific username to project-related content changes.
To customize general settings:
-
On the Sidebar, select the Preferences icon .
-
On the Preferences dialog, select General under General Preferences.
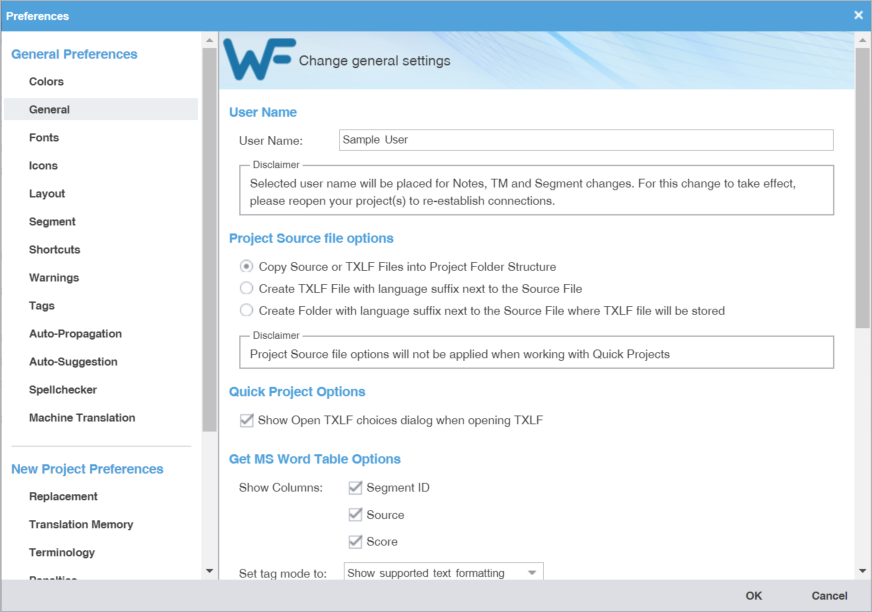
-
Select one of the source file locations.
If the source file is a TXLF file, a copy is saved.
Option
Action
Copy Source or TXLF Files into Project Folder Structure
Select to create a sub-folder within the project language folder for storing source files.
Create TXLF File with language suffix next to the Source File
Select to create a TXLF copy of the source file at the same location with the target language code as a suffix.
Create Folder with language suffix next to the Source File where TXLF file will be stored
Select to create a TXLF copy of the source file in a source file sub-folder using the target language code as a suffix.
Configure fonts
Fonts preferences control customization of font type and size for application-wide functions, such as notes.
To configure fonts:
-
On the Sidebar, select the Preferences icon
 .
.
-
Select Fonts under General Preferences.
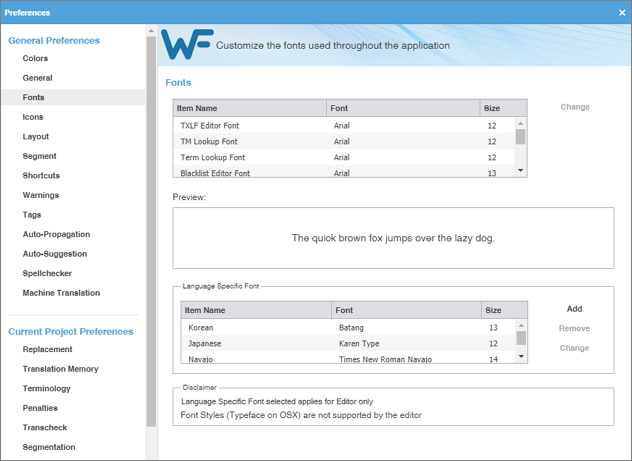
Configure icon settings
Icons preferences control the relative size of the icon and include or exclude the icon title.
To configure icon settings:
-
On the Sidebar, select the Preferences icon .
-
On the Preferences dialog, select Icons under General Preferences.
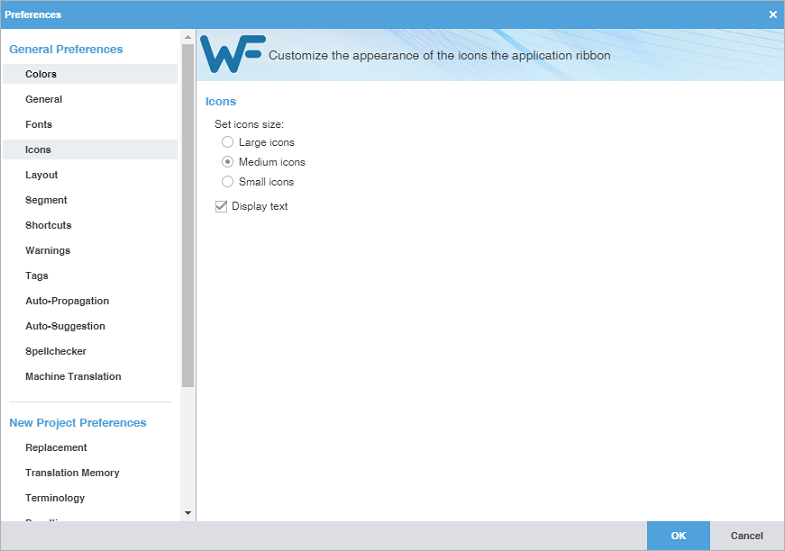
Configure layout options
Layout preferences control the arrangement of user interface views.
To configure layout options:
-
On the Sidebar, select the Preferences icon
 .
.
-
Select Layout under General Preferences.
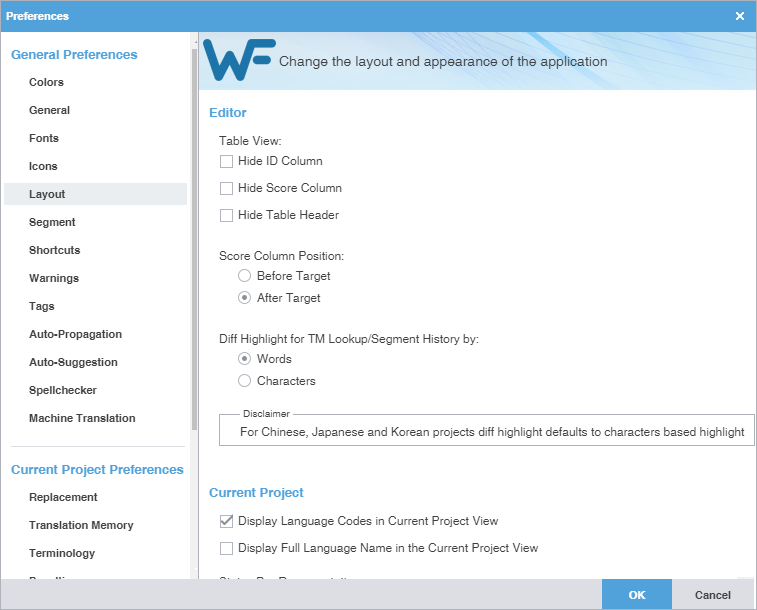
Configure segment actions
Segment Actions preferences control segment action behaviors, such as Smart Quotes or Smart Punctuation.
To configure segment actions:
-
On the Sidebar, select the Preferences icon .
-
On the Preferences dialog, select Segment under General Preferences.
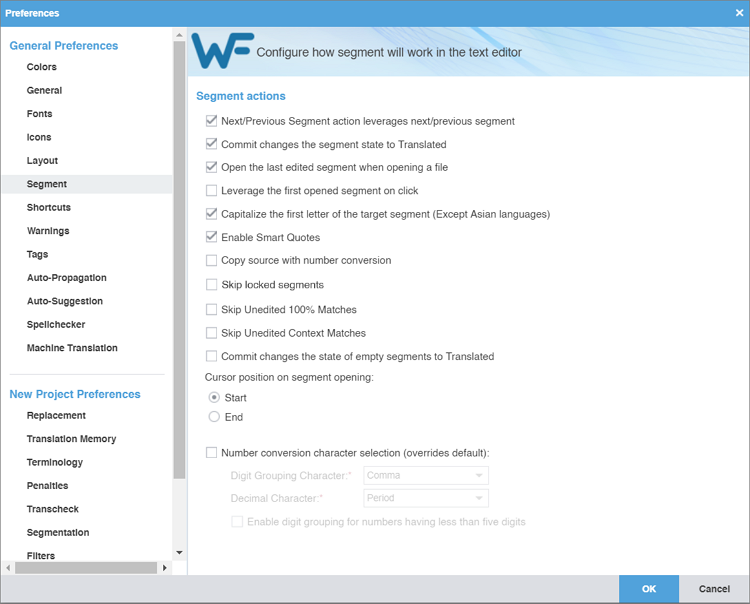
Customize keyboard shortcuts
Shortcuts preferences control keyboard shortcuts for the commands that you frequently use.
To customize keyboard shortcuts:
-
On the Sidebar, select the Preferences icon .
-
On the Preferences dialog, select Shortcuts under General Preferences.
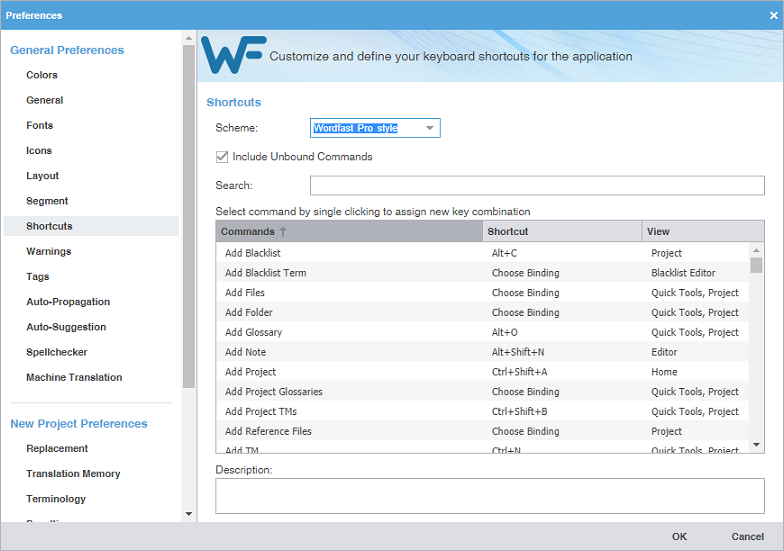
-
Select a Command from the command list and enter a new sequence of keys in the Shortcut column, then select OK.
You cannot change the standard Windows keyboard shortcuts such as copy, paste, bold, or italic.
When changing or creating new shortcut key sequences, the sequence must either begin with a Ctrl, Alt, or Shift, must use a function key, or use a combination of these.
Configure warning messages
Warnings preferences control the type of warning notifications you receive.
To configure warning messages:
-
On the Sidebar, select the Preferences icon .
-
On the Preferences dialog, select Warnings under General Preferences.
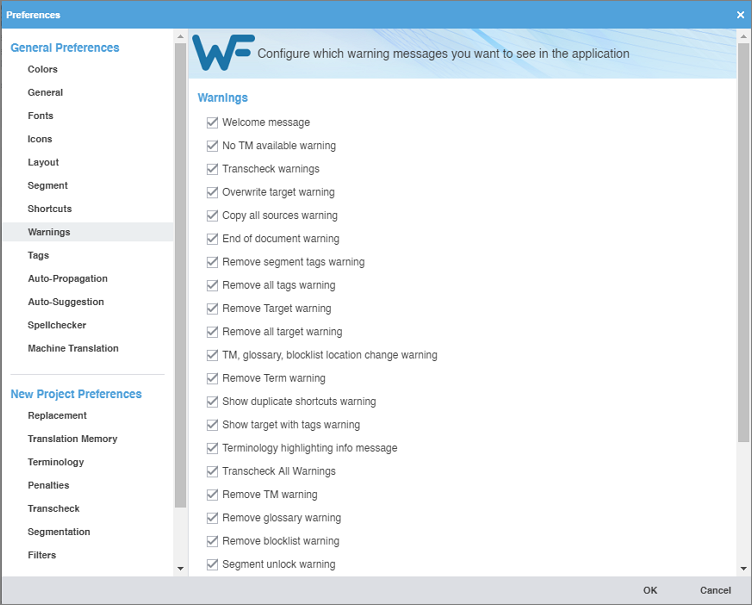
Configure tags and formatting
Tags and Formatting preferences control the tag mode, representation, and font size in the TXLF Editor view.
To configure tag and formatting options:
-
On the Sidebar, select the Preferences icon .
-
On the Preferences dialog, select Tags under General Preferences.

Configure auto-propagation
Auto-Propagation preferences control the automatic update of TXLF segments with specific segment status and scores.
To configure auto-propagation:
-
On the Sidebar, select the Preferences icon .
-
On the Preferences dialog, select Auto-Propagation under General Preferences.
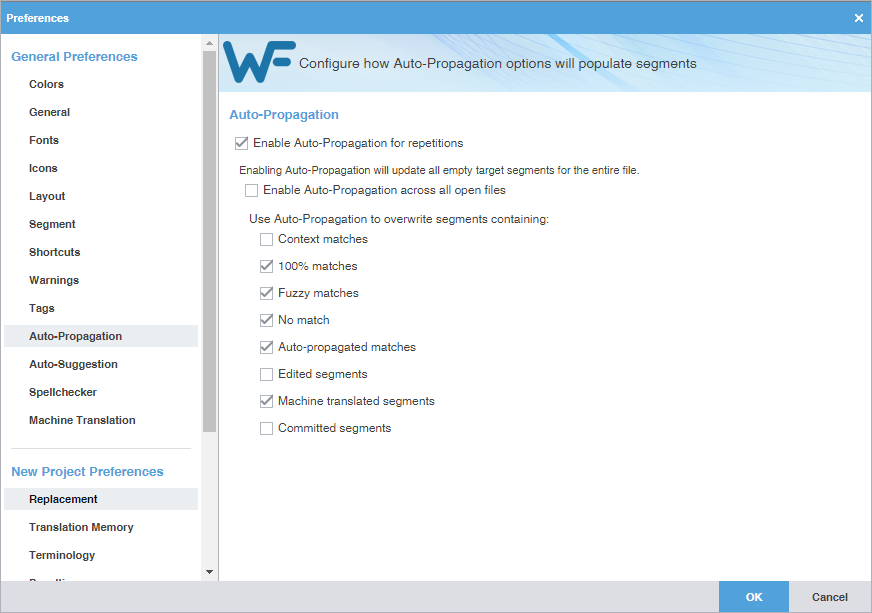
Configure auto-suggestion
Auto-Suggestion preferences control automatic recommendations for source content, such as numbers, URLs, and proper names. It can also recommend terms for the glossary, Translation Memory (TM) matches, and machine translation (MT) matches.
To configure auto-suggestion:
-
On the Sidebar, select the Preferences icon .
-
On the Preferences dialog, select Auto-Suggestion under General Preferences.
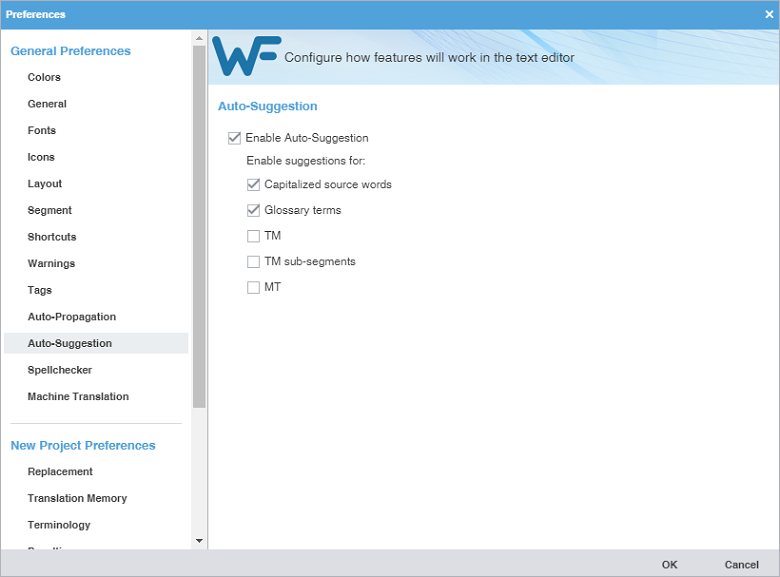
Configure and enable spellchecker
Spellchecker preferences control the interaction between the application and Microsoft Office, Hunspell, or Bing. The Hunspell option requires software installation on your computer.
To configure and enable Spellchecker:
-
On the Sidebar, select the Preferences icon .
-
Select Spellchecker in the General Preferences group.
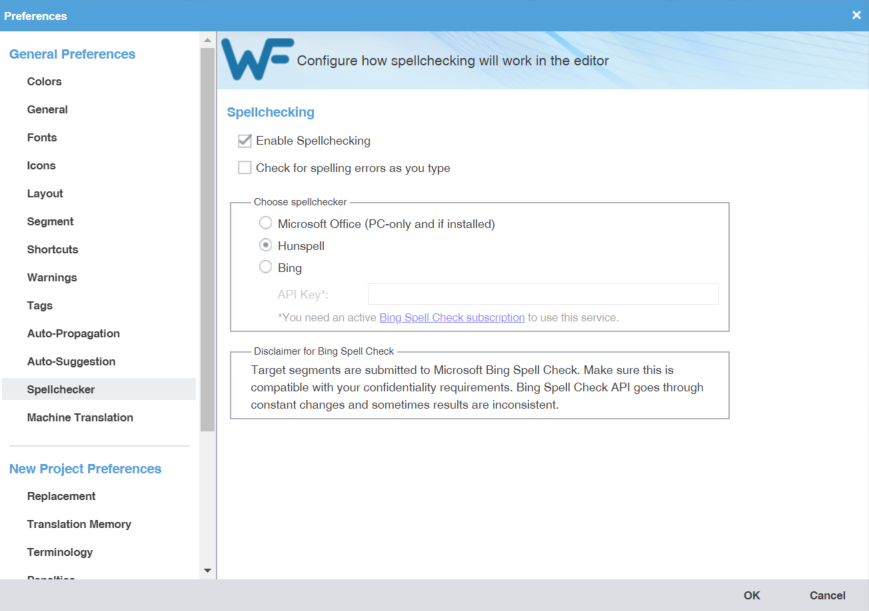
-
Select Enable Spellchecking to activate the spellchecker in TXLF Editor. This option is selected by default, and makes the Spellcheck File option available on the Review tab in TXLF Editor. You need to configure the spellchecker for Microsoft Office, Hunspell, or Bing language
engines. Hunspell is selected by default, and comes with several languages already
preset: English, German, French, and Spanish.
Clear Enable Spellchecking to disable the spellchecker. Disabling the spellchecker clears all spellchecker preferences. You must reconfigure your preferences the next time you enable Spellchecker.
Bing requires a paid subscription.
To install additional Hunspell languages, select
on the Sidebar, then select Update Wordfast Pro. Select Check For Updates. Select the languages to update, then select Update. You will then need to restart the application. Hunspell is available for the following
languages.
Language
Code
Language
Code
Arabic
AR
Korean (South Korea)
KO-KR
Basque (Basque)
EU-ES
Latvian (Latvia)
LV-LV
Bosnian (Bosnia)
BS-BA
Lithuanian (Lithuania)
LT-LT
Bulgarian (Bulgaria)
BG-BG
Malaysian (Malaysia)
MS-MY
Catalan (Catalan)
CA-ES
Norwegian (Bokmål Norway)
NB-NO
Croatian (Croatia)
HR-HR
Norwegian (Nynorsk Norway)
NN-NO
Czech (Czech Republic)
CS-CZ
Polish (Poland)
PL-PL
Danish (Denmark)
DA-DK
Portuguese (Brazil)
PT-BR
Dutch (Netherlands)
NL-NL
Portuguese (Portugal)
PT-PT
English (Canada)
EN-CA
Romanian (Romania)
RO-RO
English (United Kingdom)
EN-GB
Russian (Russia)
RU-RU
English (United States)
EN-US
Scottish Gaelic (United Kingdom)
GD-GB
Estonian (Estonia)
ET-EE
Serbian (Serbia)
SR-RS
Farsi (Iran)
FA-IR
Slovak (Slovakia)
SK-SK
Finnish (Finland)
FI-FI
Slovenian (Slovenia)
SL-SI
French (Canada)
FR-CA
Spanish (Mexico)
ES-MX
French (France)
FR-FR
Spanish (Spain)
ES-ES
Galician (Spain)
GL-ES
Swedish (Sweden)
SV-SE
German (Germany)
DE-DE
Swahili (Kenya)
SW-KE
Greek (Greece)
EL-GR
Tagalog (Philippines)
TL-PH
Hebrew (Israel)
HB-IL
Thai (Thailand)
TH-TH
Hindi (India)
HI-IN
Turkish (Turkey)
TR-TR
Hungarian (Hungary)
HU-HU
Ukrainian (Ukraine)
UK-UA
Indonesian (Indonesia)
ID-ID
Urdu
UR
Irish (Ireland)
GA-IE
Vietnamese (Vietnam)
VI-VN
Italian (Italy)
IT-IT
Welsh (United Kingdom)
CY-GB
Japanese (Japan)
JA-JP
Zulu (South Africa)
ZU-ZA
Kazakh (Kazakhstan)
KK-KZ
Configure machine translation
Machine Translation (MT) preferences control automatic population of target segments with translations that have no translation memory (TM) segment matches using a machine translation engine.
To configure machine translation:
-
On the Sidebar, select the Preferences icon .
-
On the Preferences dialog, select Machine Translation under General Preferences.
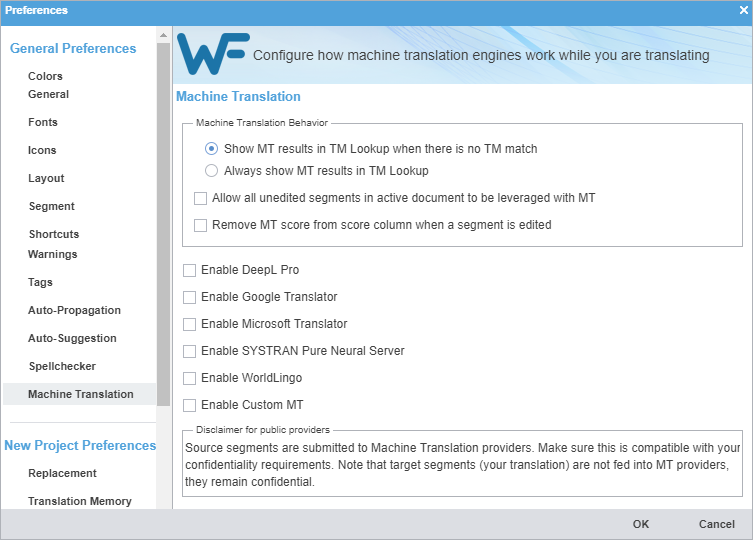
-
Select MT options for each machine translator, then perform the designated setup tasks
associated with each machine translator.
WorldLingo has a limited set of source languages for MT.
-
Arabic
-
Chinese Simplified
-
Chinese Traditional
-
Dutch
-
English
-
French
-
German
-
Greek
-
Italian
-
Japanese
-
Korean
-
Portuguese
-
Russian
-
Spanish
-
Swedish
Translator
Options
Enable DeepL Pro
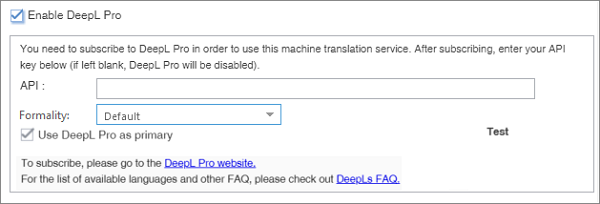
Enable Google Translator
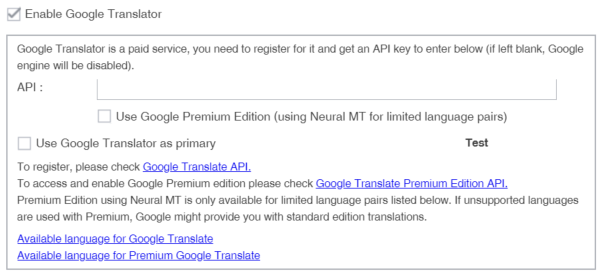
Enable Microsoft Translator
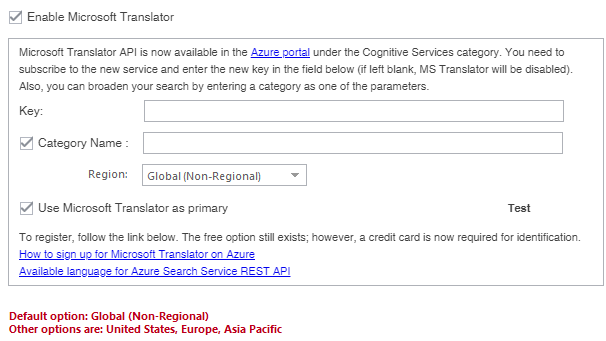
Enable SYSTRAN Pure Neural Server
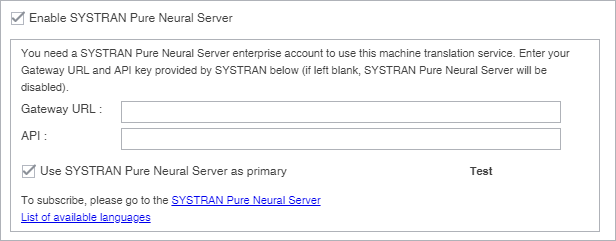
Enable WorldLingo

WorldLingo MT has a limited source language set.
Enable Custom MT
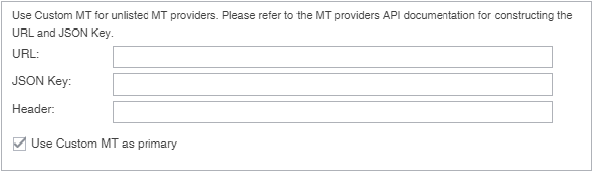
If your remote Machine Translation provider is not listed as a provider tab, use the Custom MT to create a custom connector. A Custom MT is only possible if the API of your MT provider uses a REST standard, and returns results in JSON or similar format. That is the case with major MT providers currently available with WFP, for example, Google, Microsoft, WorldLingo, deepL, etc..
Note: This section is Do-It-Yourself. Our hotline cannot assist with the customization of an MT engine because that requires knowledge of the remote provider specifications. Public discussion groups may offer help.
-
Configure replacement
Replacement preferences allow you to select certain types of content in the source translation units (TUs) that will be replaced with the correct target language format in the translation memory (TM). These replacements provide better TM matches when the files are analyzed.
To enable replacements:
-
On the Sidebar, select the Preferences icon .
-
Select Replacement in the Current Project Preferences group.
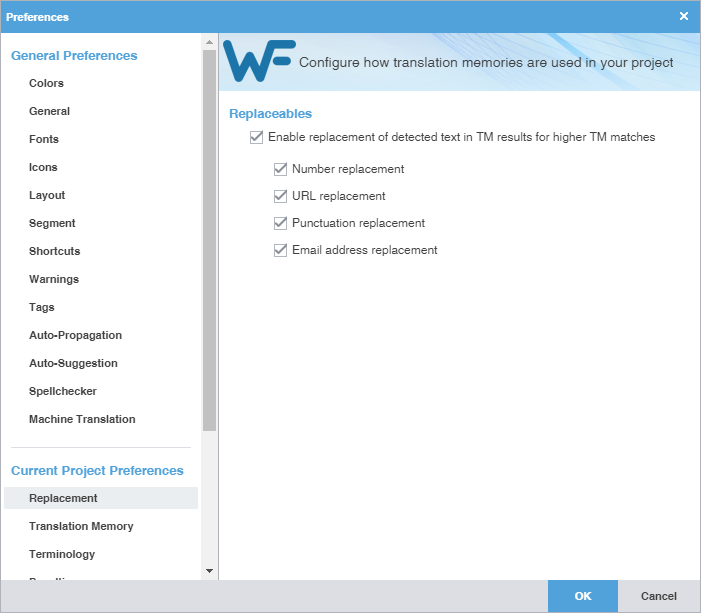
Configure a translation memory
Translation Memory (TM) preferences control project-level TM behaviors.
To configure a translation memory:
-
On the Sidebar, select the Preferences icon .
-
Select Translation Memory in the Current Project Preferences group.
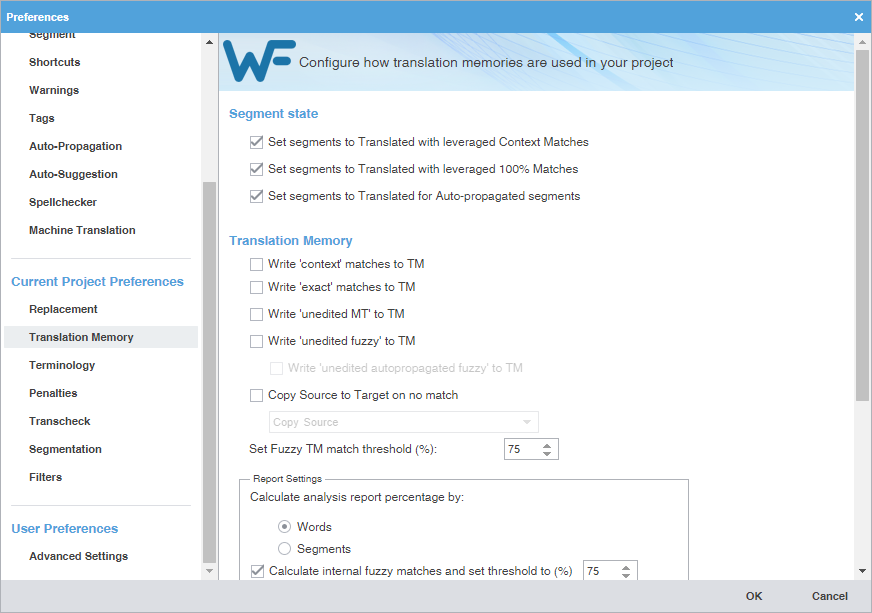
Configure terminology
Terminology preferences control terminology lists for leveraging previously translated content.
To select terminology options:
-
On the Sidebar, select the Preferences icon .
-
Select Terminology under Current Project Preferences. All options are enabled by default.

Configure TM penalties
Penalties preferences help maintain a high quality of content leveraged from a translation memory (TM). This involves assessing a penalty to TM matches to provide a relative score for those TM matches. You can assign a relative value to each penalty type when calculating the translation score. This score helps users differentiate between 100% match, fuzzy match, and no match content.
To configure penalties for TM matches:
-
On the Sidebar, select the Preferences icon .
-
On the Preferences dialog, select Penalties under New Project Preferences.

Configure Transcheck
Transcheck preferences control how Transcheck verifies target segments and issues warnings about
common translation errors within a project. For example, if a translated term conflicts
with the designated glossary, the Error Status icon ![]() displays in the Status column in the TXLF Editor view.
displays in the Status column in the TXLF Editor view.
To configure Transcheck:
-
On the Sidebar, select the Preferences icon .
-
On the Preferences dialog, select Transcheck under New Project Preferences.
-
To search for an option, enter text in the Transcheck search field above the options column list. To select all, select the Transcheck check box. To clear all options, deselect the check box. Use the Up or Down Arrow keys to move among the options, then the Spacebar to enable or disable.
-
The Sub-options panel to the right of the Transcheck Options panel contains any sub-options related to the selected category. Use the Tab key to enter and move among the sub-options, then the Spacebar to enable or disable. To exit the Sub-options panel, press Shift+Tab.
-
Configure segmentation
Segmentation preferences control how the TXLF editor separates file content into logical segments for a project.
To select segmentation options:
-
On the Sidebar, select the Preferences icon .
-
Select Segmentation under Current Project Preferences.
Configure a file format filter
Filters preferences control the file format filters for importing source content to Wordfast Pro.
To configure a file format filter:
-
On the Sidebar, select the Preferences icon .
-
On the Preferences dialog, select Filters under Current Project Preferences.

-
To select the file filter settings for the open project, select a filter to list the
current settings on the Format Settings pane.
To search the filters, enter the search string in the Available filters search field.
-
On the New Filter dialog, select a format from the Choose file format drop-down list to use as a template for the new filter.
The Format Settings options vary, depending on the file format you choose.

Configure advanced settings
Advanced Settings preferences allow you to restore a Wordfast Pro installation to factory or default settings, migrate preferences between computers, and customize strings.
To configure advanced settings:
-
On the Sidebar, select the Preferences icon .
-
Select Advanced Settings under User Preferences.
-
Change Advanced Settings based on your preferences.
Option
Description
Default Settings
Restore Original reverts all the preferences to their original factory settings.
Once you select this option, all general preferences and custom new project preferences will be lost.
Restore Defaults reverts the preferences only for the current project to the default new project preferences.
You must have a project open for this option to take effect.
Export/Import Preferences Settings
Export allows you to export the settings values that you currently have applied in Preferences for general settings and for a current project. You can select specific preferences or export them all. You will be asked to browse to a path where the export file will be saved with a .pref extension.
Import allows you to browse to a saved .pref file and import it. When the file is selected, a dialog displays the preferences that will be imported. The imported settings will not be activated in Preferences until you select OK.
Customization String List
This field is primarily for developer's use. Select the Add options icon
 , type an option in the Customization String List field, then select OK.
Highlight an option and select the Delete options icon
 to delete it from the list.
You must restart the application for the customized strings to be applied or removed.
Keyboard shortcuts
This topic includes the keyboard shortcuts that are available for PC and Apple users for Wordfast Pro, Wordfast Classic, SDLX, and Trados.
PC scheme:
Mac scheme:
PC scheme - Wordfast Pro style
|
This section only includes shortcuts with a default application-assigned keystroke sequence. |
|
Commands |
Shortcut |
View |
|---|---|---|
|
Add Blocklist |
Alt+C |
Project |
|
Add Glossary |
Alt+O |
Project |
|
Add Note |
Alt+Shift+N |
Editor |
|
Add Project |
Ctrl+Shift+A |
Home |
|
Add Project TMs |
Ctrl+Shift+B |
Quick Tools |
|
Add Term |
Ctrl+Alt+T |
Editor |
|
Add TM |
Ctrl+N |
Project |
|
Analyze |
Ctrl+Space |
Editor |
|
Attach/Detach Toolbar |
Ctrl+D |
Editor |
|
Bold |
Ctrl+B |
Editor |
|
Clear All Tags (Segment) |
Ctrl+Shift+V |
Editor |
|
Clear Target Document |
Alt+Shift+Delete |
Editor |
|
Close |
Ctrl+W |
Editor |
|
Close All |
Ctrl+Shift+W |
Editor |
|
Close Project from home window |
Ctrl+Shift+X |
Home |
|
Close Segment |
Esc |
Editor |
|
Commit All Segments to TM |
Ctrl+Alt+End |
Editor |
|
Commit Current Segment |
Alt+End |
Editor |
|
Copy |
Ctrl+C |
Blocklist Editor, TM Editor, Glossary Editor, Editor |
|
Copy All Sources |
Ctrl+Alt+Insert |
Editor |
|
Copy All Tags (Document) |
Alt+Shift+P |
Editor |
|
Copy All Tags (Segment) |
Alt+A |
Editor |
|
Copy selected text to target |
Alt+F12 |
Editor |
|
Copy Source |
Alt+S |
Editor |
|
Copy Tag |
Ctrl+Alt+Down |
Editor |
|
Copy Term |
Ctrl+0 |
Editor |
|
Copy TM |
Ctrl+Shift+C |
Project |
|
Create Blocklist |
Alt+B |
Project |
|
Create Glossary |
Alt+N |
Project |
|
Create Project |
Alt+P |
Home |
|
Create TM |
Ctrl+Shift+N |
Project |
|
Current Project |
Ctrl+3 |
Blocklist Editor, TM Editor, Glossary Editor, Quick Tools, Editor, Home |
|
Current Segment Leverage |
Alt+- |
Editor |
|
Cut |
Ctrl+X |
Blocklist Editor, TM Editor, Glossary Editor, Editor |
|
Delete Note |
Alt+Shift+D |
Editor |
|
Edit Note |
Alt+Shift+E |
Editor |
|
Edit Term |
Ctrl+E |
Editor |
|
Export Blocklist |
Alt+K |
Project, Blocklist Editor |
|
Export Glossary |
Alt+E |
Project, Glossary Editor |
|
Export Package |
Ctrl+E |
Project, Home |
|
Export Report as PDF format |
Alt+U |
Project |
|
Export TM |
Ctrl+Shift+E |
Project |
|
Find/Replace |
Ctrl+F |
Editor |
|
Get MS Word Bilingual Table |
Ctrl+Alt+P |
Editor |
|
Go To Segment |
Ctrl+G |
Editor |
|
Help |
Ctrl+Alt+H |
Blocklist Editor, TM Editor, Glossary Editor, Quick Tools, Editor, Project, Home |
|
Import Blocklist |
Alt+J |
Project |
|
Import Glossary |
Alt+I |
Project |
|
Import TM |
Ctrl+Shift+I |
Project |
|
Insert Cent Sign |
Ctrl+; |
Editor |
|
Insert Ellipsis |
Ctrl+Alt+. |
Editor |
|
Insert Em Dash |
Alt+Shift+- |
Editor |
|
Insert En Dash |
F10 |
Editor |
|
Insert non-breaking hyphen |
Ctrl+Shift+- |
Editor |
|
Insert non-breaking space |
Ctrl+Shift+Space |
Editor |
|
Insert Registered Trademark symbol |
Ctrl+Alt+R |
Editor |
|
Italic |
Ctrl+I |
Editor |
|
Key Assist Panel |
Ctrl+Shift+L |
Blocklist Editor, TM Editor, Glossary Editor, Quick Tools, Editor, Project, Home |
|
Last Modified Segment |
Shift+F5 |
Editor |
|
Leverage the first TM Lookup match |
Alt+1 |
Editor |
|
Leverage the second TM Lookup match |
Alt+2 |
Editor |
|
Leverage the third TM Lookup match |
Alt+3 |
Editor |
|
Leverage the fourth TM Lookup match |
Alt+4 |
Editor |
|
Leverage the fifth TM Lookup match |
Alt+5 |
Editor |
|
Leverage the sixth TM Lookup match |
Alt+6 |
Editor |
|
Leverage the seventh TM Lookup match |
Alt+7 |
Editor |
|
Leverage the eighth TM Lookup match |
Alt+8 |
Editor |
|
Leverage Next TU |
Alt+Right |
Editor |
|
Leverage Previous TU |
Alt+Left |
Editor |
|
Machine Translate |
Ctrl+Shift+M |
Editor |
|
Mark Translated |
Ctrl+Alt+V |
Editor |
|
Merge Segments |
Alt+Page_Down |
Editor |
|
Modify Glossary |
Alt+M |
Project |
|
Modify Project |
Ctrl+Shift+M |
Project, Home |
|
Modify TM |
Ctrl+Shift+T |
Project |
|
Next Needs Translation Segment |
Ctrl+Enter |
Editor |
|
Next Segment (Commit to TM) |
Alt+Down |
Editor |
|
Next Segment (Without Commit) |
Ctrl+Down |
Editor |
|
Next Tag |
Ctrl+Alt+Right |
Editor |
|
Next Term |
Ctrl+9 |
Editor |
|
Next View |
Alt+W |
Blocklist Editor, TM Editor, Glossary Editor, Quick Tools, Editor, Project, Home |
|
Open Blocklist |
Alt+H |
Project |
|
Open Glossary |
Alt+G |
Project |
|
Open Project |
Ctrl+Shift+P |
Home |
|
Open TM |
Ctrl+Shift+G |
Project |
|
Paste |
Ctrl+V |
Blocklist Editor, TM Editor, Glossary Editor, Quick Tools, Editor, Project, Home |
|
Preferences |
F9 |
Blocklist Editor, TM Editor, Glossary Editor, Quick Tools, Editor, Project, Home |
|
Previous Segment (TM Commit) |
Alt+Up |
Editor |
|
Previous Segment (Without Commit) |
Ctrl+Up |
Editor |
|
Previous Tag |
Ctrl+Alt+Left |
Editor |
|
Previous Term |
Ctrl+8 |
Editor |
|
Previous Update |
Alt+Up |
Blocklist Editor, Glossary Editor |
|
Project List |
Ctrl+2 |
Blocklist Editor, TM Editor, Glossary Editor, Quick Tools, Editor, Project |
|
Pseudo Translate |
Ctrl+Shift+Y |
Quick Tools |
|
Quick Tools |
Alt+Q |
Home |
|
Redo |
Ctrl+Y |
Blocklist Editor, TM Editor, Glossary Editor, Editor |
|
Remove Glossary |
Alt+R |
Project |
|
Remove Reference Files |
Alt+0 |
Project |
|
Remove Report |
Alt+Z |
Project |
|
Remove TM |
Ctrl+Shift+R |
Project |
|
Replace/Find |
Ctrl+H |
Editor |
|
Run Transcheck |
Ctrl+Shift+Q |
Editor |
|
Save |
Ctrl+S |
Editor |
|
Save As |
F12 |
Editor |
|
Segment Beginning |
Ctrl+Home |
Editor |
|
Segment End |
Ctrl+End |
Editor |
|
Show White Space Characters |
Ctrl+Shift+8 |
Editor |
|
Source TM Lookup |
Ctrl+Shift+F |
Editor |
|
Spell Check |
F7 |
Editor |
|
Split Segment |
Alt+Page_Up |
Editor |
|
Strikethrough |
Ctrl+K |
Editor |
|
Subscript |
Ctrl+= |
Editor |
|
Superscript |
Ctrl+Shift+= |
Editor |
|
TM Concordance |
F8 |
Editor |
|
TXLF Editor |
Ctrl+4 |
Blocklist Editor, TM Editor, Glossary Editor, Quick Tools, Project, Home |
|
Term Info |
Alt+T |
Editor |
|
Terminology Highlight |
Ctrl+F5 |
Editor |
|
Toggle Cursor between Source and Target |
Ctrl+Tab |
Editor |
|
Toggle Uppercase/Lowercase |
Shift+F3 |
Editor |
|
Translate All |
Ctrl+Shift+End |
Editor |
|
Translate File |
Ctrl+O |
Project |
|
Translate Until Fuzzy |
Ctrl+Alt+F |
Editor |
|
Translate Until No Match |
Ctrl+Shift+Page_Down |
Editor |
|
Underline |
Ctrl+U |
Editor |
|
Undo |
Ctrl+Z |
Blocklist Editor, TM Editor, Glossary Editor, Editor |
PC scheme - Wordfast Classic style
|
This section only includes shortcuts with a default application-assigned keystroke sequence. |
|
Commands |
Shortcut |
View |
|---|---|---|
|
Add Blocklist |
Alt+C |
Project |
|
Add Glossary |
Alt+O |
Project |
|
Add Project |
Ctrl+Shift+A |
Home |
|
Add Project TMs |
Ctrl+Shift+B |
Quick Tools |
|
Add Reference Files |
Alt+1 |
Project |
|
Add Term |
Ctrl+Alt+T |
Editor |
|
Add TM |
Ctrl+N |
Project |
|
Analyze |
Ctrl+Space |
Quick Tools |
|
Attach/Detach Toolbar |
Ctrl+D |
Editor |
|
Bold |
Ctrl+B |
Editor |
|
Clear Target Document |
Alt+Shift+Delete |
Editor |
|
Close All |
Ctrl+Shift+W |
Home |
|
Close Project from home window |
Ctrl+Shift+X |
Project, Home |
|
Close Segment |
Esc |
TM Editor, Editor |
|
Commit All Segments to TM |
Ctrl+Alt+End |
Editor |
|
Commit Current Segment |
Alt+Q |
Editor |
|
Copy |
Ctrl+C |
Blocklist Editor, TM Editor, Glossary Editor, Editor |
|
Copy All Sources |
Ctrl+Shift+Insert |
Editor |
|
Copy All Tags (Segment) |
Alt+P |
Editor |
|
Copy Source |
Alt+Insert |
Editor |
|
Copy TM |
Ctrl+Shift+C |
Project |
|
Copy Tag |
Ctrl+Alt+Down |
TM Editor, Editor |
|
Copy Term |
Ctrl+Alt+0 |
Editor |
|
Create Blocklist |
Alt+B |
Project |
|
Create Glossary |
Alt+N |
Project |
|
Create Project |
Ctrl+P |
Home |
|
Create TM |
Ctrl+Shift+N |
Project |
|
Current Project |
Ctrl+3 |
Blocklist Editor, TM Editor, Glossary Editor, Quick Tools, Editor, Home |
|
Current Segment Leverage |
Alt+- |
Editor |
|
Cut |
Ctrl+X |
Blocklist Editor, TM Editor, Glossary Editor, Editor |
|
Export Blocklist |
Alt+K |
Project |
|
Export Glossary |
Alt+E |
Project |
|
Export Package |
Ctrl+E |
Home |
|
Export Report as PDF format |
Alt+U |
Project |
|
Export TM |
Ctrl+Shift+E |
Project |
|
Find/Replace |
Ctrl+F |
Editor |
|
Go To Segment |
Ctrl+G |
Editor |
|
Help |
Ctrl+Alt+H |
Blocklist Editor, TM Editor, Glossary Editor, Quick Tools, Editor, Project, Home |
|
Import Blocklist |
Alt+J |
Project |
|
Import Glossary |
Alt+I |
Project |
|
Import TM |
Ctrl+Shift+I |
Project |
|
Insert non-breaking space |
Ctrl+Shift+Space |
Editor |
|
Italic |
Ctrl+I |
Editor |
|
Key Assist Panel |
Ctrl+Shift+L |
Blocklist Editor, TM Editor, Glossary Editor, Quick Tools, Editor, Project, Home |
|
Last Modified Segment |
Shift+F5 |
Editor |
|
Leverage Next TU |
Alt+Right |
Editor |
|
Leverage Previous TU |
Alt+Left |
Editor |
|
Mark Translated |
Ctrl+Alt+V |
Editor |
|
Merge Segments |
Alt+Page_Down |
Editor |
|
Modify Glossary |
Alt+M |
Project |
|
Modify Project |
Ctrl+Shift+M |
Home |
|
Modify TM |
Ctrl+Shift+T |
Project |
|
Next Needs Translation segment |
Ctrl+Enter |
Editor |
|
Next Segment (Without Commit) |
Ctrl+Down |
Editor |
|
Next Tag |
Ctrl+Alt+Right |
Editor |
|
Next Term |
Ctrl+Alt+9 |
Editor |
|
Next Update |
Alt+Down |
Blocklist Editor |
|
Next View |
Alt+W |
Blocklist Editor, TM Editor, Glossary Editor, Quick Tools, Editor, Project, Home |
|
Open Blocklist |
Alt+H |
Project |
|
Open Glossary |
Alt+G |
Project |
|
Open Project |
Ctrl+Shift+P |
Home |
|
Open Reference Files |
Alt+2 |
Project |
|
Open TM |
Ctrl+Shift+G |
Project |
|
Paste |
Ctrl+V |
Blocklist Editor, TM Editor, Glossary Editor, Quick Tools, Editor, Project, Home |
|
Preferences |
F9 |
Blocklist Editor, TM Editor, Glossary Editor, Quick Tools, Editor, Project, Home |
|
Previous Segment (TM Commit) |
Alt+Up |
Editor |
|
Previous Tag |
Ctrl+Alt+Left |
Editor |
|
Previous Term |
Ctrl+Alt+8 |
Editor |
|
Previous Update |
Alt+Up |
Blocklist Editor, Glossary Editor |
|
Project List |
Ctrl+2 |
Blocklist Editor, TM Editor, Glossary Editor, Quick Tools, Editor, Project |
|
Pseudo translate |
Ctrl+Shift+Y |
Quick Tools |
|
Quick Tools |
Ctrl+5 |
Blocklist Editor, TM Editor, Glossary Editor, Editor, Project, Home |
|
Redo |
Ctrl+Y |
Blocklist Editor, TM Editor, Glossary Editor, Editor |
|
Remove Glossary |
Alt+R |
Project |
|
Remove Project |
Ctrl+Alt+R |
Home |
|
Remove Reference Files |
Alt+0 |
Project |
|
Remove Report |
Alt+Z |
Project |
|
Remove TM |
Ctrl+Shift+R |
Project |
|
Remove tag |
Ctrl+Alt+Up |
Editor |
|
Replace/Find |
Ctrl+H |
Editor |
|
Save |
Ctrl+S |
Editor |
|
Save As |
F12 |
Editor |
|
Segment Beginning |
Ctrl+Home |
Editor |
|
Segment End |
Ctrl+End |
Editor |
|
Show White Space Characters |
Ctrl+Shift+8 |
Editor |
|
Spell Check |
F7 |
Editor |
|
Split Segment |
Alt+Page_Up |
Editor |
|
Strikethrough |
Ctrl+K |
Editor |
|
Subscript |
Ctrl+= |
Editor |
|
Superscript |
Ctrl+Shift+= |
Editor |
|
Term Info |
Alt+T |
Editor |
|
Terminology Highlight |
Ctrl+F5 |
Editor |
|
TM Concordance |
Ctrl+Shift+F |
Editor |
|
Translate File |
Ctrl+O |
Project |
|
Translate Until Fuzzy |
Ctrl+Alt+F |
Editor |
|
Translate Until No Match |
Ctrl+Shift+Page_Down |
Editor |
|
TXLF Editor |
Ctrl+4 |
Blocklist Editor, TM Editor, Glossary Editor, Quick Tools, Project, Home |
|
Underline |
Ctrl+U |
Editor |
|
Undo |
Ctrl+Z |
Blocklist Editor, TM Editor, Glossary Editor, Editor |
PC scheme - SDLX style
|
This section only includes shortcuts with a default application-assigned keystroke sequence. |
|
Commands |
Shortcut |
View |
|---|---|---|
|
Add Blocklist |
Alt+C |
Project |
|
Add Glossary |
Alt+O |
Project |
|
Add Note |
Alt+Shift+N |
Editor |
|
Add Project |
Ctrl+Shift+A |
Home |
|
Add Project TMs |
Ctrl+Shift+B |
Quick Tools |
|
Add TM |
Ctrl+N |
Project |
|
Add Term |
Ctrl+T |
Glossary Editor, Editor |
|
Analyze |
Ctrl+Space |
Editor |
|
Attach/Detach Toolbar |
Ctrl+D |
Editor |
|
Bold |
Ctrl+B |
Editor |
|
Clear Target Document |
Alt+Shift+Delete |
Editor |
|
Close |
Ctrl+Shift+W |
Editor |
|
Close All |
Ctrl+Shift+W |
Editor |
|
Close Project |
Ctrl+Shift+X |
Home |
|
Close Segment |
Esc |
TM Editor, Editor |
|
Commit All Segments to TM |
Alt+End |
Editor |
|
Commit Current Segment |
Alt+Q |
Editor |
|
Copy |
Ctrl+C |
Blocklist Editor, TM Editor, Glossary Editor, Editor |
|
Copy All Sources |
Ctrl+Alt+Insert |
Editor |
|
Copy All Tags (Document) |
Alt+Shift+P |
Editor |
|
Copy All Tags (Segment) |
Alt+P |
Editor |
|
Copy selected text to target |
Alt+F12 |
Editor |
|
Copy Source |
F4 |
Editor |
|
Copy TM |
Ctrl+Shift+C |
Project |
|
Copy Tag |
Ctrl+Alt+Down |
Editor |
|
Copy Term |
Ctrl+Alt+0 |
Editor |
|
Create Blocklist |
Alt+B |
Project |
|
Create Glossary |
Alt+N |
Project |
|
Create Project |
Alt+P |
Home |
|
Create TM |
Ctrl+Shift+N |
Project |
|
Current Project |
Ctrl+3 |
Blocklist Editor, TM Editor, Glossary Editor, Quick Tools, Editor, Home |
|
Current Segment Leverage |
F8 |
Editor |
|
Cut |
Ctrl+X |
Blocklist Editor, TM Editor, Glossary Editor, Editor |
|
Delete Note |
Alt+Shift+D |
Editor |
|
Edit Note |
Alt+Shift+E |
Editor |
|
Edit Term |
Ctrl+E |
Editor |
|
Export Blocklist |
Alt+K |
Project |
|
Export Glossary |
Alt+E |
Project |
|
Export Package |
Ctrl+E |
Project, Home |
|
Export Report as PDF format |
Alt+U |
Project |
|
Export TM |
Ctrl+Shift+E |
Project |
|
Find/Replace |
Ctrl+F |
Editor |
|
Go To Segment |
Ctrl+L |
Editor |
|
Help |
Ctrl+Alt+H |
Blocklist Editor, TM Editor, Glossary Editor, Quick Tools, Editor, Project, Home |
|
Import Blocklist |
Alt+J |
Project |
|
Import Glossary |
Alt+I |
Project |
|
Import TM |
Ctrl+Shift+I |
Project |
|
Insert ellipsis |
F11 |
Editor |
|
Insert Em dash |
Ctrl+F10 |
Editor |
|
Insert En dash |
F10 |
Editor |
|
Insert non-breaking hyphen |
Ctrl+F9 |
Editor |
|
Insert non-breaking space |
Ctrl+Shift+Space |
Editor |
|
Insert Registered Trademark symbol |
Ctrl+Alt+R |
Editor |
|
Italic |
Ctrl+I |
Editor |
|
Key assist panel |
Ctrl+Shift+L |
Blocklist Editor, TM Editor, Glossary Editor, Quick Tools, Editor, Project, Home |
|
Last Modified Segment |
Shift+F5 |
Editor |
|
Leverage the first TM Lookup match |
Alt+1 |
Editor |
|
Leverage the second TM Lookup match |
Alt+2 |
Editor |
|
Leverage the third TM Lookup match |
Alt+3 |
Editor |
|
Leverage the fourth TM Lookup match |
Alt+4 |
Editor |
|
Leverage the fifth TM Lookup match |
Alt+5 |
Editor |
|
Leverage the 6th TM Lookup match |
Alt+6 |
Editor |
|
Leverage the 7th TM Lookup match |
Alt+7 |
Editor |
|
Leverage the 8th TM Lookup match |
Alt+8 |
Editor |
|
Leverage Next TU |
Alt+Right |
Editor |
|
Leverage Previous TU |
Alt+Left |
Editor |
|
Machine Translate |
Ctrl+Shift+F8 |
Editor |
|
Mark Translated |
Ctrl+Alt+V |
Editor |
|
Merge Segments |
Ctrl+J |
Editor |
|
Modify Glossary |
Alt+M |
Project |
|
Modify Project |
Ctrl+Shift+M |
Home |
|
Modify TM |
Ctrl+Shift+T |
Project |
|
Next Needs Translation segment |
Ctrl+Enter |
Editor |
|
Next Segment (Commit to TM) |
Alt+Down |
Editor |
|
Next Segment (Without Commit) |
Ctrl+Down |
Editor |
|
Next Tag |
Ctrl+Alt+Right |
Editor |
|
Next Term |
Ctrl+Alt+9 |
Editor |
|
Next View |
Alt+W |
Blocklist Editor, TM Editor, Glossary Editor, Quick Tools, Editor, Project, Home |
|
Open Blocklist |
Alt+H |
Project |
|
Open General |
Ctrl+1 |
Blocklist Editor, TM Editor, Glossary Editor, Quick Tools, Editor, Project, Home |
|
Open Glossary |
Alt+G |
Project |
|
Open Project |
Ctrl+Shift+P |
Home |
|
Open TM |
Ctrl+Shift+G |
Project |
|
Paste |
Ctrl+V |
Blocklist Editor, TM Editor, Glossary Editor, Quick Tools, Editor, Project, Home |
|
Preferences |
F9 |
Blocklist Editor, TM Editor, Glossary Editor, Quick Tools, Editor, Project, Home |
|
Previous Segment (TM Commit) |
Alt+Up |
Editor |
|
Previous Segment (Without Commit) |
Ctrl+Up |
Editor |
|
Previous Tag |
Ctrl+Alt+Left |
Editor |
|
Previous Term |
Ctrl+Alt+8 |
Editor |
|
Previous Update |
Alt+Up |
Glossary Editor, Blocklist Editor |
|
Project List |
Ctrl+2 |
Blocklist Editor, TM Editor, Glossary Editor, Quick Tools, Editor, Project |
|
Pseudo Translate |
Ctrl+Shift+Y |
Quick Tools |
|
Redo |
Ctrl+Y |
Blocklist Editor, TM Editor, Glossary Editor, Editor |
|
Remove Glossary |
Alt+R |
Project |
|
Remove Reference Files |
Alt+0 |
Project |
|
Remove Report |
Alt+Z |
Project |
|
Remove TM |
Ctrl+Shift+R |
Project |
|
Remove Tag |
Ctrl+Alt+Up |
Editor |
|
Replace/Find |
Ctrl+H |
Editor |
|
Run Transcheck |
F12 |
Editor |
|
Save |
Ctrl+S |
Editor |
|
Segment Beginning |
Ctrl+Home |
Editor |
|
Segment End |
Ctrl+End |
Editor |
|
Show White Space Characters |
Ctrl+Shift+8 |
Editor |
|
Source TM Lookup |
Ctrl+Shift+F |
Editor |
|
Spell Check |
F6 |
Editor |
|
Split Segment |
Ctrl+Enter |
Editor |
|
Strikethrough |
Ctrl+K |
Editor |
|
Subscript |
Ctrl+= |
Editor |
|
Superscript |
Ctrl+Shift+= |
Editor |
|
TM Concordance |
F7 |
Editor |
|
Term Info |
Alt+T |
Editor |
|
Terminology Highlight |
Ctrl+F5 |
Editor |
|
Toggle Cursor between Source and Target |
Ctrl+Tab |
Editor |
|
Toggle uppercase/lowercase |
Shift+F3 |
Editor |
|
Translate All |
Ctrl+Shift+End |
Editor |
|
Translate File |
Ctrl+O |
Project |
|
Translate Until Fuzzy |
Ctrl+Alt+F |
Editor |
|
Translate Until No Match |
Ctrl+Shift+Page_Down |
Editor |
|
TXLF Editor |
Ctrl+4 |
Blocklist Editor, TM Editor, Glossary Editor, Quick Tools, Project, Home |
|
Underline |
Ctrl+U |
Editor |
|
Undo |
Ctrl+Z |
Blocklist Editor, TM Editor, Glossary Editor, Editor |
PC scheme - Trados style
|
This section only includes shortcuts with a default application-assigned keystroke sequence. |
|
Commands |
Shortcut |
View |
|---|---|---|
|
Add Blocklist |
Alt+C |
Project |
|
Add Glossary |
Alt+O |
Project |
|
Add Project TMs |
Ctrl+Shift+B |
Quick Tools |
|
Add Reference Files |
Alt+1 |
Project |
|
Add TM |
Ctrl+N |
Project |
|
Add Term |
Ctrl+F11 |
Glossary Editor, Editor |
|
Analyze |
Ctrl+Space |
Quick Tools |
|
Attach/Detach Toolbar |
Ctrl+D |
Editor |
|
Bold |
Ctrl+B |
Editor |
|
Clear Target Document |
Alt+Shift+Delete |
Editor |
|
Close |
Ctrl+W |
Editor |
|
Close All |
Ctrl+Shift+W |
Editor |
|
Close Project |
Ctrl+Shift+X |
Project, Home |
|
Close Segment |
Esc |
TM Editor, Editor |
|
Commit All Segments to TM |
Ctrl+Shift+U |
Editor |
|
Commit Current Segment |
Alt+Q |
Editor |
|
Copy |
Ctrl+C |
Blocklist Editor, TM Editor, Glossary Editor, Editor |
|
Copy All Tags (Segment) |
Alt+P |
Editor |
|
Copy selected text to target |
Alt+F12 |
Editor |
|
Copy Source |
F4 |
Editor |
|
Copy TM |
Ctrl+Shift+C |
Project |
|
Copy Tag |
Ctrl+F4 |
Editor |
|
Copy Term |
Ctrl+Alt+Down |
Editor |
|
Create Blocklist |
Alt+B |
Project |
|
Create Glossary |
Alt+N |
Project |
|
Create Project |
Space |
Home |
|
Create TM |
Ctrl+Shift+N |
Project |
|
Current Project |
Ctrl+3 |
Blocklist Editor, TM Editor, Glossary Editor, Quick Tools, Editor, Home |
|
Current Segment Leverage |
Alt+Space |
Editor |
|
Cut |
Ctrl+X |
Blocklist Editor, TM Editor, Glossary Editor, Editor |
|
Export Blocklist |
Alt+K |
Project |
|
Export Glossary |
Alt+E |
Project |
|
Export Package |
Ctrl+E |
Home |
|
Export Report as PDF format |
Alt+U |
Project |
|
Export TM |
Ctrl+Shift+E |
Project |
|
Go To Segment |
Ctrl+L |
Editor |
|
Help |
Ctrl+Alt+H |
Blocklist Editor, TM Editor, Glossary Editor, Quick Tools, Editor, Project, Home |
|
Import Blocklist |
Alt+J |
Project |
|
Import Glossary |
Alt+I |
Project |
|
Import TM |
Ctrl+Shift+I |
Project |
|
Insert en dash |
F10 |
Editor |
|
Insert non-breaking space |
Ctrl+Shift+Space |
Editor |
|
Italic |
Ctrl+I |
Editor |
|
Key Assist Panel |
Ctrl+Shift+L |
Blocklist Editor, TM Editor, Glossary Editor, Quick Tools, Editor, Project, Home |
|
Last Modified Segment |
Shift+F5 |
Editor |
|
Machine Translate |
Ctrl+Shift+F8 |
Editor |
|
Mark Translated |
Ctrl+Alt+V |
Editor |
|
Merge Segments |
Ctrl+J |
Editor |
|
Modify Glossary |
Alt+M |
Project |
|
Modify Project |
Ctrl+Shift+M |
Home |
|
Modify TM |
Ctrl+Shift+T |
Project |
|
Next Needs Translation segment |
Ctrl+Enter |
Editor |
|
Next Segment (Commit to TM) |
Enter |
Editor |
|
Next Segment (Without Commit) |
Ctrl+Down |
Editor |
|
Next Tag |
Ctrl+Alt+Right |
TM Editor |
|
Next Update |
Alt+Down |
Blocklist Editor |
|
Next View |
Alt+W |
Blocklist Editor, TM Editor, Glossary Editor, Quick Tools, Editor, Project, Home |
|
Open Blocklist |
Alt+H |
Project |
|
Open General |
Ctrl+1 |
Blocklist Editor, TM Editor, Glossary Editor, Quick Tools, Editor, Project, Home |
|
Open Glossary |
Alt+G |
Project |
|
Open Project |
Ctrl+Shift+P |
Home |
|
Open Reference Files |
Alt+2 |
Project |
|
Open TM |
Ctrl+Shift+G |
Project |
|
Paste |
Ctrl+V |
Blocklist Editor, TM Editor, Glossary Editor, Quick Tools, Editor, Project, Home |
|
Preferences |
F9 |
Blocklist Editor, TM Editor, Glossary Editor, Quick Tools, Editor, Project, Home |
|
Previous Tag |
Ctrl+Alt+Left |
Editor |
|
Previous Update |
Alt+Up |
Blocklist Editor |
|
Project List |
Ctrl+2 |
Blocklist Editor, TM Editor, Glossary Editor, Quick Tools, Editor, Project |
|
Pseudo Translate |
Ctrl+Shift+Y |
Quick Tools |
|
Quick Tools |
Ctrl+5 |
Blocklist Editor, TM Editor, Glossary Editor, Quick Tools, Editor, Project, Home |
|
Redo |
Ctrl+Y |
Blocklist Editor, TM Editor, Glossary Editor, Editor |
|
Remove Glossary |
Alt+R |
Project |
|
Remove Project |
Ctrl+Alt+R |
Home |
|
Remove Reference Files |
Alt+0 |
Project |
|
Remove Report |
Alt+Z |
Project |
|
Remove TM |
Ctrl+Shift+R |
Project |
|
Save |
Ctrl+S |
Editor |
|
Segment Beginning |
Ctrl+Home |
Editor |
|
Segment End |
Ctrl+End |
Editor |
|
Show White Space Characters |
Ctrl+Shift+8 |
Editor |
|
Source TM Lookup |
Ctrl+Shift+F |
Editor |
|
Spell Check |
F6 |
Editor |
|
Split Segment |
Alt+S |
Editor |
|
Strikethrough |
Ctrl+K |
Editor |
|
Subscript |
Ctrl+= |
Editor |
|
Superscript |
Ctrl+Shift+= |
Editor |
|
Term Info |
Alt+T |
Editor |
|
Terminology Highlight |
Ctrl+F5 |
Editor |
|
TM Concordance |
F7 |
Editor |
|
Toggle Cursor between Source and Target |
Ctrl+Tab |
Editor |
|
Translate All |
Ctrl+Shift+A |
Editor |
|
Translate File |
Ctrl+O |
Project |
|
TXLF Editor |
Ctrl+4 |
Blocklist Editor, TM Editor, Glossary Editor, Quick Tools, Editor, Project, Home |
|
Underline |
Ctrl+U |
Editor |
|
Undo |
Ctrl+Z |
Blocklist Editor, TM Editor, Glossary Editor, Editor |
Mac scheme - Wordfast Pro style
|
This section only includes shortcuts with a default application-assigned keystroke sequence. |
|
Commands |
Shortcut |
View |
|---|---|---|
|
Add Blocklist |
⌥C |
Project |
|
Add Glossary |
⌥O |
Project |
|
Add Note |
⌥⇧N |
Editor |
|
Add Project |
⌘⇧A |
Home |
|
Add Project TMs |
⌘⇧B |
Quick Tools |
|
Add Term |
⌘⌥T |
Editor |
|
Add TM |
⌘N |
Project |
|
Analyze |
⌘Space |
Editor |
|
Attach/Detach Toolbar |
⌘D |
Editor |
|
Bold |
⌘B |
Editor |
|
Clear all tags (Segment) |
⌘⇧V |
Editor |
|
Clear Target Document |
⌥⇧⌦ |
Editor |
|
Close |
⌘W |
Editor |
|
Close All |
⌘⇧W |
Editor |
|
Close Project from home window |
⌘⇧X |
Home |
|
Close segment |
⍉ |
Editor |
|
Commit All Segments to TM |
⌘⌥↘ |
Editor |
|
Commit Current Segment |
⌥↘ |
Editor |
|
Copy |
⌘C |
Blocklist Editor, TM Editor, Glossary Editor, Editor |
|
Copy All Sources |
⌘⌥Insert |
Editor |
|
Copy All Tags (Document) |
⌥⇧P |
Editor |
|
Copy All Tags (Segment) |
⌥A |
Editor |
|
Copy selected text to target |
⌥F12 |
Editor |
|
Copy Source |
⌥S |
Editor |
|
Copy Tag |
⌘⌥↓ |
Editor |
|
Copy Term |
⌘0 |
Editor |
|
Copy TM |
⌘⇧C |
Project |
|
Create Blocklist |
⌥B |
Project |
|
Create Glossary |
⌥N |
Project |
|
Create Project |
⌥P |
Home |
|
Create TM |
⌘⇧N |
Project |
|
Current Project |
⌘3 |
Blocklist Editor, TM Editor, Glossary Editor, Quick Tools, Editor, Home |
|
Current Segment Leverage |
⌥Q |
Editor |
|
Cut |
⌘X |
Blocklist Editor, TM Editor, Glossary Editor, Editor |
|
Delete Note |
⌥⇧D |
Editor |
|
Edit Note |
⌥⇧E |
Editor |
|
Edit Term |
⌘E |
Editor |
|
Export Blocklist |
⌥K |
Project |
|
Export Glossary |
⌥E |
Project |
|
Export Package |
⌘E |
Project, Home |
|
Export Report as PDF format |
⌥U |
Project |
|
Export TM |
⌘⇧E |
Project |
|
Find/Replace |
⌘F |
Editor |
|
Get Bilingual Table |
⌘⌥P |
Editor |
|
Go To Segment |
⌘G |
Editor |
|
Help |
⌘⌥H |
Blocklist Editor, TM Editor, Glossary Editor, Quick Tools, Editor, Project, Home |
|
Import Blocklist |
⌥J |
Project |
|
Import Glossary |
⌥I |
Project |
|
Import TM |
⌘⇧I |
Project |
|
Insert a cent sign |
⌘; |
Editor |
|
Insert ellipsis |
⌘⌥. |
Editor |
|
Insert em dash |
⌥- |
Editor |
|
Insert en dash |
⌥⇧- |
Editor |
|
Insert non-breaking hyphen |
⌘⇧- |
Editor |
|
Insert non-breaking space |
⌘⇧Space |
Editor |
|
Insert Registered Trademark symbol |
⌘⌥R |
Editor |
|
Italic |
⌘I |
Editor |
|
Key Assist Panel |
⌘⇧L |
Blocklist Editor, TM Editor, Glossary Editor, Quick Tools, Editor, Project, Home |
|
Last Modified Segment |
⇧F5 |
Editor |
|
Leverage the first TM Lookup match |
⌥1 |
Editor |
|
Leverage the second TM Lookup match |
⌥2 |
Editor |
|
Leverage the third TM Lookup match |
⌥3 |
Editor |
|
Leverage the fourth TM Lookup match |
⌥4 |
Editor |
|
Leverage the fifth TM Lookup match |
⌥5 |
Editor |
|
Leverage the sixth TM Lookup match |
⌥6 |
Editor |
|
Leverage the seventh TM Lookup match |
⌥7 |
Editor |
|
Leverage the eighth TM Lookup match |
⌥8 |
Editor |
|
Leverage Next TU |
⌘→ |
Editor |
|
Leverage Previous TU |
⌘← |
Editor |
|
Machine Translate |
⌘⇧M |
Editor |
|
Mark Translated |
⌘⌥V |
Editor |
|
Merge Segments |
⌥⇟ |
Editor |
|
Modify Glossary |
⌥M |
Project |
|
Modify Project |
⌘⇧M |
Project, Home |
|
Modify TM |
⌘⇧T |
Project |
|
Next Needs Translation Segment |
⌘↩ |
Editor |
|
Next Segment (Commit to TM) |
⌥↓ |
Editor |
|
Next Segment (Without Commit) |
⌘↓ |
Editor |
|
Next Tag |
⌘⌥→ |
Editor |
|
Next Term |
⌘9 |
Editor |
|
Next View |
⌥W |
Blocklist Editor, TM Editor, Glossary Editor, Quick Tools, Editor, Project, Home |
|
Open Blocklist |
⌥H |
Project |
|
Open Glossary |
⌥G |
Project |
|
Open Project |
⌘⇧P |
Home |
|
Open TM |
⌘⇧G |
Project |
|
Paste |
⌘V |
Blocklist Editor, TM Editor, Glossary Editor, Quick Tools, Editor, Project, Home |
|
Preferences |
F9 |
Blocklist Editor, TM Editor, Glossary Editor, Quick Tools, Editor, Project, Home |
|
Previous Segment (No Commit) |
⌘↑ |
Editor |
|
Previous Segment (TM Commit) |
⌥↑ |
Editor |
|
Previous Tag |
⌘⌥← |
Editor |
|
Previous Term |
⌘8 |
Editor |
|
Previous Update |
⌥↑ |
Blocklist Editor, Glossary Editor |
|
Project List |
⌘2 |
Blocklist Editor, TM Editor, Glossary Editor, Quick Tools, Editor, Project |
|
Pseudo Translate |
⌘⇧Y |
Quick Tools |
|
Quick Tools |
⌥Q |
Home |
|
Redo |
⌘Y |
Blocklist Editor, TM Editor, Glossary Editor, Editor |
|
Remove Glossary |
⌥R |
Project |
|
Remove Reference Files |
⌥0 |
Project |
|
Remove Report |
⌥Z |
Project |
|
Remove TM |
⌘⇧R |
Project |
|
Replace/Find |
⌘H |
Editor |
|
Run Transcheck |
^Q |
Editor |
|
Save |
⌘S |
Editor |
|
Save As |
F12 |
Editor |
|
Segment Beginning |
⌘↗ |
Editor |
|
Segment End |
⌘↘ |
Editor |
|
Show White Space Characters |
⌘⇧8 |
Editor |
|
Source TM Lookup |
⌘⇧F |
Editor |
|
Spell Check |
F7 |
Editor |
|
Split Segment |
⌥⇞ |
Editor |
|
Strikethrough |
⌘K |
Editor |
|
Subscript |
⌘= |
Editor |
|
Superscript |
⌘⇧= |
Editor |
|
Term Info |
⌥T |
Editor |
|
Terminology Highlight |
⌘F5 |
Editor |
|
TM Concordance |
F8 |
Editor |
|
Toggle Cursor between Source and Target |
⇧⇥ |
Editor |
|
Toggle uppercase/lowercase |
⇧F3 |
Editor |
|
Translate All |
⌘⇧↘ |
Editor |
|
Translate File |
⌘O |
Project |
|
Translate Until Fuzzy |
⌘⌥F |
Editor |
|
Translate Until No Match |
⌘⇧⇟ |
Editor |
|
TXLF Editor |
⌘4 |
Blocklist Editor, TM Editor, Glossary Editor, Quick Tools, Project, Home |
|
Underline |
⌘U |
Editor |
|
Undo |
⌘Z |
Blocklist Editor, TM Editor, Glossary Editor, Editor |
Mac scheme - Wordfast Classic style
|
This section only includes shortcuts with a default application-assigned keystroke sequence. |
|
Commands |
Shortcut |
View |
|---|---|---|
|
Add Blocklist |
⌥C |
Project |
|
Add Glossary |
⌥O |
Project |
|
Add Project |
⌘⇧A |
Home |
|
Add Project TMs |
⌘⇧B |
Quick Tools |
|
Add Reference Files |
⌥1 |
Project |
|
Add Term |
⌘⌥T |
Editor |
|
Add TM |
⌘N |
Project |
|
Analyze |
⌘Space |
Quick Tools |
|
Attach/Detach Toolbar |
⌘D |
Editor |
|
Bold |
⌘B |
Editor |
|
Clear Target Document |
⌥⇧⌦ |
Editor |
|
Close All |
⌘⇧W |
Home |
|
Close Project from home window |
⌘⇧X |
Home |
|
Close Segment |
⍉ |
TM Editor, Editor |
|
Commit All Segments to TM |
⌘⌥↘ |
Editor |
|
Commit Current Segment |
⌥Q |
Editor |
|
Copy |
⌘C |
Blocklist Editor, TM Editor, Glossary Editor, Editor |
|
Copy All Sources |
⌥⇧Insert |
Editor |
|
Copy All Tags (Segment) |
⌥P |
Editor |
|
Copy Source |
⌥Insert |
Editor |
|
Copy Tag |
⌘⌥↓ |
TM Editor |
|
Copy Term |
⌘⌥0 |
Editor |
|
Copy TM |
⌘⇧C |
Project |
|
Create Blocklist |
⌥B |
Project |
|
Create Glossary |
⌥N |
Project |
|
Create Project |
⌥P |
Home |
|
Create TM |
⌘⇧N |
Project |
|
Current Project |
⌘3 |
Blocklist Editor, TM Editor, Glossary Editor, Quick Tools, Editor, Home |
|
Current Segment Leverage |
⌥Q |
Editor |
|
Cut |
⌘X |
Blocklist Editor, TM Editor, Glossary Editor, Editor |
|
Export Blocklist |
⌥K |
Project |
|
Export Glossary |
⌥E |
Project |
|
Export Package |
⌘E |
Home |
|
Export Report as PDF format |
⌥U |
Project |
|
Export TM |
⌘⇧E |
Project |
|
Find/Replace |
⌘F |
Editor |
|
Go To Segment |
⌘G |
Editor |
|
Help |
⌘⌥H |
Blocklist Editor, TM Editor, Glossary Editor, Quick Tools, Editor, Project, Home |
|
Import Blocklist |
⌥J |
Project |
|
Import Glossary |
⌥I |
Project |
|
Import TM |
⌘⇧I |
Project |
|
Insert non-breaking space |
⌘⇧Space |
Editor |
|
Italic |
⌘I |
Editor |
|
Key Assist Panel |
⌘⇧L |
Blocklist Editor, TM Editor, Glossary Editor, Quick Tools, Editor, Project, Home |
|
Last Modified Segment |
⇧F5 |
Editor |
|
Leverage Next TU |
⌘→ |
Editor |
|
Leverage Previous TU |
⌘← |
Editor |
|
Mark Translated |
⌘⌥V |
Editor |
|
Merge Segments |
⌥⇟ |
Editor |
|
Modify Glossary |
⌥M |
Project |
|
Modify Project |
⌘⇧M |
Home |
|
Modify TM |
⌘⇧T |
Project |
|
Next Needs Translation segment |
⌘↩ |
Editor |
|
Next Segment (No Commit) |
⌘↓ |
Editor |
|
Next Tag |
⌥⇧→ |
Editor |
|
Next Term |
⌘⌥9 |
Editor |
|
Next Update |
⌥↓ |
Blocklist Editor |
|
Next View |
⌥W |
Blocklist Editor, TM Editor, Glossary Editor, Quick Tools, Editor, Project, Home |
|
Open Blocklist |
⌥H |
Project |
|
Open Glossary |
⌥G |
Project |
|
Open Project |
⌘⇧P |
Home |
|
Open Reference Files |
⌥2 |
Project |
|
Open TM |
⌘⇧G |
Project |
|
Paste |
⌘V |
Blocklist Editor, TM Editor, Glossary Editor, Quick Tools, Editor, Project, Home |
|
Preferences |
F9 |
Blocklist Editor, TM Editor, Glossary Editor, Quick Tools, Editor, Project, Home |
|
Previous Segment (TM Commit) |
⌥↑ |
Editor |
|
Previous Tag |
⌘⌥← |
Editor |
|
Previous Term |
⌘⌥8 |
Editor |
|
Previous Update |
⌥↑ |
Blocklist Editor, Glossary Editor |
|
Project List |
⌘2 |
Blocklist Editor, TM Editor, Glossary Editor, Quick Tools, Editor, Project |
|
Pseudo Translate |
⌘⇧Y |
Quick Tools |
|
Quick Tools |
⌘5 |
Home |
|
Redo |
⌘Y |
Blocklist Editor, TM Editor, Glossary Editor, Editor |
|
Remove Glossary |
⌥R |
Project |
|
Remove Project |
⌘⌥R |
Home |
|
Remove Reference Files |
⌥0 |
Project |
|
Remove Report |
⌥Z |
Project |
|
Remove tag |
⌘⌥↑ |
|
|
Remove TM |
⌘⇧R |
Project |
|
Replace/Find |
⌘H |
Editor |
|
Save |
⌘S |
Editor |
|
Save As |
F12 |
Editor |
|
Segment Beginning |
⌘↗ |
Editor |
|
Segment End |
⌘↘ |
Editor |
|
Show White Space Characters |
⌘⇧8 |
Editor |
|
Spell Check |
F7 |
Editor |
|
Split Segment |
⌥⇞ |
Editor |
|
Strikethrough |
⌘K |
Editor |
|
Subscript |
⌘= |
Editor |
|
Superscript |
⌘⇧= |
Editor |
|
Term Info |
⌥T |
Editor |
|
Terminology Highlight |
⌘F5 |
Editor |
|
TM Concordance |
⌘⇧F |
Editor |
|
Translate File |
⌘O |
Project |
|
Translate Until Fuzzy |
⌘⌥F |
Editor |
|
Translate Until No Match |
⌘⇧⇟ |
Editor |
|
TXLF Editor |
⌘4 |
Blocklist Editor, TM Editor, Glossary Editor, Quick Tools, Project, Home |
|
Underline |
⌘U |
Editor |
|
Undo |
⌘Z |
Blocklist Editor, TM Editor, Glossary Editor, Editor |
Mac scheme - SDLX style
|
This section only includes shortcuts with a default application-assigned keystroke sequence. |
|
Commands |
Shortcut |
View |
|---|---|---|
|
Add Blocklist |
⌥C |
Project |
|
Add Glossary |
⌥O |
Project |
|
Add Note |
⌥⇧N |
Editor |
|
Add Project |
⌘⇧A |
Home |
|
Add Project TMs |
⌘⇧B |
Quick Tools |
|
Add Term |
⌘T |
Glossary Editor, Editor |
|
Add TM |
⌘N |
Project |
|
Analyze |
⌘Space |
Editor |
|
Attach/Detach Toolbar |
⌘D |
Editor |
|
Bold |
⌘B |
Editor |
|
Clear Target Document |
⌥⇧⌦ |
Editor |
|
Close |
⌘⇧W |
Editor |
|
Close All |
⌘⇧W |
Editor |
|
Close Project |
⌘W |
Project, Home |
|
Close Segment |
⍉ |
Editor |
|
Commit All Segments to TM |
⌥↘ |
Editor |
|
Commit Current Segment |
⌥↘ |
Editor |
|
Copy |
⌘C |
Blocklist Editor, TM Editor, Glossary Editor, Editor |
|
Copy All Sources |
⌘⌥Insert |
Editor |
|
Copy All Tags (Document) |
⌥⇧P |
Editor |
|
Copy All Tags (Segment) |
⌥P |
Editor |
|
Copy selected text to target |
⌥F12 |
Editor |
|
Copy Source |
F4 |
Editor |
|
Copy Tag |
⌘⌥↓ |
Editor |
|
Copy Term |
⌘⌥0 |
Editor |
|
Copy TM |
⌘⇧C |
Project |
|
Create Blocklist |
⌥B |
Project |
|
Create Glossary |
⌥N |
Project |
|
Create Project |
⌥P |
Home |
|
Create TM |
⌘⇧N |
Project |
|
Current Project |
⌘3 |
Blocklist Editor, TM Editor, Glossary Editor, Quick Tools, Editor, Home |
|
Current Segment Leverage |
⌥Q |
Editor |
|
Cut |
⌘X |
Blocklist Editor, TM Editor, Glossary Editor, Editor |
|
Delete Note |
⌥⇧D |
Editor |
|
Edit Note |
⌥⇧E |
Editor |
|
Edit Term |
⌘E |
Editor |
|
Export Blocklist |
⌥K |
Project |
|
Export Glossary |
⌥E |
Project |
|
Export Package |
⌘E |
Project, Home |
|
Export Report as PDF format |
⌥U |
Project |
|
Export TM |
⌘⇧E |
Project |
|
Find/Replace |
⌘F |
Editor |
|
Go To Segment |
⌘L |
Editor |
|
Help |
⌘⌥H |
Blocklist Editor, TM Editor, Glossary Editor, Quick Tools, Editor, Project, Home |
|
Import Blocklist |
⌥J |
Project |
|
Import Glossary |
⌥I |
Project |
|
Import TM |
⌘⇧I |
Project |
|
Insert ellipsis |
F11 |
Editor |
|
Insert em dash |
⌥- |
Editor |
|
Insert en dash |
⌥⇧- |
Editor |
|
Insert non-breaking hyphen |
⌘F9 |
Editor |
|
Insert non-breaking space |
⌘⇧Space |
Editor |
|
Insert Registered Trademark symbol |
⌘⌥R |
Editor |
|
Italic |
⌘I |
Editor |
|
Key Assist Panel |
⌘⇧L |
Blocklist Editor, TM Editor, Glossary Editor, Quick Tools, Editor, Project, Home |
|
Last Modified Segment |
⇧F5 |
Editor |
|
Leverage the first TM Lookup match |
⌥1 |
Editor |
|
Leverage the second TM Lookup match |
⌥2 |
Editor |
|
Leverage the third TM Lookup match |
⌥3 |
Editor |
|
Leverage the fourth TM Lookup match |
⌥4 |
Editor |
|
Leverage the fifth TM Lookup match |
⌥5 |
Editor |
|
Leverage the sixth TM Lookup match |
⌥6 |
Editor |
|
Leverage the seventh TM Lookup match |
⌥7 |
Editor |
|
Leverage the eighth TM Lookup match |
⌥8 |
Editor |
|
Leverage Next TU |
⌘→ |
Editor |
|
Leverage Previous TU |
⌘← |
Editor |
|
Machine Translate |
⌘⇧F8 |
Editor |
|
Mark Translated |
⌘⌥V |
Editor |
|
Merge Segments |
⌥J |
Editor |
|
Modify Glossary |
⌥M |
Project |
|
Modify Project |
⌘⇧M |
Home |
|
Modify TM |
⌘⇧T |
Project |
|
Next Needs Translation segment |
⌘↩ |
Editor |
|
Next Segment (Commit to TM) |
⌥↓ |
Editor |
|
Next Segment (Without Commit) |
⌘↓ |
Editor |
|
Next Tag |
⌘⌥→ |
Editor |
|
Next Term |
⌘⌥9 |
Editor |
|
Next View |
⌥W |
Blocklist Editor, TM Editor, Glossary Editor, Quick Tools, Editor, Project, Home |
|
Open Blocklist |
⌥H |
Project |
|
Open General |
⌘1 |
Blocklist Editor, TM Editor, Glossary Editor, Quick Tools, Editor, Project, Home |
|
Open Glossary |
⌥G |
Project |
|
Open Project |
⌘⇧P |
Home |
|
Open TM |
⌘⇧G |
Project |
|
Paste |
⌘V |
Blocklist Editor, TM Editor, Glossary Editor, Quick Tools, Editor, Project, Home |
|
Preferences |
F9 |
Blocklist Editor, TM Editor, Glossary Editor, Quick Tools, Editor, Project, Home |
|
Previous Segment (No Commit) |
⌘↑ |
Editor |
|
Previous Segment (TM Commit) |
⌥↑ |
Editor |
|
Previous Tag |
⌘⌥← |
Editor |
|
Previous Term |
⌘⌥8 |
Editor |
|
Previous Update |
⌥↑ |
Blocklist Editor, Glossary Editor |
|
Project List |
⌘2 |
Blocklist Editor, TM Editor, Glossary Editor, Quick Tools, Editor, Project |
|
Pseudo Translate |
⌘⇧Y |
Quick Tools |
|
Redo |
⌘Y |
Blocklist Editor, TM Editor, Glossary Editor, Editor |
|
Remove Glossary |
⌥R |
Project |
|
Remove Reference Files |
⌥0 |
Project |
|
Remove Report |
⌥Z |
Project |
|
Remove tag |
⌘⌥↑ |
Editor |
|
Remove TM |
⌘⇧R |
Project |
|
Replace/Find |
⌘H |
Editor |
|
Run Transcheck |
F12 |
Editor |
|
Save |
⌘S |
Editor |
|
Segment Beginning |
⌘↗ |
Editor |
|
Segment End |
⌘↘ |
Editor |
|
Show White Space Characters |
⌘⇧8 |
Editor |
|
Source TM Lookup |
⌘⇧F |
Editor |
|
Spell Check |
F6 |
Editor |
|
Split Segment |
⌥↩ |
Editor |
|
Strikethrough |
⌘K |
Editor |
|
Subscript |
⌘= |
Editor |
|
Superscript |
⌘⇧= |
Editor |
|
Term Info |
⌥T |
Editor |
|
Terminology Highlight |
⌘F5 |
Editor |
|
TM Concordance |
F7 |
Editor |
|
Toggle Cursor between Source and Target |
⇧⇥ |
Editor |
|
Toggle uppercase/lowercase |
⇧F3 |
Editor |
|
Translate All |
⌘⇧↘ |
Editor |
|
Translate File |
⌘O |
Project |
|
Translate Until Fuzzy |
⌘⌥F |
Editor |
|
Translate Until No Match |
⌘⇧⇟ |
Editor |
|
TXLF Editor |
⌘4 |
Blocklist Editor, TM Editor, Glossary Editor, Quick Tools, Project, Home |
|
Underline |
⌘U |
Editor |
|
Undo |
⌘Z |
Blocklist Editor, TM Editor, Glossary Editor, Editor |
Mac scheme - Trados style
|
This section only includes shortcuts with a default application-assigned keystroke sequence. |
|
Commands |
Shortcut |
View |
|---|---|---|
|
Add Blocklist |
⌥C |
Project |
|
Add Glossary |
⌥O |
Project |
|
Add Project TMs |
⌘⇧B |
Quick Tools |
|
Add Reference Files |
⌥1 |
Project |
|
Add Term |
⌘F11 |
Glossary Editor, Editor |
|
Add TM |
⌘N |
Project |
|
Analyze |
⌘Space |
Quick Tools |
|
Attach/Detach Toolbar |
⌘D |
Editor |
|
Bold |
⌘B |
Editor |
|
Clear Target Document |
⌥⇧⌦ |
Editor |
|
Close |
⌘W |
Editor |
|
Close All |
⌘⇧W |
Editor |
|
Close Project |
⌘⇧X |
Home |
|
Close Segment |
⍉ |
TM Editor, Editor |
|
Commit All Segments to TM |
⌘⇧U |
Editor |
|
Commit Current Segment |
⌥↘ |
Editor |
|
Copy |
⌘C |
Blocklist Editor, TM Editor, Glossary Editor, Editor |
|
Copy All Tags (Segment) |
⌥P |
Editor |
|
Copy selected text to target |
⌥F12 |
Editor |
|
Copy Source |
F4 |
Editor |
|
Copy Tag |
⌘F4 |
Editor |
|
Copy Term |
⌘⌥↓ |
Editor |
|
Copy TM |
⌘⇧C |
Project |
|
Create Blocklist |
⌥B |
Project |
|
Create Glossary |
⌥N |
Project |
|
Create Project |
⌥P |
Home |
|
Create TM |
⌘⇧N |
Project |
|
Current Project |
⌘3 |
Blocklist Editor, TM Editor, Glossary Editor, Quick Tools, Editor, Home |
|
Current Segment Leverage |
⌥Q |
Editor |
|
Cut |
⌘X |
Blocklist Editor, TM Editor, Glossary Editor, Editor |
|
Export Blocklist |
⌥K |
Project |
|
Export Glossary |
⌥E |
Project |
|
Export Package |
⌘E |
Home |
|
Export Report as PDF format |
⌥U |
Project |
|
Export TM |
⌘⇧E |
Project |
|
Go To Segment |
⌘L |
Editor |
|
Help |
⌘⌥H |
Blocklist Editor, TM Editor, Glossary Editor, Quick Tools, Editor, Project, Home |
|
Import Blocklist |
⌥J |
Project |
|
Import Glossary |
⌥I |
Project |
|
Import TM |
⌘⇧I |
Project |
|
Insert en dash |
⌥⇧- |
Editor |
|
Insert non-breaking space |
⌘⇧Space |
Editor |
|
Italic |
⌘I |
Editor |
|
Key Assist Panel |
⌘⇧L |
Blocklist Editor, TM Editor, Glossary Editor, Quick Tools, Editor, Project, Home |
|
Last Modified Segment |
⇧F5 |
Editor |
|
Machine Translate |
⌘⇧F8 |
Editor |
|
Mark Translated |
⌘⌥V |
Editor |
|
Merge Segments |
⌘J |
Editor |
|
Modify Glossary |
⌥M |
Project |
|
Modify Project |
⌘⇧M |
Home |
|
Modify TM |
⌘⇧T |
Project |
|
Move the cursor between the source and the target |
⇧⇥ |
Editor |
|
Next Segment (Commit to TM) |
↩ |
Editor |
|
Next Segment (No Commit) |
⌘↓ |
Editor |
|
Next Tag |
⌘⌥→ |
TM Editor |
|
Next Update |
⌥↓ |
Blocklist Editor |
|
Next View |
⌥W |
Blocklist Editor, TM Editor, Glossary Editor, Quick Tools, Editor, Project, Home |
|
Open Blocklist |
⌥H |
Project |
|
Open General |
⌘1 |
Blocklist Editor, TM Editor, Glossary Editor, Quick Tools, Editor, Project, Home |
|
Open Glossary |
⌥G |
Project |
|
Open Project |
⌘⇧P |
Home |
|
Open Reference Files |
⌥2 |
Project |
|
Open TM |
⌘⇧G |
Project |
|
Paste |
⌘V |
Blocklist Editor, TM Editor, Glossary Editor, Quick Tools, Editor, Project, Home |
|
Preferences |
F9 |
Blocklist Editor, TM Editor, Glossary Editor, Quick Tools, Editor, Project, Home |
|
Previous Tag |
⌘⌥← |
Editor |
|
Previous Update |
⌥↑ |
Blocklist Editor, Glossary Editor |
|
Project List |
⌘2 |
Blocklist Editor, TM Editor, Glossary Editor, Quick Tools, Editor, Project |
|
Pseudo Translate |
⌘⇧Y |
Quick Tools |
|
Quick Tools |
⌘5 |
Blocklist Editor, TM Editor, Glossary Editor, Quick Tools, Editor, Project, Home |
|
Redo |
⌘Y |
Blocklist Editor, TM Editor, Glossary Editor, Editor |
|
Remove Glossary |
⌥R |
Project |
|
Remove Project |
⌘⌥R |
Home |
|
Remove Reference Files |
⌥0 |
Project |
|
Remove Report |
⌥Z |
Project |
|
Remove TM |
⌘⇧R |
Project |
|
Save |
⌘S |
Editor |
|
Segment Beginning |
⌘↗ |
Editor |
|
Segment End |
⌘↘ |
Editor |
|
Show White Space Characters |
⌘⇧8 |
Editor |
|
Source TM Lookup |
⌘⇧F |
Editor |
|
Spell Check |
F6 |
Editor |
|
Split Segment |
⌥S |
Editor |
|
Strikethrough |
⌘K |
Editor |
|
Subscript |
⌘= |
Editor |
|
Superscript |
⌘⇧= |
Editor |
|
Term Info |
⌥T |
Editor |
|
Terminology Highlight |
⌘F5 |
Editor |
|
TM Concordance |
F7 |
Editor |
|
Toggle Cursor between Source and Target |
⇧⇥ |
Editor |
|
Translate All |
⌘⇧A |
Editor |
|
Translate File |
⌘O |
Project |
|
TXLF Editor |
⌘4 |
Blocklist Editor, TM Editor, Glossary Editor, Quick Tools, Project, Home |
|
Underline |
⌘U |
Editor |
|
Undo |
⌘Z |
Blocklist Editor, TM Editor, Glossary Editor, Editor |
Appendix
System Requirements
This section contains hardware and software requirements for using Wordfast.
|
Supported Operating Systems |
Microsoft Windows 7+ 64-bit, Mac OS X 10.11+ 64-bit, and Linux 64-bit |
|
Java Runtime Environment |
If not present, Wordfast Pro automatically installs Java Runtime Environment during the application installation process |
|
License and Registration |
Activation of the full Wordfast Pro installation requires a license and registration |
|
Minimum System Memory |
4 GB RAM |
|
Minimum Screen Resolution |
1366 x 768 pixels |
Formatting tools
The Formatting tab in the TXLF Editor includes formatting tools you can use to edit the target content format.
Formatting tools fall into three categories: format, tags, and options.
|
Format category options are only available for MS Office source file formats. |
Format Buttons
|
Button |
Keyboard Shortcut |
Description |
|---|---|---|
|
|
Ctrl+B |
Format the selected text as bold. |
|
|
Ctrl+I |
Format the selected text as italic. |
|
|
Ctrl+U |
Format the selected text as underlined. |
|
|
Ctrl+= |
Format the selected text as subscript. |
|
|
Ctrl+Shift+= |
Format the selected text as superscript. |
|
|
Ctrl+K |
Format the selected text to display as strikethrough (deleted), without actually deleting the text. |
Tags Buttons
|
Button |
Keyboard Shortcut |
Description |
|---|---|---|
|
|
No shortcut |
Display actual formatting associated with tags for the active segment (when supported.) |
|
|
No shortcut |
Display the content of the formatting tags for the active segment. |
Options Buttons
|
Button |
Keyboard Shortcut |
Description |
|---|---|---|
|
|
Ctrl+Shift+Space |
Insert a non-breaking space at the cursor location. |
|
|
No shortcut |
Insert a marker to indicate left-to-right reading direction. |
|
|
No shortcut |
Insert a marker to indicate right-to-left reading direction. |
|
|
Ctrl+D |
Attach and detach the Formatting toolbar. When attached, the toolbar is displayed as a tab. When detached, the toolbar is displayed as a minimized toolbar that can be moved to any area of the TXLF Editor. |
Format filters
The Filters selection on the Preferences dialog box configures how translatable content is parsed from source files.
|
Format and Extension |
|---|
|
Active Server Page (*.asp) |
|
Adobe FrameMaker Interchange Format (*.mif) |
|
Adobe InCopy Markup language (*.icml) |
|
Adobe InDesign Interchange (*.inx) |
|
Adobe InDesign Markup Language (*.idml) |
|
Flat OPC XML Word Document Format (*.xml) |
|
Hypertext Markup Language (*.htm) |
|
Hypertext Markup Language (*.html) |
|
JSON files (*.json) |
|
Java Server Page (*.jsp) |
|
MS Excel 2007 Spreadsheet (*.xlsx) |
|
MS Excel Open XML Macro-Enabled Spreadsheet (*.xlsm) |
|
MS Excel Open XML Spreadsheet Template (*.xltx) |
|
MS Excel Open Spreadsheet (*.xls) |
|
MS Excel Spreadsheet template (*.xlt) |
|
MS PowerPoint 2007 Presentation (*.pptx) |
|
MS PowerPoint 97-2003 Template (*.pot) |
|
MS PowerPoint Macro-Enabled Presentation (*.pptm) |
|
MS PowerPoint Macro-Enabled Show (*.ppsm) |
|
MS PowerPoint Macro-Enabled Template (*.potm) |
|
MS PowerPoint Presentations (*.ppt) |
|
MS PowerPoint Show (*.ppsx) |
|
MS PowerPoint Template (*.potx) |
|
MS Visio Document (*.vdx) |
|
MS Visio Document (*.vsd) |
|
MS Visio Document (*.vsdx) |
|
MS Word 2007 Document (*.docx) |
|
MS Word Document (*.doc) |
|
MS Word Open XML Macro-Enabled Document (*.docm) |
|
MS Word Open XML Macro-Enabled Template (*.dotm) |
|
MS Word Open XML Template (*.dox) |
|
MS Word Template (*.dot) |
|
Markdown file (*.md) |
|
MemoQ XLIFF (*.mqxliff) |
|
Microsoft Word 2003 WordprocessingML document (*.xml) |
|
PO files (*.po) |
|
Plain Text (*.txt) |
|
Portable Document Format (*.pdf) |
|
Quark Documents (*.tag) |
|
Rich Text Format (*.rtf) |
|
SDL XLIFF (*.sdlxliff) |
|
SubRip (*.srt) |
|
TXML (*.txml) |
|
Trados TTX (*.ttx) |
|
WF TXLF Document (*.txlf) |
|
XLIFF (*.xlf) |
|
XLIFF 2.0 (*.xlf) |
|
XLIFF 2.0 (*.xliff) |
FAQs
|
How do I obtain a Wordfast Pro License and install the application? |
|
|
|
Wordfast products are try-before-you-buy. You can download a free 30-day Demo mode of Wordfast Pro from http://www.wordfast.com/. Demo mode has limited functionality until you enter the activation key. When you purchase a Wordfast license, you can generate an activation key at https://www.wordfast.com/myaccount by signing in with your sign in email and password. Copy and save the activation key. To activate Wordfast Pro, click |
|
What does Wordfast Pro Demo mode mean? |
|
|
|
When in Demo mode, you are limited to creating bilingual projects and storing up to 500 translation units in your Translation Memory. To get a full version, you must upload a license. Refer to Activation. |
|
Why is my completed project now showing as less than 100% complete in my Projects List? |
|
|
|
The latest version of Wordfast Pro contains a new segment state feature and an improved Progress Bar. As a result, projects from legacy versions of Wordfast Pro might register as less than 100% complete or N/A in the Projects List. To resolve the issue, open the project, then open the translation file. If you have multiple translation files, chain them together. In the TXLF Editor view, click Mark All Translated. Save and close the project. In the Project List view, click Recalculate Progress. The project should now register as 100% complete. |
|
What happens if I upload a corrupt file for translation when creating a project? |
|
|
|
If one of the files is corrupt or invalid, you can still create a project with clean files. The corrupt or invalid file will not upload and you receive a warning message. |
|
How do I chain individual files? |
|
|
|
Instead of opening files one-by-one to display in individual tabs, you can chain files to open in a single tab as long as these files are in the same batch. You cannot chain files across batches. Chaining files has the following main advantages:
|
|
Why is the Analyze button inactive when I open a chained file for translation? |
|
|
|
The Analyze action you can normally access in TXLF Editor view is inactive when you open a chained file because the translation memory cannot provide the best results. |
|
What are the different ways to analyze files? |
|
|
|
The analysis process converts source files into TXLF, leverages the content against existing translation memories, and generates a report listing matches, non-matches, word count, character count, and segment count. You can analyze source files in the following ways:
Refer to Analysis. |
|
How do I use Skip 100% and 100%+ Segments when using TXLF Editor view? |
|
|
|
To skip 100% and 100%+ segments when moving to a segment that requires linguistic changes, you have two options:
|
|
How do I update a TM with my translations? |
|
|
|
To update a TM after you finish translating or editing a segment in TXLF Editor view, you must commit it to the TM. Committing a segment will turn the color highlight from pink to purple. You can commit a segment to the TM as follows:
If a segment does not require any changes, for example, if the 99% match or the MT match is linguistically correct, you can change the Translation Memory settings in Preferences to add these items to the TM. To change the TM settings:
|
|
How do I keep translations from updating the master TM? |
|
|
|
To prevent a segment from updating the TM:
|
|
How do I correctly apply inline formatting? |
|
|
|
You can apply inline formatting to the target segment in two ways:
|
|
Why is the Whole Words Only check box inactive on the Find/Replace dialog? |
|
|
|
In the Find and Replace dialog, the Whole Words Only check box is inactive if you added multiple words or punctuation to the Find field. |
|
What are Preferences and how do I access them? |
|
|
|
You can customize all user interface options and features in the preferences section. To access preferences, on the Sidebar click
Refer to Current project preferences. |
|
How can I preview a file during translation? |
|
|
|
In TXLF Editor, on the File tab, click Preview, then select Live Preview, Office Preview, or Html Preview from the drop-down menu. Live Preview works with Word, PowerPoint, or Markdown files. It opens a preview of the target content for comparison to your source content. If you click on a line of text in the preview document, your cursor will move to that segment in the TXLF file. Office Preview will open a PDF preview of the current translation file. Html Preview will open a preview as an HTML file, only if the source file was HTML. Another option is to click Preview File, and a translated file will open if the source is available. |